Showing posts with label ST8300M. Show all posts

Thursday, August 27, 2015

Using the Celestron Field Flattener with an SBIG ST-8300M and FW8-8300

I purchased a used Celestron 9.25" XLT SCT intending to use it primarily for planetary imaging at f/10 or greater. There was no need for a focal reducer/flattener. I did purchase a used Celestron 94175 f/6.3 flattener/reducer so I could, if I wanted to, image deep sky objects. As it turns out, deep sky objects have been the C925's main use.

Reducer/Flatteners like the Celestron 94175 work best when at a specific distance from the sensor. Can this distance be known? Let's use the calculator at  Wilmslow Astro and find out.

For a standard f/10 SCT, the separation to give f/6.3 (where we presume the field will be flattest) should be 105mm.

Two nights ago I imaged NGC 7008, the Fetus Nebula, using my CCD and the focal reducer. The stars were nice and round all the way to the edge:

NGC 7008 (click to enlarge)
Astrometry.net reported that the image scale was 1.58" per pixel, which translates to f/6.0. According to the above calculator this should happen at a reducer/CCD separation of 113mm**. 

If the reducer is flattest at f/6.3 I need to decrease the separation from 113mm to 105mm, or by about 8mm.

Happily, I can do that. The nosepiece I was using was a 2" focuser-to-TeleVue IS adapter + IS to T-ring adapter. I also have a nosepiece that's just 2" focuser to T-ring, and amazingly it will let the CCD get about 8mm closer. Just about perfect!***

The next night I'm out I'll try this configuration and see if it gets the focal ratio correct and also produces round stars.

* This suggests that the performance of the reducer is rather insensitive to the separation. Here I'm 8mm off and the stars look good. This has limits, though. In a previous image a 12.7mm spacer was included and the stars at the corners were plainly distorted. That image had an image scale of 1.65" per pixel, which corresponds to a focal ratio of  f/5.75. The calculator says this happens at a separation of about 123mm. I measured the separation as about 125mm. That image suggests the separation reduction should be 20mm, which is roughly the same as 12.7 + 7.3 (the spacer plus the ~8 mm suggested by the other image).

** One thing that's usually left ambiguous in reducer explanations is the point on the reducer from which the CCD distance is measured. In the case of the system operating at f/6 I measured the CCD to be 125mm from the front of the reducer. which is the same thing as 114mm from the center and about 100mm from the rear thread base. Because the center position in only 1mm different from the formula's value of 113mm, and given the inexactness of my measurement, It's reasonable to conclude separation should be measured from the center of the reducer.

*** Is this an accident? The Antares 50mm long 2" focus tube on the back of the SCT makes this possible, but it predates the ST-8300 + filter wheel and couldn't be designed to work with their backfocus requirement. But it works out nicely, right?


What does this say about using a 0.5 focal reducer? The model I have is a SmartAstronomy 2", which is probably identical to the GSO 2". GSO says that the focal length is 106mm and the optimal separation is 53mm. The calculator puts it a bit larger at 56mm. Because this reducer screws into 2" nosepieces, the closest I can get it to my CCD is about 69mm (measuring from the center of the reducer). That puts it at about f/4. I'd guess that's too far from ideal to produce pleasing images, but it's worth a try. A Lumicon low profile nosepiece could trim 9mm off that, getting it close: f/4.7. Trying that will cost about $35.

Thursday, April 9, 2015

A DIY Finder for Wide-Field Imaging

Aiming a CCD when imaging through a lens: Not so easy.

Here's what the ST-8300 looks like when sporting a lens:

ST-8300 + filter wheel + 200mm lens
ST-8300 + filter wheeel, rear view. Note the lack of any useful sighting lines.
After a few nights out with 135mm and 200mm lenses it became apparent that a fair amount of time could be spent getting a target into the field of view. I thought it would be easy, but it's nothing like using a well-aligned finder scope. Perhaps with practice I can learn to sight along an edge on the mount but I plan on using the lenses so infrequently I'm almost sure to lose that skill between sessions.

To get an idea of how small a 200 mm field is, take a look at this:

200mm field of view with ST-8300
Now imagine aiming a sightless camera at this.

A finder that addresses this problem should: 
  1. Have a large field
  2. Not be permanently attached to the camera; it won't be needed when imaging with longer focal length telescopes
  3. Not require permanent modifications to the camera or filter wheel
  4. Be secure regardless of the orientation of the CCD
  5. Not interfere with the operation of the CCD
This suggests a 1X finder of some sort. A sighting tube or aligning posts would be fine, but I prefer a red dot finder for when it's really dark. Generic red dot finders are lightweight and inexpensive. I bought this one from Telescope Warehouse on eBay for $16 (including shipping):

Generic Red-Dot Finder
The nice thing about this particular finder is that the bottom of the stalk is perfectly flat. It comes with a shoe that's essentially useless for this project.

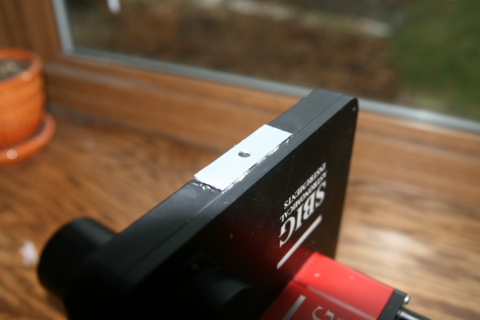
It would be nice to have some sort of quick-release attachment. Because of the way my ST-8300 is mounted the filter wheel (FW) presents a clean edge on which to mount a finder:

Top edge of filter wheel


My first thought was to use magnetic coupling but the filter wheel case is aluminum. If I could attach some steel to the FW and then use strong magnets on the stalk to hold it to the steel I'd be in business.That way after the target is composed I can remove the finder and its magnetic influence. (I don't know if a magnet can affect the FW operation, but why take a chance?)

The finder stalk glued to a bar magnet:


 A small strip of steel glued to the top of the FW. It's sized to not span the seam of the FW.


For the adhesive I prefer to use something that can eventually be removed without damaging the FW's finish. Beacon 3-in-1 Advanced Craft Glue works well

Beacon 3-in-1 Advanced Craft Glue
Here's the finished finder + CCD.


This can aim in any direction and the finder stays in place.

I should mention that an earlier prototype didn't work. Instead of a steel plate I used two washers, and the magnetic hold was too weak. Also be aware that some magnets have their strongest attraction on one face. The big bar magnet I used here is overkill; smaller yet stronger rare earth magnets would be preferable, but I used what was on hand. If I encounter any slippage I'll probably replace the bar with stronger magnets.


Odd but true. In 1979 I viewed a total solar eclipse from a point north of Williston, ND. If I live to be 91 (plus 22 days) I would be able to return to the same exact spot and see another total solar eclipse. Although a point further south will have a longer duration, so I'll have some decisions to make if I live that long!

Wednesday, November 12, 2014

Lens Happy

A visit to National Camera Exchange's used lenses page turned up a manual focus 200mm f/4 Olympus Zuiko OM lens. This should work with my ST-8300M, and old reviews suggest that it's got a chance of providing acceptable corner stars even when close to wide open. At a price of $40 it's worth a try. My impression is that the lens sells for $50-60 on the used market, which probably explains why it sat on NatCam's shelf for a long time at $90.

If you get the impression I've got a fixation with lenses, you're right. There have been too many objects that are a bit too large for my 422mm AT65EDQ, and I'm too impatient to make a mosaic for each of them. My telescopes currently give me a nice range of focal lengths:
  • 2350mm (C925 @ f/10)
  • 1480mm (C925 @ f/6.3)
  • 700mm (TV 102 @ f/6.9)
  • 422mm (AT65EDQ @ f/6.5)
These very roughly represent steps of two in scale. Extending these to shorter focal lengths with SLR lenses adds:
  • 135mm (Tamron OM @ f/5.6)
  • 70mm (Canon 17-70mm zoom @ f/5.6)
  • 50mm (Zuiko OM lens @ f/1.8)
  • 28mm (Tokina @ f/1.8)
The 200 mm lens fills the gap between scopes and lenses, taking the place of an old Tele-Astranar that won't reach focus with my CCD. Granted that these are a bunch of consumer-grade lenses I don't expect miracles from them.

The field of view of a 200mm lens used with an ST-8300 is huge: 5.1 x 3.9 degrees. Here are some objects that fit nicely into that field with a little room around the edges:
IC 1396, which is more extensive than Sky Tools depicts

Lagoon and Trifid Nebulae and vicinity.

Rho Ophiuchi Nebula and vicinity

Orion Nebula and vicinity


M 31 et al.

IC 1318 et al.

Rosette nebula
North America and Pelican Nebulae
The pictures represent the full field of a 200mm lens combined with an ST-8300 CCD camera as illustrated by SkyTools3.

There are more objects than these suitable for the 200mm lens, but this will make a good start!


Wednesday, November 5, 2014

A New Imaging Telescope, sort of.

Recently I've tried making a couple of mosaic images, but the process is slow. Given my circumstances it's typically a full night's work to make one piece of a mosaic. Wouldn't it be nice to use something that's fast with a much wider field of view?

One way to shoot wide fields is with a camera lens. Consumer-grade lenses tend to be mediocre imaging tools, though; their fields are not very flat and stars at the edges will show a lot of distortion unless the lens is closed down quite a bit. A good reference is Jerry Lodriguss' "Catching the Light" page about lenses. He recommends a number of lenses for imaging, some of which are within the reach of budget-minded imagers.

I'd like to add another lens, a fixed focal length Tamron 135mm Adaptall. It opens up to f/2.5, but it's actually quite decent at f/4. Here's what I mean:

400x400 Corners of a Tamron image
These are the four corners, each 400x400 pixels, from a stretched stack of 10-minute H-alpha exposures. The full frame is 3352x2532. The uneven brightness result from not applying a flat frame. Obviously it needs one!

For reference, here is the frame center:
Center 400x400 area
Center focus is sharp, and the corners are very good.

I originally purchased this lens back in the late 70's or early 80's for my OM-1 and it's been gathering dust since I went digital. Getting this mated with my SBIG ST-8300 was a minor adventure.

The Tamron was sold as a lens that can be used with a number of cameras. It was usually sold along with an adapter for the indended camera, in my case Olympus. SBIG sells a Canon lens adapter for the ST-8300 (A little pricey at $300, but it works). There are a whole bunch of adapter rings available to let OM-1 users put their lenses on their Canons, so the whole thing fits together: Adaptall lens | Adaptall to OM-1 adapter | OM-1 to Canon adapter | Canon adapter | ST-8300. Simple, right?

So now I can go wide. Instead of my AT65EDQ (422mm @ f/6.5) I can image with 135mm @ f/4. That's almost ten times the angular area with exposures that are a factor of 2.5 shorter. Nice.

Targets for this winter will be Barnard's Loop, Sh 2-240 (the Spaghetti Nebula), and whatever else the weather permits.

I'll also be testing an old 200mm lens I used with my OM-1. It only opens to f/6.3 and I suspect the optics are relatively poor. We'll see.

Wednesday, September 3, 2014

Two star Parties, Two Images

A sad story.

First, the Iowa Star Party. Another year, another hot and humid run of days, even worse that last year. The weather forecasts were so bad (ditto the satellite loops) that I stayed home the first two nights. Thursday night reports were that there were at most two hours of observing. Friday night (the public night) it rained. Saturday it was hot, with the heat index hitting 113. Around the time of the before-dinner talk the dew point reached up to 82. The compensation was that the evening was clear, and I managed to get one image. Because of the extreme humidity my camera's sensor window fogged over at any temperature under 15C, which curtailed using it in a meaningful way. Sunday: l little cooler and drier, but still very warm and humid. The evening started clear (with clouds to the south from a thunderstorm over Missouri) but ended early when a thunderstorm to the northwest attained a high level of electrical activity--its lightning illuminated the sky to such an extent that observing or imaging was nearly impossible.

Out of four possible nights, one decent one.

Now on to the Northern Nights StarFest. Great Facilities. Amazingly enough almost no mosquitoes or flies. As might be expected for a forest setting, generally poor horizons. Wednesday night, clear, but absurdly heavy dew. One image as I fought the fogging sensor window problem. Thursday night: cloudy. Friday night: cloudy, Saturday night: cloudy with rain.

Four possible nights, one decent one.

No more star parties for this year, unless I opt to go to the Heart of America party. As nice as that one is, it's simply too far to go for a maximum of three nights.

In other news, SBIG sent me the ST-8300 sensor window heater and it was waiting for me when I returned from NNSF. It installed easily, and last night it seemed to work, although conditions didn't test it well. With it running, the camera went down to -15C, a good value for any summer night. It may have used a little more power than it used to, perhaps compensating for the heat source.

 I managed to image one of the objects on my list for ISP/NNSF: DG 191:

DG 191 and vdB 158
This was an ill-conceived RGB image. (I should have had the patience to do a multi-night HaRGB image. But it's just for AL, so it doesn't have to be frame-worthy, or even close.)

Another clear night on Friday? Sadly, the moon will be nearly full, so I'll collect Ha. IC 4954 may be the target.

Sunday, July 6, 2014

Finally!

This is the first image of the year! Let's just say it's been a bad year. Amazingly everything worked smoothly, including me. This is yet another AL Bright nebular object, LBN 331.

A so-so picture, but I'll take it--LBN 331 is a brightness 4 object, so given my skies I don't expect much from 1.6 hours total exposure.

LBN 331
Details are here.

Tonight's supposed to be clear again (we'll see), so with luck I can bag another object, or go back to this one and shoot some RGB so that the stars have color.

Wednesday, August 7, 2013

Two images from last weekend: M17, M20/21; Processing workflow.

I'm REALLY pleased with how this image of M17 came out:

Messier 17 (Omega or Swan Nebula), click for full size
The previous night's image was not quite as successful--M20 and 21. More about why in the next blog entry.
M20 (Triffid) and M21
Both images are full-frame. For all the gory details of acquisition, look at my gallery on AstroBin. By way of a quick summary, both are LRGB images made with an SBIG ST8300M CCD, TeleVue 102 apo and autoguided CGEM mount under mag 6+ skies. Dark and bias frames only, no flats.

Imaging is SO much faster doing LRGB in the dark than it is to use narrowband filters under light-polluted skies. 

I realize that the colors in the M17 image may look a little muted to you, but I kind of like them this way. What's particularly pleasing about the image from my standpoint is three-fold: The stars are nice and round right out to the edge of the field, meaning that my field flattener is doing its job perfectly; The merging of the LRGB channels seems to be spot-on. And finally, guiding with the Orion mini-guider works great at the 700mm focal length of the TV102 to correct mount errors. I'll eventually try out the mini on my C925.

My processing workflow continues to evolve. These two images were made by ping-ponging back and forth between Images Plus and Photoshop:
  • Calibrate, align and stack using IP
  • Stretch using PS
  • Noise cleanup and star size reduction in IP
  • LRGB combine in PS using Annie's Actions
  • Color balance in IP
  • Masked sharpening in PS
Yes, I know that's a mess, and some will say that all can be done in IP or PS or Maxim or whatever. Good for you if you can function with only one software package, but at this point I can't. I'm using IP 4.5, so probably some of the changes that have gone into later versions would make it a better processing tool. 

Sunday, January 13, 2013

Another Year, Another M42

I've imaged good old M42 a couple of times in the past with my DSLR and ST80. This is a more ambitious try, using my ST8300 monochrome CCD and AT72ED:

M42 (click for full size)
What's ambitious is that it's my first serious attempt at an LRGB image where I've given some thought about how to properly combine luminance and color data. This could definitely use a longer integration time--it was only about 15 minutes per channel at f/6, made worse by fairly substantial light pollution.

Notice those spikes coming out of the brighter stars? They're from overhead power lines!

The next clear night I'll try taking some shorter exposures so that I can mask in the overexposed center of the nebula.

Coming shortly will be a report on the Orion 50mm mini-guider. I will be using it for autoguiding on scopes of different focal lengths. It cuts about five pounds off my mount's load by replacing my ST80, which weighs about 6.4 pounds when guiding. This is particularly significant because that 6.4 pounds rides piggyback on my telescopes and has a substantial moment arm.

Friday, January 4, 2013

Are Baader filters Parfocal?

At a recent star party I made an offhand statement that I doubted that my narrowband filters were parfocal. That set me wondering if I was correct and how would I go about determining this for all my filters. So I did a little experimenting one night by imaging Betelgeuse through all my filters.

I decided to set focus with the luminosity filter in place, and then cycle through all my filters seeing if the focus changed. Sorry, but I don't have a focuser with a digital readout. To get some sense of any focal shift I put a Bahtinov mask on my scope and imaged the results. I used three stars of different spectral types (O, A, and M), just in case the results would be influenced by wavelength. (I was imaging through my TV-102, so I didn't expect to see any significant wavelength dependence.) Here is a test strip for Betelgeuse (click to see full scale image):

Betelgeuse imaged through various filter configurations with no adjustment of focus

I used 5 and 25 s exposures for the broadband and narrowband filters, respectively, and processed only using ImagesPlus digital development. It looks like the central spike produced by the mask moves little if at all as the filter is changed. As expected, the focus shifts significantly when changing to no filter in use. So how much shift is significant? Here is an image resulting from 1/12th turn of my fine-focus knob away from focus:

Appearance when defocused by about 0.3mm

This is approximately an adjustment of 0.3 mm in focus and the central Bahtinov spike has shifted quite a bit. From past imaging experience, I think my final focusing "tweaks" are about 1/5 of this in magnitude.

So are the filters (Baader LRGB and 7 to 8.5 nm Ha/S-II/O-III) parfocal? They look close to being so. To my surprise, the broadband and narrowband filter sets seem to be almost, but not quite, parfocal with each other. The results were the same for the other two stars, Sirius and Altinak. But I'll probably still refocus every time I change filters in the future, particularly when using anything less than an apochromatic telescope or there's been a change in temperature.

Wednesday, January 2, 2013

Photoshop Actions

I spent a little (emphasis on little) of my holiday money on the purchase of two Photoshop action packages for astrophotography. My simple goal for today was using the packages to reprocess one of my old images. Here's my original take on NGC 6781, a small planetary in Aquila. This was shot in June 2012 using H alpha and OIII narrowband filters with my ST8300M CCD and C925. This was my original "final" image:

Original Processing

I used the OIII data for both the blue and green channels, which produced a washed-out cyan in the nebula's interior. Other defects in this image include some uncorrected mild vignetting, a noisy background and almost colorless stars. Using the actions it was an easy task to generate a synthetic green channel, clean up the background, give the stars some color and pretty much obliterate the vignetting (without any flats). Wow! That's not bad for a day's work with new software. Here's the result:

Processed using actions


Not that it's perfect by any means. I think the background is too black and I've lost a lot of the dimmer stars. I'll take it as good enough for the first day of using the actions.

The two packages are Astronomy Tools ($21) and Annie's Astro Actions ($15).  There's some overlap between the packages, but they're so inexpensive that you can get both!

Monday, October 29, 2012

HOASP, CCD Returns

It's back, and it works. SBIG contacted me after about three weeks that the problem had been diagnosed. The news was not good: both circuit boards were fried and would have to be replaced. The cost would be $695.

Ouch!

I told them to go ahead and do the repairs. My options were limited. The filter wheel and 36mm filters I use are tied to the ST-8300 and can't be easily adapted to another camera. While $700 could probably buy a used CCD, but it wouldn't be as good a camera as the 8300--and I would have to add the cost of a new filter wheel and filters to that.

A week later the 8300 came back, and it works like new so far as I can tell. The fan runs and the filter wheel aligns itself when powered up, the shutter clatters when initialized, and the cooling system cools. It's been cloudy here since the camera was returned, so all I've been able to do so far is shoot dark frames.

Two questions I asked SBIG that you may be interested in if you are an ST-8300 owner:

Q. How did the breakdown happen, and how can it be prevented in the future?

A. The camera apparently much prefers to be powered up first; always connect the 12V power before plugging the USB connection into your laptop.


Q. Even though the sensor was not replaced, do the new boards mean that I need to shoot new dark frames?

A. Probably not, but it would be a good idea to shoot some test dark frames that match the exposure time and temperature of old dark frames. If they compare well, then my flat library doesn't need to be rebuilt.

So I'm back in business, once the skies finally clear. While I'm waiting, I'm going to make myself a poor man's camera case using a Plano #761 toolbox, some foam from a craft store, a twin-blade electric carving knife and a hot glue gun. It won't be a Pelican, but it will cost about 1/4 as much. I'll post more about this micro-project when I'm finished.

The Heart of America Star Party was a viewing and imaging bust, but I had a good time, as did most of the attendees. All three nights were cloudy, and it rained pretty much from the second night through all of the third day, with a lot of lightning the second night. Severe weather was forecast for the third night so I folded my tent and stayed at the Days Inn in Butler. Fortunately the severe weather bypassed the observing area.

HOASP featured an abundance of knowledgeable and friendly people, excellent talks, great food (assembled if not made on the premises) and nightly movies to help people cope with the clouds. One vendor (Bushnell) was on site, the daily door prizes were decent (I won none). One word of advice: If you decide to play bingo, take several cards. It's a cutthroat game, bingo.

I'll definitely want to return.

Sunday, October 7, 2012

Waiting Time

One week since I sent in my CCD to SBIG, and one week to go to the Heart of America Star Party 2012. I didn't expect to hear anything from SBIG this week; my impression is that the repair queue is about two weeks long. After that--in a few short days--you hear from them, they do the repair, and it's on its way back to you. So I'm guessing that I'll get it back sometime around the last week of October.

On the HOASP front, there's good and bad news. A friend who also owns an ST-8300M has agreed to loan me his for the trip. CCD imaging is back on the menu. I'm still waffling about which scope to bring, the TV102 or C925. Today, I'm favoring the TV102. Stand by.

Bad news is the weather forecast. At this time it has all three days of HOASP as showers and thunderstorms, so the whole CCD issue may very well end up moot. I've picked three targets as if there will be three nights of clear sky. The helix nebula (NGC 7293), The sculptor galaxy (NGC 253), and The foxface nebula (NGC 1788, a reflection and dark nebulae in Orion) Will any get imaged? Or will I come home having collected only mildew?

Saturday, September 29, 2012

CCD Camera Goes in for Repairs

My ST-8300M began acting erratic at a star party a couple of weeks ago. I was able to pull a couple of dark frames off it when it lost contact with my laptop. Subsequent tries to reconnect all failed. Either the camera couldn't be found by the camera control software, or Windows was declaring it an unidentified USB device.

Cable swapping and driver reinstallation ensued to no good effect. It was time to consult a higher source.

I contacted SBIG and they suggested trying to use another computer. I loaded the drivers onto my desktop computer and got the same results. SBIG suggested sending in the camera for diagnosis and repair.

Two days ago I mailed it to them. I expect to hear back in a couple of weeks, and then perhaps another two weeks for repair and the return trip. Which means I'll miss the best part of autumn, and imaging from the Heart of America Star Party. Bummer.

The fallback is to rely on my DSLR for some dark-sky imaging at HOASP. I think it would be nice to do some reflection nebula imaging, perhaps the Iris?

Monday, July 23, 2012

Another telescope, WOW, images


Yes, I've purchased another telescope, this time a used C9.25. This is something I've wanted for a long time; it fills the niches for long focal length deep sky imaging and planetary imaging/observing. I've been using it so far only for deep sky imaging, and it's very nice, even at f/10. Here are some samples:

Messier 16 (Eagle Nebula) LRGB

M27 (first light image) Ha+OIII full frame
NGC 6820 (full frame) Ha
Sort of looks like M 16, doesn't it?
NGC 6781 (full frame) Ha + OIII
At f/10 it has a nice flat field. These are imaged with an SBIG ST-8300M and Baader filters. I usually bin 3x3.

WOW stands for the Wisconsin Observers Weekend, an annual event that brings together amateurs from all over Wisconsin and nearby states. It's held at the lovely Hartman Creek state park near Waupaca, WI, and features very dark skies. If you're in the MN, IA, WI, IL area and looking for a nice group of people to observe with under great skies, you can't do much better. I had bad luck with a faulty dew preventer, but still managed one night of imaging that got me the M 16 image above.

Next for me is the backyard observatory, the resumption of the school year, and a weekend trip to Jeffers Petroglyphs. More images coming soon, too.

Tuesday, April 17, 2012

M101 Progress

This Friday I may be able to complete the acquisition part of my M101 project. At the present time I have 13 hours of H-alpha, two hours of luminance, 40 minutes of red and 40 minutes of blue. (Both the R and B are binned 2x2 on board my ST-8300. I feel that I need to add at least 20 minutes of red, 20 minutes of blue, and an hour of green before I'm ready to process it all. I have the dark frames ready to go.

Friday night is a gathering of imagers out at Onan Observatory, and the forecast is for clear skies. There should be a good four hours of imaging time between the start of darkness and RA end-of-travel. Deduct from that the time for polar alignment, (re)focusing, and the usual snags and glitches.

The last several years my clear-sky luck at Onan has been terrible. I won't be surprised if the clear forecast busts.

Monday, February 27, 2012

Wide-Field Imaging with EOS Lenses

I would like to do some very wide field imaging, in which I can capture entire constellations or significant parts of them. This means imaging with focal lengths less than 200 mm, which can be done with camera lenses. I have a few Canon EOS lenses, and lenses that can be adapted to work as if an EOS lens, but the problem is mating the lenses to my SBIG CCD.

A search of internet forums suggests that there's only one way to do this: With an SBIG EOS to ST-8300 adapter ring. The problem is that this adapter is pricey: $295 + shipping. A Wanted ad on Cloudy Nights failed to produce someone willing to sell a used one, so yesterday I faced reality and ordered one from Oceanside. I should say, back-ordered it. With luck it will be here for the warmer weather expected to arrive in April.

Update 2/27: OPT wrote that the adapter would be delivered no earlier than late April! Tomorrow I'll call around to see if any other dealers have it in stock.

Update 2/28: Oh, well. It seems that SBIG items are usually special order most places and are fulfilled in 30 to 60 days. I'll stick with OPT.

Wednesday, January 18, 2012

The 10-Year Rule

Simply put, it is: "If you haven't used something even once in the last ten years, you should get rid of it." These are not easy words to live up to, particularly for someone like myself who has pack rat in his blood. But at least today I took a stab at it.

Gone are some Maxxum lenses from my Father's old Minolta SLR That hadn't been used since 1999. Also gone is the body of my Ancient Olympus OM1N SLR. This was probably last used in the mid 90s. I also have some Olympus-compatible lenses that I was going to sell, But I didn't, since they eventually prove useful.

The folks out at National Camera Exchange in Golden Valley were helpful in taking these items off my hands. I know I might have gotten more by selling the items someplace like EBay, but it seemed like too much hassle to do that. A week or so before I had taken the lenses to the MAS swap meet, but they generated no interest

It turns out that Olympus-compatible lenses can be fitted with an adapter enabling them to be used as Canon EOS lenses. No autofocusing or aperture control, but those are not important for astrophotography. So now I've got a bunch of lenses for using with my ST-83000M: 50mm f/1.8 Olympus; 50mm f/1.8 Canon; 17-70mm Sigma for Canon zoom; 135mm f/2.5 Tamron for Olympus; 400mm TeleAstranar f/6.3 (of dubious quality); 2X Vivitar Teleconverter for Olympus.

Before any of those can be mated to the ST-8300M, I need to get this. Hence the coupon clipping mentioned in an earlier blog entry. (The fund now stands at a about $110.) I'm particularly eager to try out the 17-70mm zoom and 135mm fixed focal length lenses.


Tuesday, January 17, 2012

Cold Weather Performance

Tonight I'm shooting O-III frames of the NGC 2244 (the Rosette Nebula) to add to those already taken the other night. Tonight will probably be the coldest night we've had so far this winter, which is not really saying much.  The next couple of nights we will probably go below zero for the first time this winter.  It's hard to believe this is Minnesota! Oh, and there's just a trace of snow on the ground. Really strange.

How well does everything run at 9° F (-13° C, the current temperature on our screened porch)?

Happily:
  • Gateway Laptop
  • ST-8300M (which I'm running at -30° C just to match existing dark frames
  • Extension cord from house (it's one of those low temperature cords, highly recommended. (Note added: at 5° F the cord began to stiffen a little, but it was still easy to coil for storage.)
  • AT72ED, focuser remains smooth (Note added: at 5° F the focuser became rather resistant to change, as if the lubricant were solidifying or parts were tightening because of differential contraction.)
Less than perfectly, but passable:
  • Me
  • Cables (all are very stiff)

Not very well:
  • SBIG filter wheel.  (reports an error when moving from filter to filter, but gets there okay. I've noticed that temperatures in the teens or lower cause this behavior. Maybe these are built for the weather in Santa Barbara?)
  • CGEM mount. It looks like the mount is moving in fits and starts, elongating the stars in right ascension. I can't yet tell if this is periodic motion that can eventually be eradicated. It might well be something else, perhaps caused by the stiffening of lubricant? I tried to change the balance in RA, but that didn't help. Most of my images from the evening have very elongated stars. Maybe I can compensate by using the Ha image as luminosity and red, the OIII as blue and the SII as green?  Time to experiment!
It's perfectly clear tonight, with just the lightest breeze; by the end of imaging at midnight, the temperature had fallen to 5° F (-15° C). The poor CGEM simply couldn't track correctly in RA with the temperature in the single digits F. I'll have to look into this, as winter evenings around here are typically near that range.