Saturday, November 28, 2015

November 2015, A Great Month for Imaging

Pleasant fall weather and clear nights are the dream for every autumn, and occasionally that's exactly what happens. This year's September, October and November allowed me to image on 15 nights (or more, I may have missed a counting a few). And that's not counting a few clear nights during full moons when lunar observers were probably having fun. I did some work on the Arp and planetary nebula observing programs, and made time for a pretty objects as well. Here are a few of this autumn's images:

Messier 33, Canon T2i and AT65EDQ

Messier 45, SBIG ST-8300M LRGB and AT65EDQ

NGC 246, SBIG ST-8300M RGB and C 9.25
I really like the way the Canon and AT65 work together to make for light-weight, large field imaging. The previous (and only) deep image I'd done with the T2i made me wonder about how noisy the camera was, but the M33 image background came out nice and smooth, probably aided by the temperature being in the 40s F.

Winter's here now it appears. Temperatures are in the teens at night and there's an inch or two of snow on the ground with several more inches in the forecast.

My winter goals this year are modest compared to last year when I was in a mad rush to complete the bright nebula program. A nice narrowband image of Barnard's loop would be nice, and perhaps if the conditions cooperate one or two of the big winter nebulae with the Canon/AT65.

Two little wiring projects are planned, too. I want to replace the cord on my CGEM's handset with a longer flat cable and make a 12V to 7.4V power supply for the Canon.

Plans are afoot for club members to gather for an imaging SIG meeting and mirror making seminar in January or February. I hope to attend both.

Wednesday, October 28, 2015

I'm Still Learning How to Process Images

One of my friends is getting back into imaging after a few years doing other things during which he forgot a lot about processing. To help him get back up to speed I've been building a rather terse guide to processing.

I know, I know. It seems like every imager eventually ends up putting together a tutorial or guide. It's not like I'm a keeper of the Secrets of Imaging. I'm stretching credulity to call myself an intermediate skill level imager; it's a joke to use my name and APOD in the same sentence. You get the idea.

There's nothing like writing things down to demystify them and perhaps once and for all learn them. I started by outlining my usual slap-dash processing workflow, and now I'm improving it with some better processing methods and tools I've found roaming the web. This is a proverbial work in progress, so it will grow in time. So far I've only worked on one-shot color and RGB three-channel imaging, but I hope to add some LRGB information shortly.

To give you a look at what some simple processing can do for an image, compare this image of M51 processed in April with an improved version making use of a few of the things I've learned.

Left, as processed in April. Right, with a few improvements
Lots of excuses: The data here are poor, there were only dark and bias frames for calibration, the telescope was very badly collimated. The left image gives you an idea of where I was at only six months ago--it was the best I could do. The right image employs a synthetic flat created by applying median filtering, Gaussian blurring, and masks in Photoshop CS5. Also applied is a high-pass filter, but it doesn't add much because I had already mucked up the image with an Unsharp Mask. Lastly, flatting out that icky background has allowed me bring out the colors that had been hidden. That was done with curves in lab mode.

It's far from perfect--that strange magenta star to the left of the galaxy vexes me--but it's a light year or two better than it was.


What I lack in processing skills I counter with determination: I've finally bested the Astronomical League's Bright Nebula Observing Program (imaging option) and have been awarded certificate #9 (advanced). I ended up imaging 103 objects. Some of those images are going to get reprocessed in light of my improving skills.


Friday, October 9, 2015

A Big Night for Arps / A No-Show Star Party.

Tuesday night (10/6-7) was a nice night for piling up some Arp objects. Nothing really pretty here as I went for quantity over quality. Each object was given about a half hour of luminance using my C 9.25 operating at f/6.0. Here are the results:


These are presented cropped and scaled by 0.5X.

Tonight is the MAS's Fall Mini-Messier Marathon. It will probably be clouded out, but the alternate night (tomorrow) looks like it will be nice and clear. I plan on attending, not to do the marathon but to take a pretty picture of the Helix with the C 9.25 again at f/6.

I'm running at f/6.0 instead of the f/6.3 because after playing around with the focal reducer / sensor separation, I prefer how the images have come out at the slightly faster setting.

The No-Show Star Party of the title is the Eastern Iowa Star Party. I had planned on attending, but was unable to get any information from the hosting club other than the date and location. It's nice to know about things like amenities (AC Power, facilities, and fees are a few that come to mind.) before driving 5+ hours to attend. I strongly suggest to the QCAS (the Quad Cities astronomy club) that they post some information useful to potential attendees a few months before next year's EISP. So far as I was able to tell, they didn't post the party's date until less than a week before the event. If they want the party to maintain itself they need to get more information about it into public view in a more timely way.

Monday, September 28, 2015

Moonlight Imaging (broadband version)

Two months ago I wrote about how one could narrowband image under moonlight. Actually, you don't have to use narrowband filters to image with a full moon in the sky. But you do need to choose your targets with a thought to where the moon is. And it helps to have a haze-free sky that's otherwise fairly dark--yellow zone at least.

Here was the situation the night of the 26th: One night before the "supermoon" total lunar eclipse. The moon's magnitude was a brilliant -12.6 and at meridian crossing reached an altitude of about
42 degrees here in Minneapolis:

The Moon on the night of 9/26/15 at meridian crossing
This shows the part of the sky with an altitude of over 30 degrees. It's not going to be good imaging in Pegasus, but going further north things get better. Polaris is about 48 degrees from the moon, and if we can find something between that and the northern horizon it might be worth a shot.

So I chose objects that were on the northern side of the zenith well away from the moon and close enough to the celestial pole that they'd be available all night. And I imaged from a darker site than my backyard in the inner red zone. Here's how it turned out:
NGC 2276 (Arp 25) and NGC 2300 (Arp 114)

NGC 0040
Not too bad, really. I imaged at f/10 because these are small targets and partly in the hopes it would help contrast. The galaxies were imaged in the time before midnight and the planetary after followed by dark frames. As it ended up I was out there until after 4 A.M., but a clear night is not exactly a common event this year and I wanted to take full advantage of it.

Note that exposure times were kept short because of the moonlight. Unbinned luminance frames were only 180s and 2x2 binned RGB frames were a brief 90 seconds. As it was I got about two hour total exposure time for each image.

After three hours of sleep I went home the next day, to bed at 7 P.M. and slept right through the lunar eclipse. Imaging has a  price!

Wednesday, September 16, 2015

When To Go Off-List

It's possible to get caught up in an observing list and work on it to the exclusion of everything else. That's pretty much what I did while working on the Bright Nebula list, particularly when I got to the point of having a dozen or so items to go. Everything was dedicated to completing the list to the point that it dictated what gear would be used at star parties and how my time would be spent.

Perhaps a saner approach is to slow down and mix in non-list items for imaging along the way. That's what I did the other night, and it worked out well.

Lately I've been traveling to a friend's home north of the Twin Cities and we've been observing and imaging together. His sky (suburban-rural transition) is much darker than mine (inner red zone urban) and his gear is definitely better than mine and mounted in an observatory. I set up just as if I'm at a star party, polar align, and get to imaging. Then I'm free to help him while he works on reacquainting himself with the process of imaging--he's been inactive for several years--or hunts down deep sky objects with his 16" go-to Dob. It's the best of both worlds for me to have the benefit of his sky and telescope.

And just as at any star party, it's nice to have someone else around to talk to.

Plus at 4 A.M., I have a nice soft sofa to crash on instead of a tent!

Last Sunday was my latest trip to his place for imaging, and we succeeded in getting his imaging system working for the most part. His autoguiding wasn't working, but he's implemented a fix for next time based on what I use.

I had no specific plans for the evening other than imaging Arp galaxies for that Astronomical League list and maybe during the A.M. of switching to a planetary. My friend had his own list of favorites he was eager to observe using his big Dob and we looked at some of those. About the time I was wrapping up with my second Arp he mentioned NGC 891 and showed my his first light frame. In case you don't know 891, it's a large edge-on galaxy in Andromeda. It's cut in half by a dark dust lane dotted with bright knots and has a rather large and distinct nuclear bulge. In other words, it's pretty.

To some extent imaging is all about pretty, and after all the "bright nebula" imaging in monochrome I decided I wanted to make an image in color. My friend's suggestion of 891 is all I needed to drop my list plans for the rest of the evening and try to make something pretty. Here's the result:

NGC 891
(Details here at Astrobin.) Not a perfect image, but I'm happy with it, and glad I opted to give it a try instead of doing more list imaging!

The early imaging was mundane Luminance only. The target galaxies were so small that color was basically a waste of time. Here's what I mean:

NGC 7550 (Arp 99, Hickson 93)
NGC 7578 (Arp 170, Hickson 94; Note the plate solving error)

These two bring my Arp count up to 12 compared to my planetary at 13. I'll probably add a couple more monochrome Arps next time out to make the lists even in terms of percent completed and then go off-list again!

Sunday, September 13, 2015

Celestron Field Flattener Follow-Up

This is a follow-up of a previous post.

I was able to image the other night with the short nosepiece. Recall that my goal was to get the system to match the presumed optimal f/6.3. It was f/6.0 with a long nosepiece/adapter in place, and by switching to a simpler nosepiece it allowed me to trim about 8mm off the FR/CCD separation. While the image is not very good, it's good enough to allow astrometry.net to plate solve it and calculate the pixel scale.

Here's the image:

NGC 7625 (small galaxy at center)
This was based on 30 minutes total exposure for each RGB channel, under near-urban sky. It could be a lot better, but sometimes one must take what the sky and gear gives.

The pixel scale is reported to be 1.51 arcseconds per pixel. This is really close to the value of 1.50 that corresponds to a focal ratio of 6.3--the error is only about 2/3 of one percent.

Monday, August 31, 2015

Forest Fires, Smoke, and Transparency

Forest fires are raging in the northwestern U.S. and western Canada, taking lives and resulting in the destruction of property. There are a lot of fires:

Active fires on 8/31/15. Map from http://activefiremaps.fs.fed.us/

The effects are not limited to the areas of burning. Smoke is being carried hundreds of miles eastward, leading to occasional serious decreases in air quality that can affect those with respiratory illness.

Another far less serious effect is the greatly diminished transparency of the sky. During the day the sky is a yellow-brown veil and at night dimmer stars are extinguished and the moon starts to look like it's in eclipse:

The full moon at an altitude of 34 degrees. It should be colorless, not yellow!
Most observing and imaging activities are put on hold until either the fires end or the winds shift. This degree of transparency loss has happened before, earlier this year and once last year. Prior to that I think one must go back about seven years or so to see a similar event.


Thursday, August 27, 2015

Using the Celestron Field Flattener with an SBIG ST-8300M and FW8-8300

I purchased a used Celestron 9.25" XLT SCT intending to use it primarily for planetary imaging at f/10 or greater. There was no need for a focal reducer/flattener. I did purchase a used Celestron 94175 f/6.3 flattener/reducer so I could, if I wanted to, image deep sky objects. As it turns out, deep sky objects have been the C925's main use.

Reducer/Flatteners like the Celestron 94175 work best when at a specific distance from the sensor. Can this distance be known? Let's use the calculator at  Wilmslow Astro and find out.

For a standard f/10 SCT, the separation to give f/6.3 (where we presume the field will be flattest) should be 105mm.

Two nights ago I imaged NGC 7008, the Fetus Nebula, using my CCD and the focal reducer. The stars were nice and round all the way to the edge:

NGC 7008 (click to enlarge)
Astrometry.net reported that the image scale was 1.58" per pixel, which translates to f/6.0. According to the above calculator this should happen at a reducer/CCD separation of 113mm**. 

If the reducer is flattest at f/6.3 I need to decrease the separation from 113mm to 105mm, or by about 8mm.

Happily, I can do that. The nosepiece I was using was a 2" focuser-to-TeleVue IS adapter + IS to T-ring adapter. I also have a nosepiece that's just 2" focuser to T-ring, and amazingly it will let the CCD get about 8mm closer. Just about perfect!***

The next night I'm out I'll try this configuration and see if it gets the focal ratio correct and also produces round stars.

* This suggests that the performance of the reducer is rather insensitive to the separation. Here I'm 8mm off and the stars look good. This has limits, though. In a previous image a 12.7mm spacer was included and the stars at the corners were plainly distorted. That image had an image scale of 1.65" per pixel, which corresponds to a focal ratio of  f/5.75. The calculator says this happens at a separation of about 123mm. I measured the separation as about 125mm. That image suggests the separation reduction should be 20mm, which is roughly the same as 12.7 + 7.3 (the spacer plus the ~8 mm suggested by the other image).

** One thing that's usually left ambiguous in reducer explanations is the point on the reducer from which the CCD distance is measured. In the case of the system operating at f/6 I measured the CCD to be 125mm from the front of the reducer. which is the same thing as 114mm from the center and about 100mm from the rear thread base. Because the center position in only 1mm different from the formula's value of 113mm, and given the inexactness of my measurement, It's reasonable to conclude separation should be measured from the center of the reducer.

*** Is this an accident? The Antares 50mm long 2" focus tube on the back of the SCT makes this possible, but it predates the ST-8300 + filter wheel and couldn't be designed to work with their backfocus requirement. But it works out nicely, right?


What does this say about using a 0.5 focal reducer? The model I have is a SmartAstronomy 2", which is probably identical to the GSO 2". GSO says that the focal length is 106mm and the optimal separation is 53mm. The calculator puts it a bit larger at 56mm. Because this reducer screws into 2" nosepieces, the closest I can get it to my CCD is about 69mm (measuring from the center of the reducer). That puts it at about f/4. I'd guess that's too far from ideal to produce pleasing images, but it's worth a try. A Lumicon low profile nosepiece could trim 9mm off that, getting it close: f/4.7. Trying that will cost about $35.

Monday, August 24, 2015

What's Correctable in this Image?

How do you assess an image's quality? Here are some factors I use to evaluate my images:

Stars:
  • Are they round?
  • Are they focused?
  • Do they have pleasantly fuzzy edges?
  • Are they free of color fringing due to optics or processing?
  • Do they have color that's pleasing in both hue and saturation? 
Background:
  • Is it a neutral gray?
  • Is it as smooth as might be expected from the data?
  • Is it free from any substantial gradients?
Nebulosity:
  • Does it fade smoothly into the background?
  • Is it the right color (both hue and saturation)?
  • Has the data been processed correctly to reveal fainter portions?
 Defects:
  • Is the image free from dust shadows and other unwanted diffraction effects?
  • Have "rogue" pixels been cleaned up?
  • Have the effects of vignetting been corrected?
  • Is the image flat?
Here's my latest image, and let's see how it measures up.

Planetary nebula Jones 1 in Pegasus
(cropped but full scale, 105 minutes of RGB at f/6.3, ST-8300M binned 2x2)

Focus is decent but the stars are not round, probably indicating a tracking issue. The stars are reasonably fuzzy and show some color--not a lot, but enough for my taste.

Background color and intensity is good. The histogram isn't clipped, and the nebulosity fades smoothly into the background. So far as I can tell by looking at other images the object's color is fairly captured, as is the amount of structure given the imaging system.

Software was used to reduce the effects of light pollution and vignetting.

There weren't many bad pixels to clean up in this cropped image thanks to fresh dark and bias frames. The full field was not at all flat in a way that suggests that the sensor to flattener distance was significantly off.

Add that all up and I conclude this is an acceptable image but nothing special. A big improvement would be  to improve the tracking. Adjusting the sensor spacing would reduce the need for cropping. And collecting more data would help--it almost always does.

Regarding the tracking, I'm beginning to wonder if the Orion MiniGuider is adequate for guiding a 1480mm imaging scope. Some experimentation is in order along with trying different spacers to correct the flatness issue.

Monday, August 17, 2015

Sloppy SCT Alignment and How to Correct It

Optical alignment is important, and particularly so when imaging. Stars are unforgiving when it comes to illustrating every little imperfection in your imaging system.

Sure, everyone knows that fast Newtonians need careful collimation. And most refractor users know that collimation is something that they almost never have to do. Then there's me...

I bought a used Celestron 9.25" SCT a while ago, and it was in perfect alignment at that time. It was easy for me to pretend it was much like a refractor and that the alignment would stay perfect. When it eventually went out of whack I started to tweak it as if I was working with my f/5 Dob. The fact that it came with Bob's Knobs encouraged me to do my tweaking in the field, leading to dreadful alignment. That was no fault of the knobs, I just didn't know what I was doing.

It took a couple of nights of dreadful images to convince me that I need to do a careful alignment of the scope. If you want to see a good explanation of how to go about this, look at Thierry Legault's instructions. He basically suggests a three step approach:

1. Course Alignment

This is the traditional centering of the secondary shadow within the defocused star. While this can be done by eye, I found it was useful to employ an imaging device to display the star. (An Orion StarShoot Autoguider works great for this.) Using this method lets you employ a nice program by Gilbert Grillot that overlays red concentric circles on whatever you're using for imaging.

2. Higher Magnification Alignment

Repeat the first step with higher magnification and using a dimmer star. You're once again centering the shadow. You'll use a shorter focal length eyepiece or a Barlow. I used a 4X Barlow with the SSAG.

3. Diffraction Ring Alignment

With the star focused you examine the diffraction rings. They should be concentric circles, and you have to carefully adjust the alignment until they are.

I did steps 1 and 2 indoors using the Hubble Optics Artificial Star. Step 3 required that I have the Hubble "star" a greater distance from the telescope than I could attain.

Here's the change in images:

Before (L) and After (R) the two-step alignment (click to enlarge)
These are from different nights and are of different targets, but it's abundantly clear that the Before image is awful--and it's worth noting these images are unscaled crops from the center of the image. I won't show you the field edge stars of  the Before, they're that bad. Here are a couple of stars from the above crops to emphasize the improvement:
Before and After (as above), 5X actual size
That blob on the left is actually a star. The elongation of the After star is due mainly to tracking error on a breezy night. Doing steps 1 and 2 led to much better stars across the entire image.
HELPFUL HINTS for Indoor Collimation:
Put your scope on a controllable mount. Every alignment adjustment will shift the star's position, and it's much easier to reacquire the "star" if you can use the mount's hand control.

Disable Tracking. The "star" isn't moving like a real star, so your scope shouldn't be trying to track it. Some mounts may allow you to turn off tracking, but my CGEM doesn't have that capability. However, it does have hibernate mode. If you have a CGEM, point your scope at the "star," activate hibernation, and leave the power on. Your hand control's RA and Dec motion buttons will still operate. 

You may have to use extension tubes. Start with the largest diagonal you've got, and then add extensions as needed. Remember, for steps 1 and 2 you don't need to reach focus, you just have to get the defocused star to fit into the field of view.

Saturday, August 1, 2015

Moonlight Imaging

I don't mean yesterday's blue moon but a pair of Sharpless objects. I've started working on the AL Arp Galaxy program, and it suffers from a seasonal bias--external galaxies tend to be seen best when placed away from the plane of our own galaxy. The Bright nebula program had an opposite bias in that most nebulae are in or close to the plane of the Milky Way. When the Milky way is well placed in the sky you're kept busy imaging nebulae; when it's not, you have almost nothing to do. The opposite holds for galaxies.

Two examples: The BN list has 15 objects in Cygnus, while the Arp has only one; The BN has one object in Ursa major while the Arp has 34!

The way to avoid the "hurry up and wait" problem is to do multiple programs at once, choosing programs that have complementary biases. So I think I'll also do the Planetary Nebula program (concentrated in the galactic plane) along with the Arp (concentrated at the poles).

Here's an image for the PN Program. It's not my first; for that I'll have to look back through my old images. This one is Sh 2-71, very bright and sitting just west of a much larger and dimmer Sh 2-72.

Sh 2-71 at right, the much more extended and dimmer Sh 2-72 at center left.
This image is in H-alpha and is another illustration of the power of narrowband imaging. These objects were in Aquila and the full moon was in Aquarius, not very far away. The moon was up for the entire data acquisition time and I was imaging under a red zone sky as well. In other words, the sky was bright.

(Imaged using a TV-102, ST-8300M; 6 x 600s autoguided exposures.)

Last night the unbeatable factor was clouds; a lovely clear night slowly went overcast as I was collecting O-III data. I had to settle for an hour of H-alpha.

It's nice to know that even though we have no remedy for clouds, we can image deep despite the moon.

Monday, July 27, 2015

The Next Imaging List: Arp Galaxies

A quick glance at the AL list of observing programs suggested to me that the next agenda item for me is the Arp Peculiar Galaxy Northern list. This lets you image any 100 out of 338 objects in the list, which is a lot nicer than the bright nebula list. The ALBN required 100 objects out of the 132 on the list that are visible from my latitude (i.e. having a declination northward of -45 degrees). There wasn't a lot of wiggle room for the ALBN!

The submitting requirements are much saner than the BN list. Apparently all that's wanted are the images themselves. There is this strange statement:
Also, photo enhancing of your image is not required, but, again, if you choose to do so then that will be accepted.
I'm not clear about what they mean by "photo enhancing," but everyone should do at least a simple stretch. I plan on doing the usual image processing to reduce noise and get as much as I can out of the images.

Most of these objects are fairly small. The largest visible from my latitude is M101; it nicely fits into the field of  my T2i when imaged through my C 925 @ f/6.3.

My plan is to image all 100 using the same scope and imaging device. Right now I'm leaning toward using the above T2i, just for the ease of getting color.

I'd also like to use the same exposures for all the objects. There will have to be some experimentation to see what that exposure might be. If the total exposure time turns out to be short enough (10 minutes or so), I might use in-camera long exposure noise reduction (LENR) instead of dark frames.

Thursday, July 23, 2015

The Last Image from the July Road Trip

This is an image I've wanted to take for some time. Unfortunately clouds kept the total exposure time at only 63 minutes. The nebulae in the image require no introduction.

200mm Zuiko lens @ f/5.6, 63m total exposure LRGB. Taken at Jeffers Petroglyphs

Can the Summer be going by so quickly? No more travel for me (except to Cherry Grove or perhaps one of the county parks I've scouted out) until September or October. Boo!


Wednesday, July 22, 2015

Three More for the ALBN and What was Lost is Now Found

LBN 140 was something I unsuccessfully tried to image from my red zone back yard using Ha. At NSP I gave it a try because the last night it was sitting in an area that still had good transparency. The first luminance frame showed some hints of nebulosity, so I continued on and collected more.

LBN 140
Getting this was a real bonus as it has a brightness of 6 on Lynds scale. A big thank you to the dark sky of NSP!

Two objects that I tried to image at the 2015 Nebraska Star Party didn't come out thanks to a really annoying line of clouds that slowly slid over them. Luckily, the one clear night at Jeffers allowed me to go after them again. These were IC 4812 and NGC 6729, luminous parts of a larger patch of nebulosity:

IC 4812 and NGC 6729
This would have been better in the AT65, but I decided to stay with the 200mm lens.

With these two I end up at 103, three more than needed.

Still to be processed is a 200mm field LRGB image of the Lagoon/Trifid area.


Now for something strange. At NSP 2014 I lost my mount's counterweight shaft end bolt, the thing that keeps counterweights from accidentally sliding off and crushing your foot. You know, this thing:

The lost bolt, now found

The bolt can easily be replaced by a bolt and washer (google and you'll see a lot of images of replacements), but it has the same specs as the bolt on my old CG5 mount, so I used that one as a replacement. However, knowing that I'd be going back to NSP again this year I began to entertain a notion that I might find my lost bolt. I know, NSP is a big place in which to find such a small thing, they don't mow the observing fields all that short, and there's been a year for it to get trampled, corroded, covered with dirt, or otherwise abused and knocked around. A bird might have decided to carry off the shiny thing. Realistically, chances of finding it were slim.

Maybe it was the small chance of finding the bolt that compelled me to look for it. Or maybe I just really hate losing things. So I set up camp as close to where I was last year as I could remember, put up my tent and set out my mount and observing table in the same relative positions. Of course I immediately searched the area under the mount and table with great expectation. Okay, that was unrealistic.

I began a not very methodical search extending outward from the mount and within a minute saw the bolt gleaming up at me, oriented as in the above picture, shining like a tiny mirror reflecting sunlight. It was only about ten feet away from this year's placement of the mount.

Had it been cloudy or I had been farther off in my positioning I might not have seen it.

As you can see in the image above, it picked up a little rust on the threads during its year of idle time in the wilds of Nebraska. Otherwise it's fine.

This year--so far as I know--I left nothing behind at NSP. But I think I'll go back again next year anyway.


Monday, July 20, 2015

AL Bright Nebula Observing Program DONE!

Finally! I've now imaged 100 of the "Bright" nebula objects.

There were only a handful of hours with clear (if not very transparent) skies at this year's Nebraska Star Party, but it was all I needed. I shot groups of objects in Scorpius and Sagittarius/Serpens to collect the six objects I needed.

Here's the first group, NGC 6357 (the Lobster), Sh 2-12, and Sh 2-13.


And here's the second group, IC 4701, LBN 53, and LBN 70

Still to process are a possible three objects, one from NSP and the other two from Jeffers Petroglyphs. The total integration time to reach 100 objects was 180.6 hours. That's a bit over 7.5 DAYS of exposure time!

Sunday, July 19, 2015

Nebraska Star Party, 2015

Just back from NSP by way of Jeffers Petroglyphs (in Minnesota).

The Bad: This NSP did not have cooperative skies. I arrived Monday, and that night had about two hours of decent sky for imaging my southern targets--visual observers who can dodge clouds had a better evening. Tuesday night was cloudy with a threat of severe weather; many people fled their tents on hilltops and spent the night in low areas. As it turned out the bad weather never materialized. Wednesday night was cloudy, with a distant thunderstorm lighting up the sky around 2:30 A.M. Thursday night had promise, but a high cirrus layer with some opaque streaks cut the transparency to poor or worse.

NSP 2015 typical Sunset sky, a preview of the evening's coming lack of transparency

A big storm passing to the south at sunset on Tuesday.
Word was that the nights leading up to the "official" NSP week were clouded out as well.

The Good: This NSP had an attendance of about 275, reported to be the largest in ten years. (David Knisely reports attendance was 286--see Cloudy Nights.) The Wednesday speakers were excellent, and the program included a live stream of a New Horizons press conference.

I discovered the Valentine Public Library and spent a couple of mornings there in air conditioned comfort catching up on email and the news.

Imaging went only so-so. I think I finished my 100 AL Bright Nebula objects. It's not official yet as I haven't had time to process the images. I did have time to get a few extra objects, so I may end up with a total of 103. It's all luminance because of the conditions, though. I'll be posting the processed images tomorrow.

And how was the weather? Let's compare with the averages...
             
              Averages  Records   --- 2015 Observations ---
Date          High Low  High Low  High Low Departure Precip
July 12 (Sun) 89   60   109  42    94  68     +6     trace
July 13 (Mon) 89   60   107  41    93  57      0     none
July 14 (Tue) 89   61   105  44    90  60      0     none
July 15 (Wed) 89   61   110  40    79  66     -2     trace
July 16 (Thu) 89   61   113  45    88  60     -1     none


Very normal, really. A little warm at first, then cooler. It rained on Sunday night and unfortunately also on Friday, the public night. Overall the period was  more humid than normal with dew point temperatures in the upper 60s sliding down to the upper 50s.


The poor weather continued into my Friday at Jeffers Petroglyphs, where it was hot and humid (90F with a 73F dew point) and rain and severe weather was possible. I decided to return home, then drove back to Jeffers for Saturday. Once again it turned out that there was no rain, much less severe storms. Saturday night varied between episodes of sparkling clarity and hazy lack of transparancy that resembled NSP's weather. I collected 200mm LRGB frames of the Lagoon/Trifid area and reimaged one of the "bonus" objects that had been partially obscured at NSP.

Sad to say  that 2015 may be the last of the annual Jeffers gatherings once known as the Prairie Grass Stargaze.

Thursday, June 25, 2015

Nebraska Star Party Weather

If last year was your first trip to NSP you probably came back wanting to return in 2015 to enjoy even more mild weather. I know I did.

 2014: Uncommonly Cool

This was not a year that people returned with stories of blistering heat or gear-toppling thunderstorms. The first four days were a cool eight or nine degrees below normal, nighttime lows were in the 40s twice, winds were light most of the time and no precipitation fell.  Daytime skies were generally clear to partly cloudy, and no weather (thunderstorms, fog, haze or smoke) was reported. There was an amazingly tiny total of 11 cooling degree days for the period compared to a normal of 50.

Daily summary for Valentine during NSP 2014: 
Date          High Low Departure
July 27 (Sun) 84   50  -8 
July 28 (Mon) 83   49  -9 
July 29 (Tue) 78   54  -9 
July 30 (Wed) 86   49  -8 
July 31 (Thu) 88   52  -5

2015: What to Expect

The average maximum temperature is around 90 and the overnight low (which you'll feel only if you're still up observing or imaging at sunrise) is around 60. Every day has about a one-third chance of a thunderstorm, so of the five days it could be expected that there be one or two with thunder.

Daily Averages for Valentine during NSP 2015:
              Average   Record 
Date          High Low  High Low
July 12 (Sun) 89   60   109  42 
July 13 (Mon) 89   60   107  41 
July 14 (Tue) 89   61   105  44 
July 15 (Wed) 89   61   110  40 
July 16 (Thu) 89   61   113  45 

In other words, last year was an outlier in a good way. You shouldn't expect it to be repeated this year, but no one will complain if it is!

Sunday, June 21, 2015

First Light Image for Gary Honis Modded Canon T2i

Two weeks after getting my camera back from Gary Honis the clouds parted, the moon was out of the sky, and my schedule permitted me to try it out. Finally!

As a target I chose The North American nebula, something I'd imaged before with my ST-8300 in LRGB. The imaging site had light green sky brightness, not nearly as dark as for the CCD image. The telescopes were nearly the same, an AT72 at f/6 vs. my current AT65EDQ at f/6.5. Total exposures were 81 vs 100 m so it's almost a dead heat in terms of expected brightness. Because of the high humidity and the lack of a window heater the CCD was cooled only to about 0C.

Here's the T2i image:

NGC 7000 with Canon T2i and AT65EDQ at Cherry Grove 2015
and here's the ST-8300M image:
NGC 7000 with SBIG ST-8300M and AT72 at Iowa Star Party 2013
The difference is mainly one of brightness and contrast, which is almost certainly a result of my processing. I think the CCD image is a little washed out. I like most aspects of the DSLR image except for the vertical bands that are most apparent on the right portion of the image. These appear to come from the dark frames (I shot only six) and my inexperience processing DSLR images.

Related to those bands, one big change I'm going to make this year is learning how to dither. Based on what I've read it's helpful to let the camera cool after the image is read, and that "lost time" is perfect for dithering.

For this image I powered the camera using the Neewer AC power adapter and controlled the acquisition with the Neewer controller. Both worked perfectly.


Only a little over three weeks remain before the Nebraska Star Party. I've prepped three images for the astrophotography contest, one from Jeffers on the way to the 2014 NSP, one from my first night at NSP, and one from last fall. I need to give my binocular mount a couple more coats of varnish and it will be ready to go.

Wednesday, June 3, 2015

Canon T2i Returns from Gary Honis; Some Accessories for It

My camera is back from Gary Honis, its Baader modification complete. Now stop me if you've heard this before: The imaging weather looks to be bad for the next week or so. *sigh*

So let's talk accessories. Last time I wrote a little about the Neewer shutter control. Now that the camera is back I've been able to give the controller a try. I'm happy to say that it works flawlessly with the T2i.

Three other things I've gotten for the camera work great, too.

The Photive battery charged nicely, but only time will tell how well it serves for astrophotography. I've got three batteries in all (two are original Canons) and my hope is that together they can supply enough power for one full night of imaging.

The Neewer AC power adapter also runs the camera nicely. After the batteries fail I can switch over to an inverter or my Duracell battery with its built in inverter.

An M42/Canon EOS lens adapter also seems solid and lets my ancient Vivitar 28mm f/2.5 fixed-focus lens focus at infinity. I also have a big old 400mm lens that can use the adapter. I'll probably never image with that lens because it's so similar in focal length to my AT65. That and its optical quality is nowhere near that of the little scope.


When the skies finally clear it will be time to test Honin's work. I hope to travel north to a friend's home (with darker sky) and see what it does with the AT65 and IC 1396.

Sunday, May 31, 2015

LBN 20 and 22, Neewer Digital Timer Remote First Look

Last night was a nice one. Cool, breezy, dry, no mosquitoes, and best of all clear. Okay, there was that almost-full moon, but the narrowband Ha filter dealt with it just fine.

LBN 22 (left half of nebulosity) and LBN 20 (right half)
These are my #93 and #94 of 100 on the ALBN. Two clear nights at the Nebraska Star Party and I'll be done. Maybe sooner if I pick up a few during the June new moon.

My Honis-modified Canon T2i will be delivered in two days. My plan is to use it for imaging at NSP while I'm also imaging with the SBIG CCD. This means bringing down my CG5 mount and running it off one battery. The camera will run off its own batteries (I have three). Rather than try to control it using the laptop, I've purchased a corded remote control. Which brings me to:

Neewer Digital Timer Remote First Look

In the past I've used a simple corded shutter control while DSLR imaging. This required me to keep track of the elapsed time. If I'm doing other things that kind of distraction isn't good; a programmable control would be much better. The Neewer is one of many models that allows you to set up an image-taking program. It gets very good reviews on Amazon, is priced under $20, and resembles a slender TV or DVD player remote. You can pay more--two or three times as much if you want to go with a name brand--but I don't see much point in that. The Neewer does what I want.

Now to some specifics:

Features:
  • A manual shutter button with lock
  • Programmable initial delay (the time between when you start the program and the shutter first opens
  • Programmable exposure time (zero to 99:59:59 with one second resolution)
  • Programmable time between exposures (same limits as exposure time). This is good for letting the camera cool between shots, or for time lapse imaging
  • Programmable number of exposures --select an exposure count of 1 to 399 images or continued imaging until manually stopped (or the battery dies). Neewer says the batteries will last two months shooting 5s exposures alternating with 5s delays. The control does not have an automatic power-off, but it's easy to turn off the three settings that could consume power.
  • The LCD shows the exposure progress, number of exposures, and counts down time while in delays
  • An LED changes color according to whether the program is shutter is open or closed. It's not bright enough to bother anyone
  • A soft beep that marks the seconds during exposures (it can be disabled)
  • A backlight button that turns on a dim backlight for the display.
  • A lock button that allows you to lock all functionality except the shutter release.
As delivered, you get the control and an instruction pamphlet. The instructions are well written and clear. My Neewer came with only English instructions.

My Neewer came in a flimsy cardboard box and plastic sleeve. The plastic cover of the LCD had a couple of light scuff marks that won't affect performance and don't bother me in the least. Buttons on the remote are clearly labeled and the case has a hole for attaching a strap (no strap is included) It was otherwise unmarked and seems to work just as advertised. Neewer says the remote will work between -20° and +50° C (-4° to 122° F), limits I can live with! I'll know more when I get my camera back and can test it.


Monday, May 25, 2015

Two "Nearby" Dark Sky Sites, Maybe--and More as I Find Them

Minneapolis and St. Paul create a substantial amount of light pollution. Even at a distance of about 50 miles their combined light dome will show up clearly in long exposures. Where can one go to find really dark skies for all-night imaging?

Existing Minnesota Astronomical Society (MAS) sites are either not very dark or are distant: Cherry Grove Observatory (about an hour away, between light green and dark yellow sky as used by Light Pollution Atlas 2006), Eagle Lake Observatory (3/4 hour, light yellow), J. J. Casby Observatory (half hour, light orange), Long Lake Conservation Center (2 3/4 hours, light blue), and Crex Meadows (not an official MAS site, 2 hours, light blue).

These are either too bright (Cherry Grove, Eagle Lake, Belwin), too far (LLCC) or lacking in any accommodations (Crex). LLCC use is limited to specific weekends, eliminating the ability to take advantage of weeknight clear sky opportunities.

I spent some time doing an initial survey of what's available in the 2 to 3 hour driving range. I've looked at Lake Shetek state park previously; it's very nice, good horizons, electricity, green zone dark, and no reservations are needed during off-peak times (i.e., Labor Day through October). This park is busy at other times, though, and reservations are needed. Given the fickle weather around here, reservations are a good way of throwing one's money away. Here's what I mean:
State Park camping reservations work like this in Minnesota in 2015: A standard drive-in rustic campsite (no electric) is $15 to $19 per night.

Let's take an example of a two-night imaging trip: Getting the reservation is at least $38.50 (this assumes a $15 nightly fee and includes the $8.50 online reservation fee (use the phone instead and it's a $10 fee). Cancelling four days in advance will get you only $20 back (The $38.50 less the reservation fee less a $10 cancellation charge. You're out $18.50. Cancel later than that--which is more likely going to be the case given the quality of cloud cover forecasts--and you only get $3.50 back because the first night's charge of $15 is forfeited. You're out $35.

Another difficulty with state parks in general is their tendency to put campgrounds in wooded areas (Lake Shetek is a wonderful exception). There are a number of parks under dark skies, but if you put your gear up next to your tent (as I do) it's going to be under trees.

The good thing about State parks is that after labor day they tend to empty out and  it's often possible to obtain camp sites without going through the reservation system. Lake Shetek would be great for this in September and October.

Parks that don't require reservations such as those administered by counties are easier to use. Generally they don't have much in the way of facilities, but if you're used to primitive camping at star parties that's perfectly fine. Are there any dark-sky parks that look like candidates within a few hours drive from the Cities?

Yes, and they're surprisingly dark.

Cottonwood county's South Dutch Charley (also spelled Charlie) County Park is little more than a wooded lot, but it sits under light blue zone sky that's 2.5 hours drive away. Google Earth images suggest that it may have some places to camp that allow a southern view. At $10 a night you don't get much beyond a shelter and pit toilet, but when one can carry one's own power that's no problem. SDC is in familiar territory sitting only 16 miles west of Jeffers Petroglyphs.

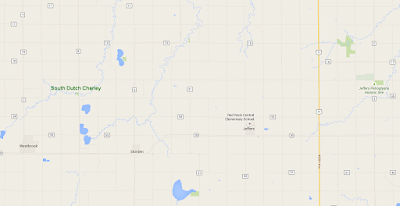
Location of South Dutch Charley Park

Renville county's Vicksburg County Park (aka County Park No. 2) is a little larger and is 2.1 hours away. $12 a night for camping, its sky is on the line between light blue and dark green. Because this park sits next to the Minnesota River it will probably have plenty of mosquitoes during summer, but spring and fall visits may be pleasant.

Skalbekken County Park (aka Renville County Park No. 1, 2.2 hours away) is farther up the river and under dark green skies. It's farther from Redwood Falls than Vicksburg is, reducing its light dome to the SE. On the other hand, the dome from Granite Falls to the NW will be substantially brighter.
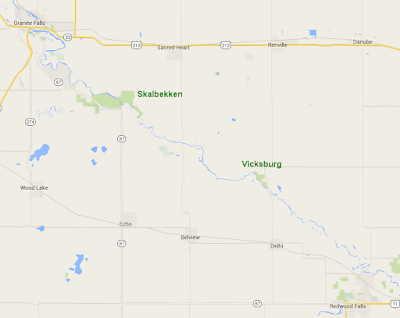
Locations of Skalbekken and Vicksburg County Parks
Here's how these two areas are located relative to the Twin Cities:
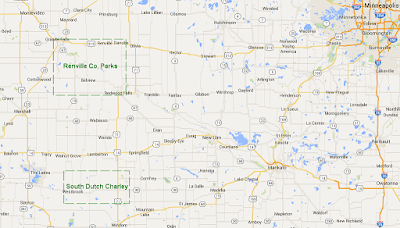
Yes, one has to drive this far to find blue zone sky.
I'll visit all of these sites in June and July to see if they are suitable for imaging trips.

ADDED:

Another dark sky camping location is in Iowa, 6.5 miles WSW of Rice in Mitchell County. It has light blue zone sky and is about 2 1/4 hours from my location. $10 camping with electrical hookups available. Worth checking out, probably on the return trip from this year's Eastern Iowa Star Party (assuming I'm able to attend).

Here's a map of the proposed sites showing the Atlas 2006 sky brightness. I've include my location and some other fairly dark sites mentioned in this post.


I looked at Wisconsin and NW of the Twin Cities, but couldn't find anyplace worth mentioning. The nice dark blue area south of LLCC seems to be mostly forests, but it contains one possible site: Snake River County Park. Aerial pictures of the camping area suggest it's forested, but it is worth a look on my next trip to LLCC (probably next summer).

ADDED 5/27: Another camping area only an hour and a half from home is Clear Lake Park in Sibley county. It's in a light green zone and about 11 miles north of New Ulm so there's going to be a substantial light dome to deal with. Camping is free (you need to get permission from the county Sheriff's office) and it looks like there may be considerable open space in which to set up.

ADD 5/58: Let's add a few more possibilities. Lake Hanska County Park is a light green zone park a little under two hours away. Blue zone camping can be found at Garvin County Park 7 miles WNW of Tracy. More blue zone at Oraas Park South of Clarkfield. All of these have inexpensive tent camping.

Maybe it's time to summarize these in a table:


SITE
ZONE
DRIVE
FEE
LOC
Elec
H2O
NOTE
L Green
1:31
?
10 NNW New Ulm
N
Y
1
L Blue
2:51
$10
7 WNW Tracy
Y
Y
2
L Green
1:53
$10
9 NW Madelia


L Blue
2:38
$5
7 S Clarkfield
16 SW Granite Falls
Y
Y

L Blue
2:19
$10
6 WSW Riceville
Y
Y

Skalbekken
D Green
2:17
?
8 SE Granite Falls
N?
N?
3
L Blue
2:33
$10
4 NE Westbrook
?
Y
4
Vicksburg
L Blue
2:06
?
10 NW Redwood Falls
?
?
3

NOTES
(1) Probable substantial light dome to south; must contact Sheriff’s office to OK stay
(2) Almost all campsites have electricity (extra $5)
(3) Very forested; no direct link at present from county web site.
(4) Open through end of October (most are open only until October 15)

At this point I'm most inclined to opt for South Dutch Charley and Garvin. Garvin in particular is attractive because of it having electricity, and aerial views suggest some campsites have passable horizons.  

Sadly I couldn't find any dark blue zones within reasonable driving distance unless one goes into South Dakota or north into the forests of Minnesota. There are a few light gray zones near the SD border, but as you might expect they're devoid of campgrounds.