Showing posts with label collimation. Show all posts

Monday, August 17, 2015

Sloppy SCT Alignment and How to Correct It

Optical alignment is important, and particularly so when imaging. Stars are unforgiving when it comes to illustrating every little imperfection in your imaging system.

Sure, everyone knows that fast Newtonians need careful collimation. And most refractor users know that collimation is something that they almost never have to do. Then there's me...

I bought a used Celestron 9.25" SCT a while ago, and it was in perfect alignment at that time. It was easy for me to pretend it was much like a refractor and that the alignment would stay perfect. When it eventually went out of whack I started to tweak it as if I was working with my f/5 Dob. The fact that it came with Bob's Knobs encouraged me to do my tweaking in the field, leading to dreadful alignment. That was no fault of the knobs, I just didn't know what I was doing.

It took a couple of nights of dreadful images to convince me that I need to do a careful alignment of the scope. If you want to see a good explanation of how to go about this, look at Thierry Legault's instructions. He basically suggests a three step approach:

1. Course Alignment

This is the traditional centering of the secondary shadow within the defocused star. While this can be done by eye, I found it was useful to employ an imaging device to display the star. (An Orion StarShoot Autoguider works great for this.) Using this method lets you employ a nice program by Gilbert Grillot that overlays red concentric circles on whatever you're using for imaging.

2. Higher Magnification Alignment

Repeat the first step with higher magnification and using a dimmer star. You're once again centering the shadow. You'll use a shorter focal length eyepiece or a Barlow. I used a 4X Barlow with the SSAG.

3. Diffraction Ring Alignment

With the star focused you examine the diffraction rings. They should be concentric circles, and you have to carefully adjust the alignment until they are.

I did steps 1 and 2 indoors using the Hubble Optics Artificial Star. Step 3 required that I have the Hubble "star" a greater distance from the telescope than I could attain.

Here's the change in images:

Before (L) and After (R) the two-step alignment (click to enlarge)
These are from different nights and are of different targets, but it's abundantly clear that the Before image is awful--and it's worth noting these images are unscaled crops from the center of the image. I won't show you the field edge stars of  the Before, they're that bad. Here are a couple of stars from the above crops to emphasize the improvement:
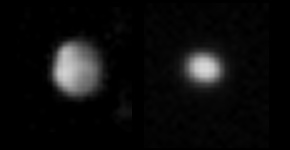
Before and After (as above), 5X actual size
That blob on the left is actually a star. The elongation of the After star is due mainly to tracking error on a breezy night. Doing steps 1 and 2 led to much better stars across the entire image.
HELPFUL HINTS for Indoor Collimation:
Put your scope on a controllable mount. Every alignment adjustment will shift the star's position, and it's much easier to reacquire the "star" if you can use the mount's hand control.

Disable Tracking. The "star" isn't moving like a real star, so your scope shouldn't be trying to track it. Some mounts may allow you to turn off tracking, but my CGEM doesn't have that capability. However, it does have hibernate mode. If you have a CGEM, point your scope at the "star," activate hibernation, and leave the power on. Your hand control's RA and Dec motion buttons will still operate. 

You may have to use extension tubes. Start with the largest diagonal you've got, and then add extensions as needed. Remember, for steps 1 and 2 you don't need to reach focus, you just have to get the defocused star to fit into the field of view.

Sunday, April 12, 2015

Last Night Could Have Gone Better

Some nights are great. All the hardware works just like it's supposed to, the weather cooperates, and you end up with a fine image. Then there are nights like last night.

How it went:

Finder and C925 axes aligned using Venus. No problem.

Polaris was still visible through the leafless tree branches (it won't be in a couple of weeks) and I could use my polar scope to get me approximately aligned. Then I fired up PHD2 and that got me a much better alignment.

Now which to image first? Dwarf planet Orcus or dwarf galaxy Leo I? Fire up Sky Tools and figure it out. But wait, Orcus isn't in the list of Dwarf planets like it is on my desktop PC. Fix: Download the data. No: WiFi signal is too weak in the back yard. Bring Laptop inside, still won't connect. Seems it has forgotten the network password, as have I. Look up PW, get laptop on the Internet. Download dwarf planet observing list. Still no Orcus. Go through Supplemental data area for the update, still no luck.

Create a SkyTools synch backup from my desktop, which takes almost five minutes for some reason. Load the synch onto the laptop, and there's Orcus. Go back outside.

Decide that Leo I is first. Navigate to Regulus. Begin to refine focus. Whoa: Stars are way out of round and any sort of reasonable focus is impossible. Obviously the C925 needs collimation. Mine came with Bob's Knobs from its previous owner, so I tweak one of the knobs and hope for the best. This initially makes it much worse, but eventually I walk it back to as bad as it was.

I begin to wonder if this is a problem with the focal reducer. I remove that from the optical path and try focusing again. No improvement, and now I've got an even smaller field of view to work with.

More playing with Bob's Knobs to no avail. I discover that the secondary's lock ring is loose and that the secondary can be spun around. Really not good.

At this point it dawns on me that there won't be any imaging. In desperation I get Leo I composed and shoot a 300s light frame binned 2x2. All I get is an overexposed field full of really horrible looking stars. The sky is too bright?

Yes, it is. I shoot another frame unbinned and get a better background. But where the dwarf galaxy is supposed to be is only darkness, even after the usual stretching. The sky is simply too bright.

So Leo I is off because of collimation and sky brightness, and Orcus can be forgotten because of the poor alignment. Evening over.

Imaging can be fun, but not when one doesn't pay attention to details.

One other detail I let slide was on the satellite loop. During the late afternoon it was obvious that what looked like a wide layer of smoke was moving northward out of Iowa and Missouri. I've seen smoke obliterate the view at a dark site, and over the light dome of the city it lit up to make imaging difficult if not impossible. My backyard limiting magnitude is typically 4 to 4.5; last night I estimated it to be around 3.0.

Tonight I collimated my C925 using the Hubble artificial star light, a really slick little LED flashlight with a precisely drilled mask. I also read up on the process of collimation at Starizona. Interesting to me was what Starizona said about Bob's Knobs:

In our experience, the original screws on an SCT secondary mirror are much better to use for collimation purposes than the aftermarket thumbscrews that can be added.  Thumbscrews cannot be turned as precisely, making accurate alignment difficult.  Also, thumbscrews do not hold the mirror as tightly, increasing the need to collimate more often.  Thumbscrews also tend to make people "collimation happy," tending to collimate a scope far more often than necessary.  Under normal use, you should be able to go months without collimating a telescope.

I removed the Knobs, snugged the locking ring, and collimated just fine. I have nothing against the product, but I can definitely relate to the idea of them tempting someone into being "collimation happy." I think I achieved "collimation loony" last night.

The weather service AND the CSC says that tomorrow night will be gloriously clear here, so I'll try again.

Maybe things will go a little better?