Last time I mentioned that I was considering purchasing a DSLR for imaging and had narrowed the field of candidate models to a short list.
The winner is the Canon T2i. I was able to pick one up on eBay for $183. (Here's hoping that it arrives in good shape and performs as well as the seller says it will.)
Here's how the T2i compares with the other candidates:
The 40D (introduced in 2007) has a sturdier build valued by professionals but lacks the video capability of the T2i that can be used for solar system imaging. The 40D is considerably larger and is 10.3 oz. heavier than the T2i; after imaging with the ST-8300M+FW8 tandem I'll appreciate the difference in weight and bulk. The T2i's pixel size is much smaller (4.3 vs. 5.7 m) making it a better match for my AT65 and TV-102. It's reported that the T2i's sensitivity is 2 f-stops better than the 40D.
The XSi (2008) is one model more recent than my XTi and has a large number of owners doing astrophotograpy. I suspect this is because it was the first consumer-class Canon camera with LiveView and USB one-cable operation. The XSi lacks video, and the T2i is said to be 3 f-stops more sensitive.
The T3i (2011) has slighter less noise than the T2i (2010), but it lost the crop mode video capability that helps with solar system imaging. The T3i adds the tilt-out display that's useful when the camera is used without a laptop but this feature is of little value to me. It also costs more to purchase being a year newer.
The T2i has a better display screen for focusing than either of the earlier models.
Assuming that the purchased camera checks out okay I'll be sending it off to Gary Honis for his Baader modification.
Two Rivers Spring Star Party Update--- It begins in three days and the weather forecast for the party is terrible: Every night mostly cloudy with a 40-50% chance of rain. Ugh.
Monday, May 11, 2015

Thursday, May 7, 2015
A More Diverse Imaging Capability
It's been cloudy, or clear with a waxing moon. So I've been working on small projects and considering a purchase.
The parallelogram binocular holder
is coming along. This week completed all the work needed to completely assemble it. Amazingly it actually worked, providing the 11x80 binoculars with smooth freedom of motion. This morning I stained the pieces and tonight (or whenever the rain ends) I'll give it a nice coat or two of spar polyurethane. No one is going to mistake it for the handiwork of a skilled wood worker, but it will work. And in the dark of night when it's used no one will notice the rough corners.
Remounting the Finder and Autoguider on my C925
The finder shoe on Celestron's C925 sits a little off-axis, making it more convenient to use. The small stock finder is so lightweight that the torque it produces is negligible. But the torque can become substantial when I configure the scope for imaging. For imaging I use a "Y" shaped mount that carries both a 9x50 finder and Orion MiniGuider. These throw the scope quite a bit off balance around the declination axis.
One solution would be to add a counterweight on the scope's opposite side, but it could be messy trying to figure out how much weight should go where.
A better solution was made possible by a dovetail bar installed on the scope by its previous owner. The bar extends from front to back and is made of stout ADM manufacture; it works great as a sort of handle for lifting the scope.
It was short work to drill a couple of holes in the bar, tap threads into them, and fasten a spare Vixen-style finder shoe I happened to have. This shoe has a flat base and fits perfectly onto the bar. Now the finder/guider tandem sits exactly opposite the scope's base and the torque should be gone.
Now the purchase: Adding Imaging Flexibility
I'm seriously considering adding a DSLR for imaging. This isn't intended as a replacement for my ST-8300M, which gives me the ability to do narrowband imaging from my back yard.
Perhaps this is a case of gear envy brought on by lousy weather. Maybe it's just me getting a little tired of having to shoot flat frames for every channel when I do LRGB. Maybe it's just an itch caused by some unexpected funds coming from the closing of my software business. In any event, I've been investigating used DSLRs.
Let's start with a price point of $600 maximum for a modded camera body. Preferred would something under $400. Under $300 would be great! And because I'm somewhat invested in Canon lenses, I'll consider only a Canon body.
Models being considered are the 40D, XSi, 50D, T1i, T2i and T3i. I've seen and handled the 40D; it's a nice camera, better built to resist the elements than the XSi is. The 50D is said to be a step up from the 40D; of the three Tn cameras the T2 stands out because of its crop mode video capability which makes it suitable for solar system imaging.
The parallelogram binocular holder
is coming along. This week completed all the work needed to completely assemble it. Amazingly it actually worked, providing the 11x80 binoculars with smooth freedom of motion. This morning I stained the pieces and tonight (or whenever the rain ends) I'll give it a nice coat or two of spar polyurethane. No one is going to mistake it for the handiwork of a skilled wood worker, but it will work. And in the dark of night when it's used no one will notice the rough corners.
Remounting the Finder and Autoguider on my C925
The finder shoe on Celestron's C925 sits a little off-axis, making it more convenient to use. The small stock finder is so lightweight that the torque it produces is negligible. But the torque can become substantial when I configure the scope for imaging. For imaging I use a "Y" shaped mount that carries both a 9x50 finder and Orion MiniGuider. These throw the scope quite a bit off balance around the declination axis.
One solution would be to add a counterweight on the scope's opposite side, but it could be messy trying to figure out how much weight should go where.
A better solution was made possible by a dovetail bar installed on the scope by its previous owner. The bar extends from front to back and is made of stout ADM manufacture; it works great as a sort of handle for lifting the scope.
It was short work to drill a couple of holes in the bar, tap threads into them, and fasten a spare Vixen-style finder shoe I happened to have. This shoe has a flat base and fits perfectly onto the bar. Now the finder/guider tandem sits exactly opposite the scope's base and the torque should be gone.
Now the purchase: Adding Imaging Flexibility
I'm seriously considering adding a DSLR for imaging. This isn't intended as a replacement for my ST-8300M, which gives me the ability to do narrowband imaging from my back yard.
Perhaps this is a case of gear envy brought on by lousy weather. Maybe it's just me getting a little tired of having to shoot flat frames for every channel when I do LRGB. Maybe it's just an itch caused by some unexpected funds coming from the closing of my software business. In any event, I've been investigating used DSLRs.
Let's start with a price point of $600 maximum for a modded camera body. Preferred would something under $400. Under $300 would be great! And because I'm somewhat invested in Canon lenses, I'll consider only a Canon body.
Models being considered are the 40D, XSi, 50D, T1i, T2i and T3i. I've seen and handled the 40D; it's a nice camera, better built to resist the elements than the XSi is. The 50D is said to be a step up from the 40D; of the three Tn cameras the T2 stands out because of its crop mode video capability which makes it suitable for solar system imaging.
Sunday, April 19, 2015
Two Rivers Spring Star Party: Image Planning
Sometimes planning seems like an exercise in futility, but it can be helpful when preparing to image far from home.
My first 2015 star party trip is to the Two Rivers Spring Star Party at the May new moon. This is located a little north of Barry, IL on a private farm. There's no power except for recharging batteries, so I'll be running from my big batteries all three nights.
What's to image? There's a cluster of five ALBN objects to go after. Fitting neatly into a 135mm field are LBNs 8, 10, 11, 19, and 1122. All are emission nebulae. 1122 is a brightness four, 11 a five, and the rest sixes. This is an all-night group, complete with a meridian flip around 2 A.M. if the four hours from 10 to 2 aren't adequate. This should make a nice LRGB image!
Assuming there's a second clear night, I'll go after something not possible from Minnesota. LBN 1091 transits at 12:49 at an
altitude of almost 16 degrees. This has an LBN brightness of 6, so it's
going to be difficult if not impossible.
The rest of the ALBN objects I have to do are better imaged later in the summer. If there's a third night of clear sky I'll do a pretty picture. Maybe an LRGB of the Antares area at 135mm. What're the chances of that?
My first 2015 star party trip is to the Two Rivers Spring Star Party at the May new moon. This is located a little north of Barry, IL on a private farm. There's no power except for recharging batteries, so I'll be running from my big batteries all three nights.
What's to image? There's a cluster of five ALBN objects to go after. Fitting neatly into a 135mm field are LBNs 8, 10, 11, 19, and 1122. All are emission nebulae. 1122 is a brightness four, 11 a five, and the rest sixes. This is an all-night group, complete with a meridian flip around 2 A.M. if the four hours from 10 to 2 aren't adequate. This should make a nice LRGB image!
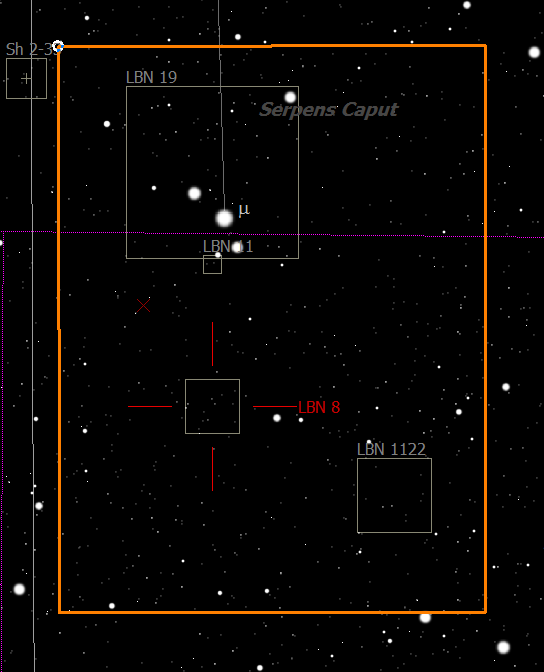 |
| LBN 10 is located at the red "X" NE of LBN 8and is about the same size as LBN 1122 |
The rest of the ALBN objects I have to do are better imaged later in the summer. If there's a third night of clear sky I'll do a pretty picture. Maybe an LRGB of the Antares area at 135mm. What're the chances of that?
Thursday, April 16, 2015
M51
I changed my imaging plans (as I often do) and imaged M5 instead of M82. I'd have more time on target that way. As it ended up, I had 105m unbinned L, and 40m binned 2x2 of R, G, and B. These were about the longest I wanted to go with the C925 operating at f/10.
I'm still having issues with the image--the sensor plane is not perpendicular to the optical axis. Possibly this happened at the coupling, or potentially much worse is an issue with the secondary mirror. Coma-like stars aside the big issue was the sky brightness. Once again the limiting magnitude was awful, something like 3.5.

Another ongoing issue is the poor showing of blue and the color balance in general.(Note the pink star at left and the blue-green one to the right.) I'm going to be a bit of a purist and suggest that many imagers oversaturate M51 to make the arms a vibrant blue. Something between what they do and what you see above would be more to my taste.
This weekend I hope to return to ALBN imaging, but as the day has progressed the weather forecast has deteriorated. If it clouds out I'll have a chance to clean my optics and work on my binocular holder. Almost time to send in my registration for the Two Rivers Spring Star Party!
I'm still having issues with the image--the sensor plane is not perpendicular to the optical axis. Possibly this happened at the coupling, or potentially much worse is an issue with the secondary mirror. Coma-like stars aside the big issue was the sky brightness. Once again the limiting magnitude was awful, something like 3.5.
Another ongoing issue is the poor showing of blue and the color balance in general.(Note the pink star at left and the blue-green one to the right.) I'm going to be a bit of a purist and suggest that many imagers oversaturate M51 to make the arms a vibrant blue. Something between what they do and what you see above would be more to my taste.
This weekend I hope to return to ALBN imaging, but as the day has progressed the weather forecast has deteriorated. If it clouds out I'll have a chance to clean my optics and work on my binocular holder. Almost time to send in my registration for the Two Rivers Spring Star Party!
Sunday, April 12, 2015
Last Night Could Have Gone Better
Some nights are great. All the hardware works just like it's supposed to, the weather cooperates, and you end up with a fine image. Then there are nights like last night.
How it went:
Finder and C925 axes aligned using Venus. No problem.
Polaris was still visible through the leafless tree branches (it won't be in a couple of weeks) and I could use my polar scope to get me approximately aligned. Then I fired up PHD2 and that got me a much better alignment.
Now which to image first? Dwarf planet Orcus or dwarf galaxy Leo I? Fire up Sky Tools and figure it out. But wait, Orcus isn't in the list of Dwarf planets like it is on my desktop PC. Fix: Download the data. No: WiFi signal is too weak in the back yard. Bring Laptop inside, still won't connect. Seems it has forgotten the network password, as have I. Look up PW, get laptop on the Internet. Download dwarf planet observing list. Still no Orcus. Go through Supplemental data area for the update, still no luck.
Create a SkyTools synch backup from my desktop, which takes almost five minutes for some reason. Load the synch onto the laptop, and there's Orcus. Go back outside.
Decide that Leo I is first. Navigate to Regulus. Begin to refine focus. Whoa: Stars are way out of round and any sort of reasonable focus is impossible. Obviously the C925 needs collimation. Mine came with Bob's Knobs from its previous owner, so I tweak one of the knobs and hope for the best. This initially makes it much worse, but eventually I walk it back to as bad as it was.
I begin to wonder if this is a problem with the focal reducer. I remove that from the optical path and try focusing again. No improvement, and now I've got an even smaller field of view to work with.
More playing with Bob's Knobs to no avail. I discover that the secondary's lock ring is loose and that the secondary can be spun around. Really not good.
At this point it dawns on me that there won't be any imaging. In desperation I get Leo I composed and shoot a 300s light frame binned 2x2. All I get is an overexposed field full of really horrible looking stars. The sky is too bright?
Yes, it is. I shoot another frame unbinned and get a better background. But where the dwarf galaxy is supposed to be is only darkness, even after the usual stretching. The sky is simply too bright.
So Leo I is off because of collimation and sky brightness, and Orcus can be forgotten because of the poor alignment. Evening over.
Imaging can be fun, but not when one doesn't pay attention to details.
One other detail I let slide was on the satellite loop. During the late afternoon it was obvious that what looked like a wide layer of smoke was moving northward out of Iowa and Missouri. I've seen smoke obliterate the view at a dark site, and over the light dome of the city it lit up to make imaging difficult if not impossible. My backyard limiting magnitude is typically 4 to 4.5; last night I estimated it to be around 3.0.
Tonight I collimated my C925 using the Hubble artificial star light, a really slick little LED flashlight with a precisely drilled mask. I also read up on the process of collimation at Starizona. Interesting to me was what Starizona said about Bob's Knobs:
How it went:
Finder and C925 axes aligned using Venus. No problem.
Polaris was still visible through the leafless tree branches (it won't be in a couple of weeks) and I could use my polar scope to get me approximately aligned. Then I fired up PHD2 and that got me a much better alignment.
Now which to image first? Dwarf planet Orcus or dwarf galaxy Leo I? Fire up Sky Tools and figure it out. But wait, Orcus isn't in the list of Dwarf planets like it is on my desktop PC. Fix: Download the data. No: WiFi signal is too weak in the back yard. Bring Laptop inside, still won't connect. Seems it has forgotten the network password, as have I. Look up PW, get laptop on the Internet. Download dwarf planet observing list. Still no Orcus. Go through Supplemental data area for the update, still no luck.
Create a SkyTools synch backup from my desktop, which takes almost five minutes for some reason. Load the synch onto the laptop, and there's Orcus. Go back outside.
Decide that Leo I is first. Navigate to Regulus. Begin to refine focus. Whoa: Stars are way out of round and any sort of reasonable focus is impossible. Obviously the C925 needs collimation. Mine came with Bob's Knobs from its previous owner, so I tweak one of the knobs and hope for the best. This initially makes it much worse, but eventually I walk it back to as bad as it was.
I begin to wonder if this is a problem with the focal reducer. I remove that from the optical path and try focusing again. No improvement, and now I've got an even smaller field of view to work with.
More playing with Bob's Knobs to no avail. I discover that the secondary's lock ring is loose and that the secondary can be spun around. Really not good.
At this point it dawns on me that there won't be any imaging. In desperation I get Leo I composed and shoot a 300s light frame binned 2x2. All I get is an overexposed field full of really horrible looking stars. The sky is too bright?
Yes, it is. I shoot another frame unbinned and get a better background. But where the dwarf galaxy is supposed to be is only darkness, even after the usual stretching. The sky is simply too bright.
So Leo I is off because of collimation and sky brightness, and Orcus can be forgotten because of the poor alignment. Evening over.
Imaging can be fun, but not when one doesn't pay attention to details.
One other detail I let slide was on the satellite loop. During the late afternoon it was obvious that what looked like a wide layer of smoke was moving northward out of Iowa and Missouri. I've seen smoke obliterate the view at a dark site, and over the light dome of the city it lit up to make imaging difficult if not impossible. My backyard limiting magnitude is typically 4 to 4.5; last night I estimated it to be around 3.0.
Tonight I collimated my C925 using the Hubble artificial star light, a really slick little LED flashlight with a precisely drilled mask. I also read up on the process of collimation at Starizona. Interesting to me was what Starizona said about Bob's Knobs:
In our experience, the original screws on an SCT secondary mirror
are much better to use for collimation purposes than the aftermarket thumbscrews
that can be added. Thumbscrews cannot be turned as precisely, making
accurate alignment difficult. Also, thumbscrews do not hold the mirror as
tightly, increasing the need to collimate more often. Thumbscrews also
tend to make people "collimation happy," tending to collimate a scope far more often
than necessary. Under normal use, you should be able to go months without
collimating a telescope.
I removed the Knobs, snugged the locking ring, and collimated just fine. I have nothing against the product, but I can definitely relate to the idea of them tempting someone into being "collimation happy." I think I achieved "collimation loony" last night.
The weather service AND the CSC says that tomorrow night will be gloriously clear here, so I'll try again.
Maybe things will go a little better?
Saturday, April 11, 2015
Leo I First Attempt; LBN 1089?
Last night was clear and I tried imaging LBN 1089 and 1090 from the club's dark sky site Cherry Grove. It did not go well.
LBN 1089 rises to an elevation of only about 16 degrees; LBN 1090 maxes out at 13 degrees. There's simply too much extinction and horizon glow for it to show up. A total luminance exposure of 21 x 5 m at f/4 produced not a hint of nebulosity.
This shouldn't be surprising, I suppose. Dan Crowson created this image of 1089 and had this to say about it:
Lynds Bright Nebula 1089 is a very faint cloud of dust located in southern constellation Antlia. This object at -29 declination only reaches about 20 degrees in altitude from my imaging location. Lynds’ gives this one a 5 out of 6 on the brightness scale (with 6 being the dimmest). This is by far the faintest object I’ve tried to image so far. I had to stretch the data more than normal to get this result. This is another one of the ‘bright nebula’ that are found on the Astronomy League’s Bright Nebula Program. I could not find any other images of this one.
I've added the emphasis. When Crowson says something is very dim, it's dim. In fact if you look at the image the nebula looks more like an integrated flux nebula than any sort of "bright" nebula. Yet it's on the ALBN and supposedly can be visually observed.
I think an open question is why this nebula is on the ALBN list. The same issue applies to many of the other nebulae with Lynds brightness 5 or 6.
The magnetic finder worked great. There could be a little more friction between the base of the magnet and the steel plate, or possible some sort of detent to keep the finder from moving when turning it on and off.
At the end of the evening I tried imaging dwarf galaxy Leo I. It's brighter than I thought-- it was distinct on individual 5m, f/4 light frames. Tonight I'll try it again with my C925. It should look a lot better at a focal length of 1480mm than it did at 135mm!
Also on tonight's agenda is dwarf planet Orcus. Currently at magnitude 19.1 it's quite faint but should be in reach if my experience with MakeMake is repeated. In that image I could see down to 19.4.
LBN 1089 rises to an elevation of only about 16 degrees; LBN 1090 maxes out at 13 degrees. There's simply too much extinction and horizon glow for it to show up. A total luminance exposure of 21 x 5 m at f/4 produced not a hint of nebulosity.
This shouldn't be surprising, I suppose. Dan Crowson created this image of 1089 and had this to say about it:
Lynds Bright Nebula 1089 is a very faint cloud of dust located in southern constellation Antlia. This object at -29 declination only reaches about 20 degrees in altitude from my imaging location. Lynds’ gives this one a 5 out of 6 on the brightness scale (with 6 being the dimmest). This is by far the faintest object I’ve tried to image so far. I had to stretch the data more than normal to get this result. This is another one of the ‘bright nebula’ that are found on the Astronomy League’s Bright Nebula Program. I could not find any other images of this one.
I've added the emphasis. When Crowson says something is very dim, it's dim. In fact if you look at the image the nebula looks more like an integrated flux nebula than any sort of "bright" nebula. Yet it's on the ALBN and supposedly can be visually observed.
I think an open question is why this nebula is on the ALBN list. The same issue applies to many of the other nebulae with Lynds brightness 5 or 6.
The magnetic finder worked great. There could be a little more friction between the base of the magnet and the steel plate, or possible some sort of detent to keep the finder from moving when turning it on and off.
At the end of the evening I tried imaging dwarf galaxy Leo I. It's brighter than I thought-- it was distinct on individual 5m, f/4 light frames. Tonight I'll try it again with my C925. It should look a lot better at a focal length of 1480mm than it did at 135mm!
 |
| Leo I at 135mm FL (5x5m at f/4) |
 |
| As above from SkyTools3 |
Also on tonight's agenda is dwarf planet Orcus. Currently at magnitude 19.1 it's quite faint but should be in reach if my experience with MakeMake is repeated. In that image I could see down to 19.4.
Thursday, April 9, 2015
A DIY Finder for Wide-Field Imaging
Aiming a CCD when imaging through a lens: Not so easy.
Here's what the ST-8300 looks like when sporting a lens:
After a few nights out with 135mm and 200mm lenses it became apparent that a fair amount of time could be spent getting a target into the field of view. I thought it would be easy, but it's nothing like using a well-aligned finder scope. Perhaps with practice I can learn to sight along an edge on the mount but I plan on using the lenses so infrequently I'm almost sure to lose that skill between sessions.
To get an idea of how small a 200 mm field is, take a look at this:
Now imagine aiming a sightless camera at this.
A finder that addresses this problem should:
The nice thing about this particular finder is that the bottom of the stalk is perfectly flat. It comes with a shoe that's essentially useless for this project.
It would be nice to have some sort of quick-release attachment. Because of the way my ST-8300 is mounted the filter wheel (FW) presents a clean edge on which to mount a finder:
My first thought was to use magnetic coupling but the filter wheel case is aluminum. If I could attach some steel to the FW and then use strong magnets on the stalk to hold it to the steel I'd be in business.That way after the target is composed I can remove the finder and its magnetic influence. (I don't know if a magnet can affect the FW operation, but why take a chance?)
The finder stalk glued to a bar magnet:

A small strip of steel glued to the top of the FW. It's sized to not span the seam of the FW.
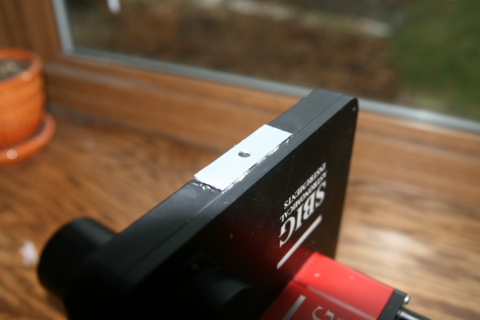
For the adhesive I prefer to use something that can eventually be removed without damaging the FW's finish. Beacon 3-in-1 Advanced Craft Glue works well
Here's the finished finder + CCD.

This can aim in any direction and the finder stays in place.
I should mention that an earlier prototype didn't work. Instead of a steel plate I used two washers, and the magnetic hold was too weak. Also be aware that some magnets have their strongest attraction on one face. The big bar magnet I used here is overkill; smaller yet stronger rare earth magnets would be preferable, but I used what was on hand. If I encounter any slippage I'll probably replace the bar with stronger magnets.
Odd but true. In 1979 I viewed a total solar eclipse from a point north of Williston, ND. If I live to be 91 (plus 22 days) I would be able to return to the same exact spot and see another total solar eclipse. Although a point further south will have a longer duration, so I'll have some decisions to make if I live that long!
Here's what the ST-8300 looks like when sporting a lens:
 |
| ST-8300 + filter wheel + 200mm lens |
 |
| ST-8300 + filter wheeel, rear view. Note the lack of any useful sighting lines. |
To get an idea of how small a 200 mm field is, take a look at this:
 |
| 200mm field of view with ST-8300 |
A finder that addresses this problem should:
- Have a large field
- Not be permanently attached to the camera; it won't be needed when imaging with longer focal length telescopes
- Not require permanent modifications to the camera or filter wheel
- Be secure regardless of the orientation of the CCD
- Not interfere with the operation of the CCD
 |
| Generic Red-Dot Finder |
It would be nice to have some sort of quick-release attachment. Because of the way my ST-8300 is mounted the filter wheel (FW) presents a clean edge on which to mount a finder:
 |
| Top edge of filter wheel |
My first thought was to use magnetic coupling but the filter wheel case is aluminum. If I could attach some steel to the FW and then use strong magnets on the stalk to hold it to the steel I'd be in business.That way after the target is composed I can remove the finder and its magnetic influence. (I don't know if a magnet can affect the FW operation, but why take a chance?)
The finder stalk glued to a bar magnet:
A small strip of steel glued to the top of the FW. It's sized to not span the seam of the FW.
For the adhesive I prefer to use something that can eventually be removed without damaging the FW's finish. Beacon 3-in-1 Advanced Craft Glue works well
 |
| Beacon 3-in-1 Advanced Craft Glue |
This can aim in any direction and the finder stays in place.
I should mention that an earlier prototype didn't work. Instead of a steel plate I used two washers, and the magnetic hold was too weak. Also be aware that some magnets have their strongest attraction on one face. The big bar magnet I used here is overkill; smaller yet stronger rare earth magnets would be preferable, but I used what was on hand. If I encounter any slippage I'll probably replace the bar with stronger magnets.
Odd but true. In 1979 I viewed a total solar eclipse from a point north of Williston, ND. If I live to be 91 (plus 22 days) I would be able to return to the same exact spot and see another total solar eclipse. Although a point further south will have a longer duration, so I'll have some decisions to make if I live that long!
Subscribe to:
Posts (Atom)