Showing posts with label DIY Finder. Show all posts

Saturday, April 11, 2015

Leo I First Attempt; LBN 1089?

Last night was clear and I tried imaging LBN 1089 and 1090 from the club's dark sky site Cherry Grove. It did not go well.

LBN 1089 rises to an elevation of only about 16 degrees; LBN 1090 maxes out at 13 degrees. There's simply too much extinction and horizon glow for it to show up. A total luminance exposure of 21 x 5 m at f/4 produced not a hint of nebulosity.

This shouldn't be surprising, I suppose. Dan Crowson created this image of 1089 and had this to say about it:

Lynds Bright Nebula 1089 is a very faint cloud of dust located in southern constellation Antlia. This object at -29 declination only reaches about 20 degrees in altitude from my imaging location. Lynds’ gives this one a 5 out of 6 on the brightness scale (with 6 being the dimmest). This is by far the faintest object I’ve tried to image so far. I had to stretch the data more than normal to get this result. This is another one of the ‘bright nebula’ that are found on the Astronomy League’s Bright Nebula Program. I could not find any other images of this one.
 

I've added the emphasis. When Crowson says something is very dim, it's dim. In fact if you look at the image the nebula looks more like an integrated flux nebula than any sort of "bright" nebula. Yet it's on the ALBN and supposedly can be visually observed.

I think an open question is why this nebula is on the ALBN list. The same issue applies to many of the other nebulae with Lynds brightness 5 or 6.


The magnetic finder worked great. There could be a little more friction between the base of the magnet and the steel plate, or possible some sort of detent to keep the finder from moving when turning it on and off.


At the end of the evening I tried imaging dwarf galaxy Leo I. It's brighter than I thought-- it was distinct on individual 5m, f/4 light frames. Tonight I'll try it again with my C925. It should look a lot better at a focal length of 1480mm than it did at 135mm!

Leo I at 135mm FL (5x5m at f/4)

As above from SkyTools3

Also on tonight's agenda is dwarf planet Orcus. Currently at magnitude 19.1 it's quite faint but should be in reach if my experience with MakeMake is repeated. In  that image I could see down to 19.4.


Thursday, April 9, 2015

A DIY Finder for Wide-Field Imaging

Aiming a CCD when imaging through a lens: Not so easy.

Here's what the ST-8300 looks like when sporting a lens:

ST-8300 + filter wheel + 200mm lens
ST-8300 + filter wheeel, rear view. Note the lack of any useful sighting lines.
After a few nights out with 135mm and 200mm lenses it became apparent that a fair amount of time could be spent getting a target into the field of view. I thought it would be easy, but it's nothing like using a well-aligned finder scope. Perhaps with practice I can learn to sight along an edge on the mount but I plan on using the lenses so infrequently I'm almost sure to lose that skill between sessions.

To get an idea of how small a 200 mm field is, take a look at this:

200mm field of view with ST-8300
Now imagine aiming a sightless camera at this.

A finder that addresses this problem should: 
  1. Have a large field
  2. Not be permanently attached to the camera; it won't be needed when imaging with longer focal length telescopes
  3. Not require permanent modifications to the camera or filter wheel
  4. Be secure regardless of the orientation of the CCD
  5. Not interfere with the operation of the CCD
This suggests a 1X finder of some sort. A sighting tube or aligning posts would be fine, but I prefer a red dot finder for when it's really dark. Generic red dot finders are lightweight and inexpensive. I bought this one from Telescope Warehouse on eBay for $16 (including shipping):

Generic Red-Dot Finder
The nice thing about this particular finder is that the bottom of the stalk is perfectly flat. It comes with a shoe that's essentially useless for this project.

It would be nice to have some sort of quick-release attachment. Because of the way my ST-8300 is mounted the filter wheel (FW) presents a clean edge on which to mount a finder:

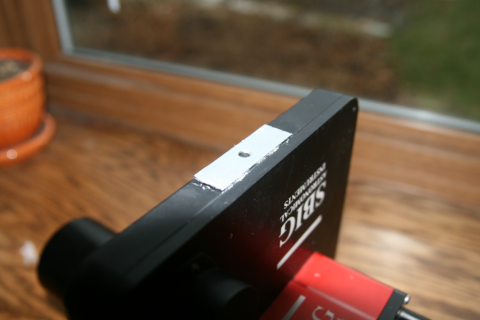
Top edge of filter wheel


My first thought was to use magnetic coupling but the filter wheel case is aluminum. If I could attach some steel to the FW and then use strong magnets on the stalk to hold it to the steel I'd be in business.That way after the target is composed I can remove the finder and its magnetic influence. (I don't know if a magnet can affect the FW operation, but why take a chance?)

The finder stalk glued to a bar magnet:


 A small strip of steel glued to the top of the FW. It's sized to not span the seam of the FW.


For the adhesive I prefer to use something that can eventually be removed without damaging the FW's finish. Beacon 3-in-1 Advanced Craft Glue works well

Beacon 3-in-1 Advanced Craft Glue
Here's the finished finder + CCD.


This can aim in any direction and the finder stays in place.

I should mention that an earlier prototype didn't work. Instead of a steel plate I used two washers, and the magnetic hold was too weak. Also be aware that some magnets have their strongest attraction on one face. The big bar magnet I used here is overkill; smaller yet stronger rare earth magnets would be preferable, but I used what was on hand. If I encounter any slippage I'll probably replace the bar with stronger magnets.


Odd but true. In 1979 I viewed a total solar eclipse from a point north of Williston, ND. If I live to be 91 (plus 22 days) I would be able to return to the same exact spot and see another total solar eclipse. Although a point further south will have a longer duration, so I'll have some decisions to make if I live that long!