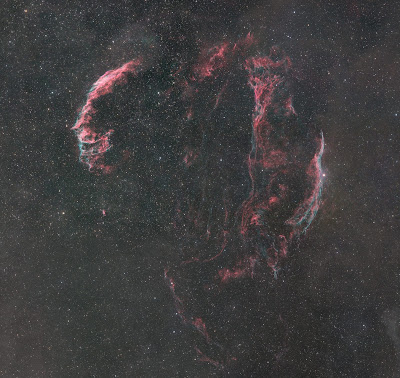
I finally had enough data to make a very flawed Veil mosaic. Here it is at 1/5 scale:
 |
| Click for 1/5 scale image |
And here is the link to download the full-scale image. You can use the cloud site's .jpg to look at it, but I suggest you use your own image viewer. Minor advisory, this is a large image, about 10K by 10K pixels and the file size is 12.5Mb.
You should immediately see some interesting things in the full image, some of which I'll detail here. I'll start with the major flaws (all the images below are at full scale if you click on them).
1) What's the big circular thing?
 |
| Bad Flat! |
This is in the upper left mosaic panel, and results from improper calibration (using an outdated flat, rookie mistake.)
2) What's all that noise?
 |
| So Noisy! |
3) What's with all the black pixels?
 |
| Pepper Spray |
This is found in the upper and middle left panel; it results from pushing the panel a little too aggressively in one post-processing stage.
4) That green thing can't possibly be right!
 |
| Streaks to Left of Center: Not Really Green! |
So far as I know there aren't any green nebulae. For reasons I don't understand this feature shows up rather strongly in the green channel compared to the red and blue channels; it's quite strong in luminance. I've seen one other LRGB image of this area, and it didn't have these green bits, so I must conclude something in my processing is at fault here.
 |
| The Dastardly 52 Cygni |
There was one other flaw I had to skate around. I used the script Star Reduction from Blanshan and Cranfield to perform star reduction. It requires a starless image; this can be made either using StarXTerminator (aka SXT) or StarNet2. I used SXT, and it had a lot of difficulty with Magnitude 4.2 52 Cygni (see above image). It essentially suppressed the northern end of NGC 6960! So I switched over to StarNet2 and it handled things fine.
Notice that StarNet2 didn't handle it 100% cleanly either, giving it what look like (but aren't) diffraction spikes. Looks kind of cool, I think, but then I grew up as a Newt user.
Now for some positives:
1) No seams. I used Photometric Mosaic, and not only didn't it produce seams, but it avoided the pinched stars that GradientMergeMosaic plagues me with.
2) Color calibration by SpectrophotometricColorCalibration (SPCC). I can't say enough positive about SPCC. My old workflow made color correction very fiddly, with the result depending on how I felt the day of processing more than any sort of objective measure.
3) Not narrowband. For good reason the Veil is usually imaged in narrowband, but that results in false colors. It's nice to see things more as they "really" are (aside from a Green nebula).
4) Not oversaturated. In my opinion oversaturation is very common now. I've said before that a guiding principle of processing should be that less is more; this idea applies to sharpening, stretching, and also color enhancement. I did bump this a half step using ColorSaturation, but pushing it further seemed like too much of a good thing.
5) Reasonably sharp. Here's a neat feature at the south end of of the East Veil. This looks good thanks mainly to BlurXTerminator (BXT). In fact, aside from the one issue seen in SXT, I think the triad of BXT, SXT, and NoiseXTerminator (NXT) is difficult to beat.
 |
| An Optical Spiral That's Probably Not a Real Spiral |
I suspect this curly-thing at center is nothing more than an undulation in a plane seen edgeways, but it does look fun.
So, with those issues listed above this thing obviously isn't done yet. The other night I shot additional light frames for the two panels that suffered from noise (along with same-night flat frames), and I think I can make sure that pepper spray of black pixels can be avoided.
This means doing much the processing over again, but that's life.
No comments:
Post a Comment