Monday, September 28, 2015

Moonlight Imaging (broadband version)

Two months ago I wrote about how one could narrowband image under moonlight. Actually, you don't have to use narrowband filters to image with a full moon in the sky. But you do need to choose your targets with a thought to where the moon is. And it helps to have a haze-free sky that's otherwise fairly dark--yellow zone at least.

Here was the situation the night of the 26th: One night before the "supermoon" total lunar eclipse. The moon's magnitude was a brilliant -12.6 and at meridian crossing reached an altitude of about
42 degrees here in Minneapolis:

The Moon on the night of 9/26/15 at meridian crossing
This shows the part of the sky with an altitude of over 30 degrees. It's not going to be good imaging in Pegasus, but going further north things get better. Polaris is about 48 degrees from the moon, and if we can find something between that and the northern horizon it might be worth a shot.

So I chose objects that were on the northern side of the zenith well away from the moon and close enough to the celestial pole that they'd be available all night. And I imaged from a darker site than my backyard in the inner red zone. Here's how it turned out:
NGC 2276 (Arp 25) and NGC 2300 (Arp 114)

NGC 0040
Not too bad, really. I imaged at f/10 because these are small targets and partly in the hopes it would help contrast. The galaxies were imaged in the time before midnight and the planetary after followed by dark frames. As it ended up I was out there until after 4 A.M., but a clear night is not exactly a common event this year and I wanted to take full advantage of it.

Note that exposure times were kept short because of the moonlight. Unbinned luminance frames were only 180s and 2x2 binned RGB frames were a brief 90 seconds. As it was I got about two hour total exposure time for each image.

After three hours of sleep I went home the next day, to bed at 7 P.M. and slept right through the lunar eclipse. Imaging has a  price!

Wednesday, September 16, 2015

When To Go Off-List

It's possible to get caught up in an observing list and work on it to the exclusion of everything else. That's pretty much what I did while working on the Bright Nebula list, particularly when I got to the point of having a dozen or so items to go. Everything was dedicated to completing the list to the point that it dictated what gear would be used at star parties and how my time would be spent.

Perhaps a saner approach is to slow down and mix in non-list items for imaging along the way. That's what I did the other night, and it worked out well.

Lately I've been traveling to a friend's home north of the Twin Cities and we've been observing and imaging together. His sky (suburban-rural transition) is much darker than mine (inner red zone urban) and his gear is definitely better than mine and mounted in an observatory. I set up just as if I'm at a star party, polar align, and get to imaging. Then I'm free to help him while he works on reacquainting himself with the process of imaging--he's been inactive for several years--or hunts down deep sky objects with his 16" go-to Dob. It's the best of both worlds for me to have the benefit of his sky and telescope.

And just as at any star party, it's nice to have someone else around to talk to.

Plus at 4 A.M., I have a nice soft sofa to crash on instead of a tent!

Last Sunday was my latest trip to his place for imaging, and we succeeded in getting his imaging system working for the most part. His autoguiding wasn't working, but he's implemented a fix for next time based on what I use.

I had no specific plans for the evening other than imaging Arp galaxies for that Astronomical League list and maybe during the A.M. of switching to a planetary. My friend had his own list of favorites he was eager to observe using his big Dob and we looked at some of those. About the time I was wrapping up with my second Arp he mentioned NGC 891 and showed my his first light frame. In case you don't know 891, it's a large edge-on galaxy in Andromeda. It's cut in half by a dark dust lane dotted with bright knots and has a rather large and distinct nuclear bulge. In other words, it's pretty.

To some extent imaging is all about pretty, and after all the "bright nebula" imaging in monochrome I decided I wanted to make an image in color. My friend's suggestion of 891 is all I needed to drop my list plans for the rest of the evening and try to make something pretty. Here's the result:

NGC 891
(Details here at Astrobin.) Not a perfect image, but I'm happy with it, and glad I opted to give it a try instead of doing more list imaging!

The early imaging was mundane Luminance only. The target galaxies were so small that color was basically a waste of time. Here's what I mean:

NGC 7550 (Arp 99, Hickson 93)
NGC 7578 (Arp 170, Hickson 94; Note the plate solving error)

These two bring my Arp count up to 12 compared to my planetary at 13. I'll probably add a couple more monochrome Arps next time out to make the lists even in terms of percent completed and then go off-list again!

Sunday, September 13, 2015

Celestron Field Flattener Follow-Up

This is a follow-up of a previous post.

I was able to image the other night with the short nosepiece. Recall that my goal was to get the system to match the presumed optimal f/6.3. It was f/6.0 with a long nosepiece/adapter in place, and by switching to a simpler nosepiece it allowed me to trim about 8mm off the FR/CCD separation. While the image is not very good, it's good enough to allow astrometry.net to plate solve it and calculate the pixel scale.

Here's the image:

NGC 7625 (small galaxy at center)
This was based on 30 minutes total exposure for each RGB channel, under near-urban sky. It could be a lot better, but sometimes one must take what the sky and gear gives.

The pixel scale is reported to be 1.51 arcseconds per pixel. This is really close to the value of 1.50 that corresponds to a focal ratio of 6.3--the error is only about 2/3 of one percent.

Monday, August 31, 2015

Forest Fires, Smoke, and Transparency

Forest fires are raging in the northwestern U.S. and western Canada, taking lives and resulting in the destruction of property. There are a lot of fires:

Active fires on 8/31/15. Map from http://activefiremaps.fs.fed.us/

The effects are not limited to the areas of burning. Smoke is being carried hundreds of miles eastward, leading to occasional serious decreases in air quality that can affect those with respiratory illness.

Another far less serious effect is the greatly diminished transparency of the sky. During the day the sky is a yellow-brown veil and at night dimmer stars are extinguished and the moon starts to look like it's in eclipse:

The full moon at an altitude of 34 degrees. It should be colorless, not yellow!
Most observing and imaging activities are put on hold until either the fires end or the winds shift. This degree of transparency loss has happened before, earlier this year and once last year. Prior to that I think one must go back about seven years or so to see a similar event.


Thursday, August 27, 2015

Using the Celestron Field Flattener with an SBIG ST-8300M and FW8-8300

I purchased a used Celestron 9.25" XLT SCT intending to use it primarily for planetary imaging at f/10 or greater. There was no need for a focal reducer/flattener. I did purchase a used Celestron 94175 f/6.3 flattener/reducer so I could, if I wanted to, image deep sky objects. As it turns out, deep sky objects have been the C925's main use.

Reducer/Flatteners like the Celestron 94175 work best when at a specific distance from the sensor. Can this distance be known? Let's use the calculator at  Wilmslow Astro and find out.

For a standard f/10 SCT, the separation to give f/6.3 (where we presume the field will be flattest) should be 105mm.

Two nights ago I imaged NGC 7008, the Fetus Nebula, using my CCD and the focal reducer. The stars were nice and round all the way to the edge:

NGC 7008 (click to enlarge)
Astrometry.net reported that the image scale was 1.58" per pixel, which translates to f/6.0. According to the above calculator this should happen at a reducer/CCD separation of 113mm**. 

If the reducer is flattest at f/6.3 I need to decrease the separation from 113mm to 105mm, or by about 8mm.

Happily, I can do that. The nosepiece I was using was a 2" focuser-to-TeleVue IS adapter + IS to T-ring adapter. I also have a nosepiece that's just 2" focuser to T-ring, and amazingly it will let the CCD get about 8mm closer. Just about perfect!***

The next night I'm out I'll try this configuration and see if it gets the focal ratio correct and also produces round stars.

* This suggests that the performance of the reducer is rather insensitive to the separation. Here I'm 8mm off and the stars look good. This has limits, though. In a previous image a 12.7mm spacer was included and the stars at the corners were plainly distorted. That image had an image scale of 1.65" per pixel, which corresponds to a focal ratio of  f/5.75. The calculator says this happens at a separation of about 123mm. I measured the separation as about 125mm. That image suggests the separation reduction should be 20mm, which is roughly the same as 12.7 + 7.3 (the spacer plus the ~8 mm suggested by the other image).

** One thing that's usually left ambiguous in reducer explanations is the point on the reducer from which the CCD distance is measured. In the case of the system operating at f/6 I measured the CCD to be 125mm from the front of the reducer. which is the same thing as 114mm from the center and about 100mm from the rear thread base. Because the center position in only 1mm different from the formula's value of 113mm, and given the inexactness of my measurement, It's reasonable to conclude separation should be measured from the center of the reducer.

*** Is this an accident? The Antares 50mm long 2" focus tube on the back of the SCT makes this possible, but it predates the ST-8300 + filter wheel and couldn't be designed to work with their backfocus requirement. But it works out nicely, right?


What does this say about using a 0.5 focal reducer? The model I have is a SmartAstronomy 2", which is probably identical to the GSO 2". GSO says that the focal length is 106mm and the optimal separation is 53mm. The calculator puts it a bit larger at 56mm. Because this reducer screws into 2" nosepieces, the closest I can get it to my CCD is about 69mm (measuring from the center of the reducer). That puts it at about f/4. I'd guess that's too far from ideal to produce pleasing images, but it's worth a try. A Lumicon low profile nosepiece could trim 9mm off that, getting it close: f/4.7. Trying that will cost about $35.

Monday, August 24, 2015

What's Correctable in this Image?

How do you assess an image's quality? Here are some factors I use to evaluate my images:

Stars:
  • Are they round?
  • Are they focused?
  • Do they have pleasantly fuzzy edges?
  • Are they free of color fringing due to optics or processing?
  • Do they have color that's pleasing in both hue and saturation? 
Background:
  • Is it a neutral gray?
  • Is it as smooth as might be expected from the data?
  • Is it free from any substantial gradients?
Nebulosity:
  • Does it fade smoothly into the background?
  • Is it the right color (both hue and saturation)?
  • Has the data been processed correctly to reveal fainter portions?
 Defects:
  • Is the image free from dust shadows and other unwanted diffraction effects?
  • Have "rogue" pixels been cleaned up?
  • Have the effects of vignetting been corrected?
  • Is the image flat?
Here's my latest image, and let's see how it measures up.

Planetary nebula Jones 1 in Pegasus
(cropped but full scale, 105 minutes of RGB at f/6.3, ST-8300M binned 2x2)

Focus is decent but the stars are not round, probably indicating a tracking issue. The stars are reasonably fuzzy and show some color--not a lot, but enough for my taste.

Background color and intensity is good. The histogram isn't clipped, and the nebulosity fades smoothly into the background. So far as I can tell by looking at other images the object's color is fairly captured, as is the amount of structure given the imaging system.

Software was used to reduce the effects of light pollution and vignetting.

There weren't many bad pixels to clean up in this cropped image thanks to fresh dark and bias frames. The full field was not at all flat in a way that suggests that the sensor to flattener distance was significantly off.

Add that all up and I conclude this is an acceptable image but nothing special. A big improvement would be  to improve the tracking. Adjusting the sensor spacing would reduce the need for cropping. And collecting more data would help--it almost always does.

Regarding the tracking, I'm beginning to wonder if the Orion MiniGuider is adequate for guiding a 1480mm imaging scope. Some experimentation is in order along with trying different spacers to correct the flatness issue.

Monday, August 17, 2015

Sloppy SCT Alignment and How to Correct It

Optical alignment is important, and particularly so when imaging. Stars are unforgiving when it comes to illustrating every little imperfection in your imaging system.

Sure, everyone knows that fast Newtonians need careful collimation. And most refractor users know that collimation is something that they almost never have to do. Then there's me...

I bought a used Celestron 9.25" SCT a while ago, and it was in perfect alignment at that time. It was easy for me to pretend it was much like a refractor and that the alignment would stay perfect. When it eventually went out of whack I started to tweak it as if I was working with my f/5 Dob. The fact that it came with Bob's Knobs encouraged me to do my tweaking in the field, leading to dreadful alignment. That was no fault of the knobs, I just didn't know what I was doing.

It took a couple of nights of dreadful images to convince me that I need to do a careful alignment of the scope. If you want to see a good explanation of how to go about this, look at Thierry Legault's instructions. He basically suggests a three step approach:

1. Course Alignment

This is the traditional centering of the secondary shadow within the defocused star. While this can be done by eye, I found it was useful to employ an imaging device to display the star. (An Orion StarShoot Autoguider works great for this.) Using this method lets you employ a nice program by Gilbert Grillot that overlays red concentric circles on whatever you're using for imaging.

2. Higher Magnification Alignment

Repeat the first step with higher magnification and using a dimmer star. You're once again centering the shadow. You'll use a shorter focal length eyepiece or a Barlow. I used a 4X Barlow with the SSAG.

3. Diffraction Ring Alignment

With the star focused you examine the diffraction rings. They should be concentric circles, and you have to carefully adjust the alignment until they are.

I did steps 1 and 2 indoors using the Hubble Optics Artificial Star. Step 3 required that I have the Hubble "star" a greater distance from the telescope than I could attain.

Here's the change in images:
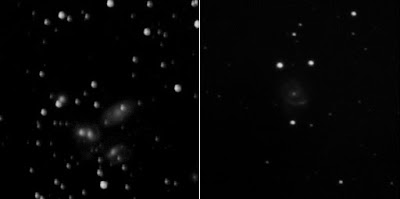
Before (L) and After (R) the two-step alignment (click to enlarge)
These are from different nights and are of different targets, but it's abundantly clear that the Before image is awful--and it's worth noting these images are unscaled crops from the center of the image. I won't show you the field edge stars of  the Before, they're that bad. Here are a couple of stars from the above crops to emphasize the improvement:
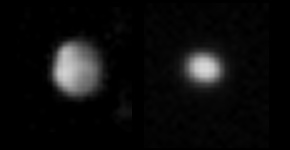
Before and After (as above), 5X actual size
That blob on the left is actually a star. The elongation of the After star is due mainly to tracking error on a breezy night. Doing steps 1 and 2 led to much better stars across the entire image.
HELPFUL HINTS for Indoor Collimation:
Put your scope on a controllable mount. Every alignment adjustment will shift the star's position, and it's much easier to reacquire the "star" if you can use the mount's hand control.

Disable Tracking. The "star" isn't moving like a real star, so your scope shouldn't be trying to track it. Some mounts may allow you to turn off tracking, but my CGEM doesn't have that capability. However, it does have hibernate mode. If you have a CGEM, point your scope at the "star," activate hibernation, and leave the power on. Your hand control's RA and Dec motion buttons will still operate. 

You may have to use extension tubes. Start with the largest diagonal you've got, and then add extensions as needed. Remember, for steps 1 and 2 you don't need to reach focus, you just have to get the defocused star to fit into the field of view.