Thursday, January 12, 2023

Winter Watchmaking

 Yes, it's been sincerely winter here since I last posted. Overnight temperatures have cruised down to -11F and there's been a lot of snow. Not Buffalo NY amounts by any means--total seasonal snowfall is now at 48.3 inches which is about twice normal, and the snow depth is 13 inches. Everything has a thin crust of ice on it, too.

This means it's been time for my winter hobby to get going. I've been out and about trying to learn about how to get the basic raw materials: watches (including bare movements) and tools. I'm also starting to ponder how to make this a long-term sort of thing. 

Last year I mainly focused on dismantling old pocket watches; This year I'm going to get a formal, if brief, education by taking a two-day class from a local professional watchmaker. I'm also going to try my hand at smaller movements. Toward that end I've purchased several HMT watches from Ebay. These have India-made movements, are typically 17 jewels, and can be had for about $10 refurbished and running. At that price there's not a lot of concern about fumblefingers wrecking it. Here's a picture of the first arrival

Yes, that's an image of Gandhi on the face. The hour and minute hands are luminous, but I'm not sure about the choice of a red second hand over a red watch face. Oh well, it's the movement that has my interest, and here it is


Fairly clean looking, but there is some discoloration on the spacer ring near the stem suggesting there might be some rust. That might account for the gritty feeling when the crown is pulled out or pushed in. On the plus side it seems to be keeping good time. I'll be able to quantify that once I put it on my timegrapher.

Like most modern wristwatches this has a screw-on back, and normally one would use a special tool to open it. It's often possible to use a rubber ball instead. One simply presses the ball against the back and turns it. Here's the one I use

It's not the famous Bergeon #8008 8-ball ($17 on Amazon or $9 on Esslinger, shipping extra). It's a dog play toy ($5 from Petco and probably other pet supply stores). It has a smooth, tacky surface and seems to work quite well. It's not inflatable so no need for a pump. And as an extra bonus it squeaks!

A footnote about saving money: shop Ebay, not Etsy. I paid $7.50 for the watch (before tax). An identical (save for a white face) model on Etsy is $37.96 before tax (shipping is free from both vendors). And the Etsy watch is a refurbish, too--the description is word-for-word identical with that on Ebay. Don't expect the Etsy version to arrive faster, either. It also ships from India and has the same protracted delivery time as it does on Ebay.

Next time, more about the Gandhi watch!

Sunday, December 11, 2022

One Last Image; Winter Hobby Time: Watchmaking Resumes

I did manage to collect RGB frames to go with the luminance I had for the California nebula. You may recall earlier this year I had a miscue with NINA and spent a night collecting only L frames. I had three targets in mind, M31, the California Nebula, and M42. Now two of those are completed; M42 will have to wait.

Here is a scale version as preview; you can see the full scale version at its AstroBin page.

I think it turned out very well! Over the winter I'll probably reprocess it to apply some deconvolution and masked sharpening.

One thing I was initially skeptical of concerning PixInsight was how well it would stretch images. Pre-PixInsight I used Photoshop for this by doing iterative applications of Curves and Levels. I appreciated the way Curves gave me fine control over the shape of the stretch and I was afraid PI would be too coarse.

What I've found is that PI's Histrogram transformation is really quite effective for stretching when used to mimic the iterative application of PS's Curves and Levels. It seems particularly good at avoiding harsh edges on nebulae. (Note that I don't start with the PI's STF, I begin iterating with the linear image. And I do use PI's CurveTransformation after the initial stretch.) 

Once I become more adept at masking in PI, it's likely I'll drop the use of PS entirely.

==================

I'm a cold weather wimp, particularly when it comes to imaging. As much as I'd like to continue imaging right through the winter months I've come to realize I simply don't enjoy it. It might be different if I had my own observatory, but that's not possible at this time--there are too many trees and too much light pollution. Therefore I've switched to my new winter hobby as of last year: watchmaking. 

Technically, it's more like watch servicing or salvaging. Some (perhaps most) of the mechanical pocket or wrist watches you find don't run well if at all. For many of these it's simply because they've never been serviced or their last service was decades ago. Even if the watch has been kept clean and dry internally solidified lubricating oil can provide enough resistance to disable a watch. 

It's sometimes possible to rejuvenate these old watches with a good cleaning and re-oiling. That's where I come in. What I've been doing is finding watches on Ebay to work on. Last year I mainly disassembled and reassembled older non-working pocket watches to learn the basic process. This year I've obtained some working examples that run, if only somewhat, and will see if I can tune them up to run halfway well.

I'm taking a short class from a local watch repair shop in January, and slowly building up my gear. Last year I purchased the basics; this year I've added proper oils and a device called a timegrapher. Timegraphers assess mechanical watch performance so that I will have an objective measure of any improvement my servicing provides.

I'm currently working on a Waltham model 1890 that was made in that year. Yes, it's 132 years old. It works, but poorly. I'll have more about it in my next post.


Wednesday, October 26, 2022

Two more finished images

These images continue my reintroduction to imaging. Big bright targets both, they're helping me prepare for the challenges ahead.

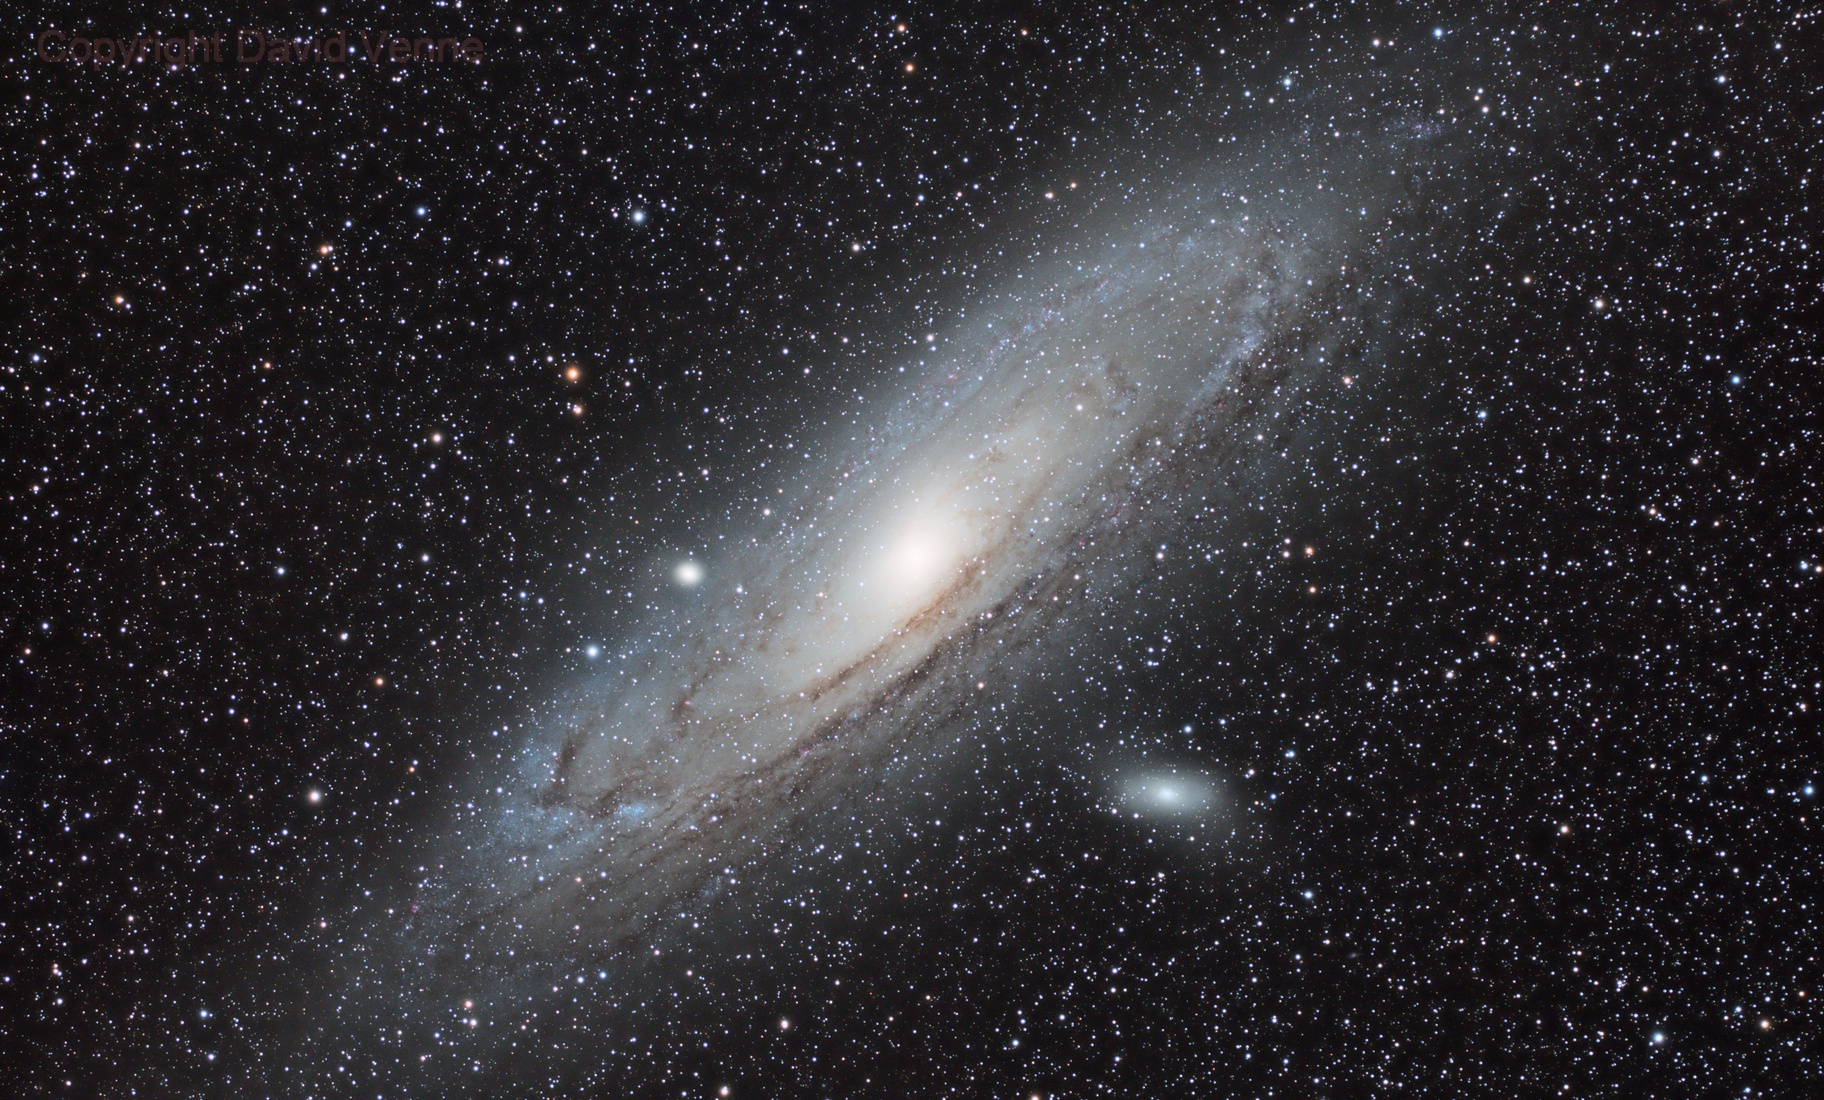
First is this completion of an earlier luminance-only image of M31:

The technical data and full scale image are here.

The colors in this may seem muted to you, but that's intentional. I much prefer less saturated images than  the common practice that I refer to as "color clipping" which results in super-saturation. See my other images from this year for other examples of softer hues, particularly the Cave and Gamma Cas nebula.

I am continually amazed by what the combination of autofocus and premium optics can achieve. Here is a full-scale portion of M31:

Hubble's Cepheid in M31

That unimpressive yellowish, fuzzy glow is a single star in another galaxy, in this case a rather historic star: Hubble's Cepheid Variable Star V1. Maybe I shouldn't be so excited about this, but I can't imagine resolving this with my old gear and manual focus. 

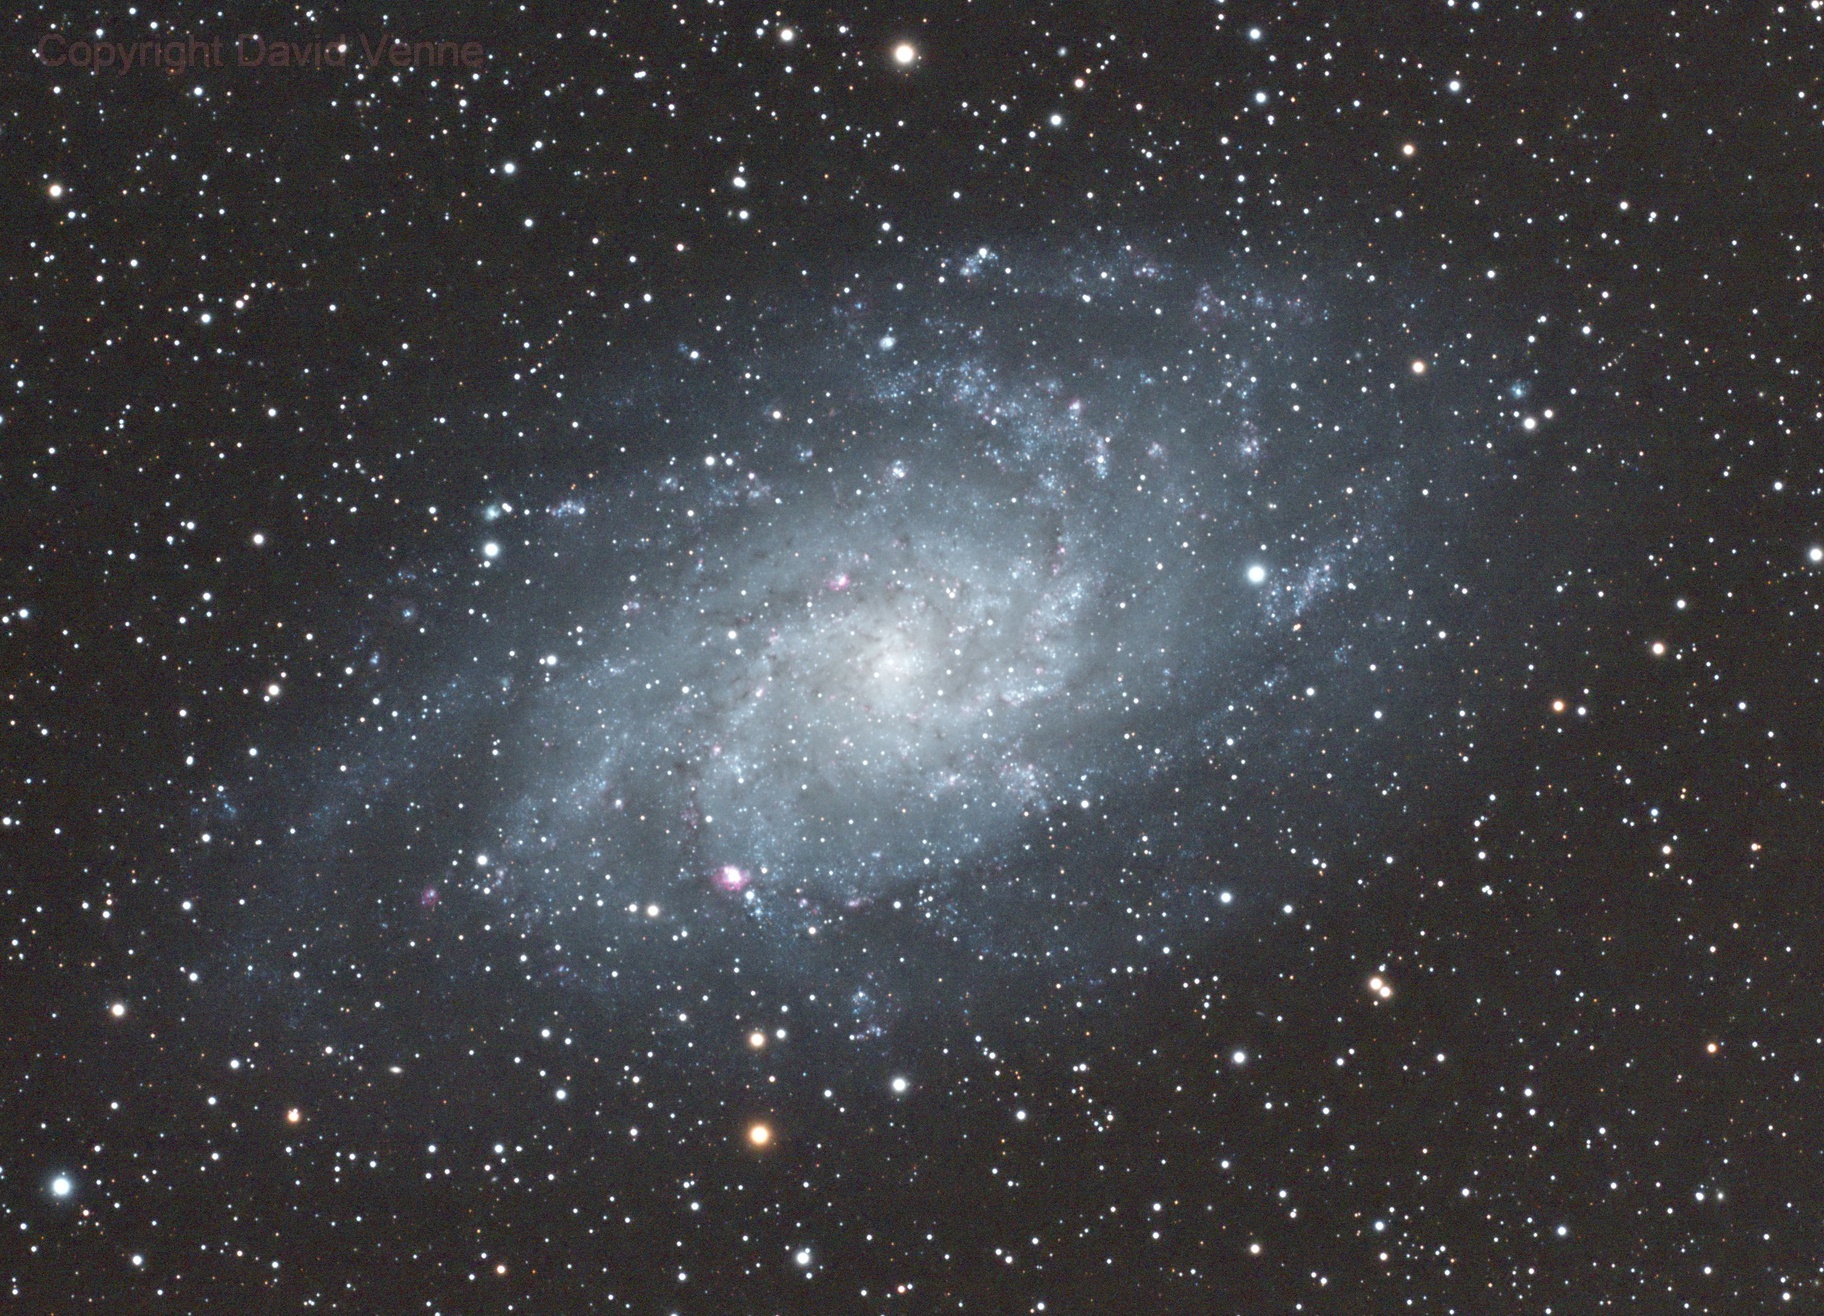
Next is one of those fortunate images a person makes while waiting for a primary target to rise. Here is M33, this time shot with the Takahashi CR 0.73 reducer.

Data and full image are here. Again note the more subtle coloration. I think the overall blue cast is "correct," but I've seen people produce M33 with colors all over the spectrum. 

Clouds ended the evening before my primary target rose high enough, so the California Nebula's RGB frames will need to wait for another night.

And No, I've not gotten back to the spectroscopic fun that I had hoped to. With winter on the doorstep it's unclear if I will.

Friday, September 16, 2022

Bumps on the imaging highway; more (unfinished) images

This is astrophotography, so things are never as easy as one hopes. 

At the beginning of September I had an all-night imaging session at the club's Eagle Lake Observatory site.  I was trying to do a few targets: M31, The California Nebula, and because a little time was left over as the dawn was approaching M42. Let's start with the latter because it illustrates the main issue.

I had only about a half an hour before the morning sky started to really brighten, so I set up NINA to do five 90-second frames for each LRGB channel. Here is the initial stretched result:

 
I did say LRGB, but this is mono! It turned out I took 20 L frames; the mystery is how that happened. I wish I could tell you, but I don't know the actual cause. My best guess is that NINA lost contact with the filter wheel and couldn't execute the filter changes. So this is not quite the image I wanted, but eventually I'll be able to shoot the chroma and make a nice image.
 
The same thing happened with my California Nebula frames and I've got 96 L frames which should make for a really nice eventual image. Here's a quick processing of the luminance frames:


This seems to have started as soon as I began imaging M31, as those are all (so far as I can tell) luminance frames. All 125 of them! I can say this from the early look at the M31 stack that if you want a very smooth background, shoot 125 frames! This is a first look at the luminance image, where I've somewhat de-emphasized field stars using PixInsight's Morphological Transformation:
 
 
Incidentally, these are all imaged using the Takahashi CR 0.73X focal reducer on my FSQ-106, so I was operating at  f/3.65 and an effective focal length of about 387mm.
 
Another mystery was easier to solve. I noticed that autofocusing was having a very difficult time. This was traced to a loosening of the connection between the motor and focuser shaft. I've tightened that up now, and just in case that was happening because of overly tight parking of the focuser I'm going to change the focuser's home position.
 
This weekend I hope to actually collect the M31 chrominance, and maybe deeper into September get the California Nebula color data.
 
-------------
 
I'm returning to something I started back in 2020: spectrographic imaging. More about that next time (I hope!)
 

Sunday, August 21, 2022

Backfocus & Hocus Focus (a NINA plugin) and a New Image

Backfocus

When I first heard about the focusing plugin Hocus Focus (HF) I was unsure if it was something I wanted. NINA's built-in autofocus seemed to work perfectly. Then I watched one of the Patriot Astronomy videos that demonstrated what else HF can do and I realized I not only wanted it, but I needed it!

HF (created by George Hilios) features what he calls Aberration Inspector. Much of what it does is beyond my ability to intepret meaningfully, much less act on. But it has one key ability: to measure error in backfocus. Having proper backfocus is a problem when using focal reducers.

If the backfocus isn't right, you won't be in focus across the field; if you focus on stars at the field's center, stars in the corners will be out of focus. This is why an old fix for this problem is to focus on stars some distance out from the center. Like most compromises it's hardly a perfect solution: stars in the center and corners will be slightly out of focus.

The better remedy is to get the backfocus as close to correct as possible. Usually this means taking images, examining them closely, guessing the distance of the correction to make, making the correction, then shooting more images, etc. It's time consuming and inexact. Fortunately there's a better way--use Hocus Focus.

HF can quickly estimate the magnitude and direction of your backfocus error during a special autofocus session. Then you can make the correction if you have the proper spacers on hand. And you're done.

I have a Takahashi CR 0.73X reducer That I want to use with my FSQ-106. The CR wants a backfocus of 72.2mm. My camera and filter wheel add to 32.5mm, so I need my adapters to provide 39.7mm.

For my first run of the Aberration Inspector I had this:

  • M56 to M48 adapter, 12.1mm
  • M48 to M42 adapter, 16.5mm
  • M42 spacer ring, 10mm

These add to 38.6mm. Close, but 1.1mm too small. The Inspector told me I needed to add 3 focuser steps to the backfocus, which is the right sense of change, but the magnitude seems off. 

One of my focuser's steps is about 0.004mm (30mm/8000steps), so 3 steps is a mere 0.012mm. My assumption is that somewhere in how I set up NINA or HF a factor of 100 error sneaked in. If that's correct, then the correction it's suggesting is to add 1.2mm.

So I added two thin spacers totaling 1.2mm and ran the inspector again. Here is the result 


As you can see (if you click the image to enlarge it), the Inspector now says the error is zero steps and the difference in star quality between center and corners is almost imperceptible. I think it's safe to say that I'm now within 0.1mm of having correct backfocus!

This means the next clear night I'm going for a larger target, maybe the Elephant's Trunk, M31, or the entire Veil!

Some incidentals for those of you who like miscellaneous information...

  • All of the goodness of fit (R squared) values were 1.00
  • This was performed without polar alignment or guiding, the exposure time was 2s through my luminance filter
  • I had to increase the autofocus backlash from 450 to 600 steps. I should probably redo all my filter offsets, too, if only to see if they have changed. The autofocus step size was unchanged.

New Image

I've imaged the two nebulae (IC 59 and IC 63) near gamma Cas before, and it was time to revisit that to see how I have progressed. 

Here is my 2009 attempt


This poor image was tortured with wild stretching and clipping, then oversaturated to show some color. 

In 2022 things are looking better: better mount, better camera, better telescope, better processing. Here is the full frame


And here is the nebular part of the image at full scale


Acquisition details are at AstroBin

What really surprised me about this image was that it looks so good for having so little data. It's based on about 82 minutes total exposure spread across the LRGB channels. And short exposures, too: only 90s each! 

The optical performance of the FSQ is--at least to me--breathtaking.


Thursday, June 23, 2022

First Image using NINA, PixInsight

I'm going to start this post with the credits. Usually these are left for the end but the amount of help they've given me earns them top billing.

For using NINA and associated plugins, you could not do better than to watch closely the many tutorials created by Patriot Astrophotography . Chad's presentations are concise and clear; even when he suggests some of the technical portions might be a little on the dull side, they're anything but.

Also well worth viewing are tutorials by the Cuiv, The Lazy Geek . His tutorials are often in demonstration form and tend to be more informal than Patriot's.

You probably already know this great reference for PixInsight, Inside PixInsight by Warren A. Keller. It's been my main resource for starting LRGB processing.

----------

Although I hated to do it, my first clear night in quite a while was dedicated to playing with NINA's autofocusing (AF). 

AF starts at a good (but not necessarily great focus position). From there it racks your focuser out by several "step sizes," takes an image and analyzes it, then racks in a step size and reimages, continuing until it has taken however many steps you specified. Because every geared focuser has some backlash (which has a first guess value of zero distance), that first inward rack will be soaking up that backlash. If your step size is smaller than the backlash no change in focus will result. Through iteration you work you way to producing a nice bowl-shaped hyperbolic curve with the minimum at the point of best focus.

In doing this you will determine two values: step size and backlash. Patriot Astro has a great video showing you how to do this. I was able to determine the values for my FSQ-106-mounted Pegasus FocusCube and was able to get hyperbolic fits with R^2 values uniformly 1.0. 

A second convenience that NINA provides is the use of filter offsets; these are basically the distance by which your filters are not parfocal with a reference filter (usually taken as the luminance filter). Using filter offsets allows you to move from filter to filter without having to go through an AF sequence. This saves you time that you can use for collecting light frames.The process of measuring offsets is automated by a plugin called Darks Customs, and this video explains how to use it. So how parfocal are Astrodon LRGB filters? Very! 

[Here are the numbers for my FocusCube: step size = 35 and backlash = 450. Filter offsets are luminance = 0 by definition, red = +7 focuser steps, green = -6, blue = -1; The narrowband Baader filter offsets are Ha = -52, O3 = -20, and S2 = -48. For perspective, the FSQ focuser has a travel of about 30mm; this corresponds to about 8000 FocusCube steps. The distance in mm for an offset is therefore equal to 

offset in mm = offset in steps * 30mm / 8000 steps = offset in steps * 0.00375

The largest RGB offset is therefore 7 * 0.00375mm or 0.02525mm. That's 1/38th of a millimeter!

Another way to think about the offsets is to compare them to the step size, which can be thought of as the travel needed to change star diameter by 25 to 50 %. An offset of 7 is just 1/5 of the step size, so using the offset in this case may lead to some improvement over assuming parfocal,  but it probably won't be much.]

Getting AF ready was one night's chore. The second night was doing a trial image using the Advanced Sequencer. Using filter offsets made for a very simple sequence: Cool the camera, unpark the mount, run AF on the luminance, slew and center on NGC 188, start guiding and shoot 20 frames of each filter in the order of offsets from negative to positive: green, blue, luminance, and red. (This ordering means the focuser  only moves in one direction, eliminating the need to deal with backlash.) The triggers for this were AF after a significant change in star width and to dither every third light frame. 

Almost everything worked perfectly. But--it was crazy windy and that gave PHD2 fits while trying to recover from dithers. This resulted in a number of frames that had terrible stars, and those triggered AF runs that wasted time. I need to apply a better settling time the next gusty night. 

AF worked to perfection. Stars for each filter were near perfect. My target was NGC 188, an open cluster near Polaris. Processing in PI resulted in this image.

I had trouble dealing with the light pollution and the end result is a rather blotchy image. I'm sure flats would have helped a lot. 

New moon is coming up, so weather  permitting there will be more imaging!


Monday, June 6, 2022

Jumping the APT ship for a ride with NINA

I hopped on the imaging automation wagon reluctantly because I'm very old school. My mounts had go-to that I seldom used; star hopping and a good finder were all I needed, right? Absolutely! I did the H400 pushing a non-electronic 10" Dob from star to star to H object, and it was fun. All I needed was a red light, star atlas, and dew strap for the finder.

Then I started imaging and kept right on hopping. That worked for awhile, but then it became evident (only because someone pointed it out to me) that I spent a lot of time hopping when I could have been collecting photons. Reluctantly I started to move into the 21st Century. A friend suggested a setup that included planetarium and acquisition software. 

The planetarium part was easy enough as I liked Stellarium's simplicity. For acquisition I already had ImagesPlus.  IP and photoshop handled my calibration and image processing needs. After completing the Astronomical League's Bright Nebula list I switched from CCD to DSLR and I changed to BackyardEOS for acquisition.

Then things happened.

I became involved with the creation of a club imaging platform. This brought me into contact with more modern imagers, and they gently suggested I modernize. For the platform I surveyed available acquisition software and put APT and SGP on the short list. APT looked horribly complex (partly due to the clunky interface) and the way SGP worked seemed counterintuitive to me. The decision was made by someone else after I left because of the pandemic, but for myself I decided on APT.

Next, a friend wanted me to learn PixInsight so that I could teach him. I knew PI was a fine package, and that eventually I'd want to wean myself from Photoshop, so PI became the third leg of my imaging tripod: Stellarium, APT, and PI.

Which was how it stood until yesterday when I revisited NINA. In 2019 I had considered NINA briefly but thought it was too new, too undocumented, and too undertutorialed (if that's a word). And since it was Open Source and free, I had concerns that it might wither and have a premature death. Now it's 2022 and none of those concerns are valid. So it is time to revisit NINA. And after a day inside seeing how well it plays with my equipment I'm ready to switch.

First and only somewhat important, NINA looks great. Better yet, the style of NINA complements its large set of features; it seems, at least to me, incredibly intuitive. I've already had a dry run with NINA and my complete imaging setup, and I'm ready to try it out when we have a clear night.