Saturday, October 8, 2016

Where Did The Summer Go?

An update, or a wrap up of the summer? It's been a couple of months since I last posted, and already northern Minnesota has experience its first snowfall!

July: Preparation for the Nebraska Star Part consumed most of this month, aided by the poor weather we had.

Nebraska Star Party. The less said about this the better. By that I mean the nightly weather was terrible--The presentations and people were a good as always. Of my four nights there, only one was decent, and it was on the night I arrived. The clouds didn't clear out until about 11:30 or so, and by then I was too tired to handle the requirements of imaging.The next three nights were all lost to clouds.

And yes, for the third consecutive year, I did not win a door prize.

Labor Day: The next new moon brought better luck at the Northern Nights Star Fest, a star party sponsored by the Minnesota Astronomical Society. Three nights, each of which was good for imaging until around midnight or so. The first two nights came with very nice auroral displays, too.

More globulars imaged toward the AL program certificate, and one pretty picture that would have been a lot prettier had it not clouded over at a too-early 11:30.

Pacman nebula, NGC 281.
October's first new moon Part 1: I completed the required number of globulars to qualify for the imaging certificate, and am now working on the documentation. The images are here, if you want to look. Note that by and large these are not pretty pictures; they're the imaging equivalent of visual observations good enough to ID an object and its gross characteristics.

Part 2: With the globular list done, I tried for another pretty picture and made an unpleasant discovery. Here's the picture.
Pelican Nebula, IC 5067/5070
The discovery was that my TeleVue 102 refractor is badly out of collimation. Getting it aligned will give me something to do this winter.

Part 3: This is tomorrow night with the moon at first quarter. Given how far south the moon is it won't be a big factor; it sets early, too. I'm either going to try a piggyback image using a camera lens on the DSLR, or a pretty picture at the 432mm FL of my AT65EDQ.

----------------------------------------------

Politics now, with one month remaining before the Presidential election. If you don't like dealing with political opinion, stop reading here.

It's sad to say, but the Republican Party has made itself into a laughing stock almost as comical as its so-called leader, Donald Trump.

Trump is:
  • A bigot
  • A misogynist
  • A serial sexual offender
  • A narcissist
  • An adolescent boy in an old man's body
And as malodorous as Trump is, the GOP smells worse because of the way the party rolled onto its back like a dead whale and allowed itself to be harpooned by him. None of the other candidates took his brand of demagoguery seriously and were easily swept aside. For that reason alone they deserved their walking papers, and I hope the damage they sustained will last through 2020.

The more reprehensible lapse comes from Paul Ryan and Mitch McConnell, two men who have substituted avarice for patriotism. Both have played politics and fiercely guarded their majorities in congress instead of speaking out meaningfully against the party's beyond-lamentable candidate. Yes, both have slapped Donald's wrists, but they're still 100% behind their guy anyway. Their appeasement has set the stage for the destruction of their party.

One wonders if the reason that so many Republicans are at this late date finally renouncing their support for Trump is not the litany of crude remarks and despicable behavior toward women finally coming to light, but instead the growing realization that the ship is sinking and they're about to be caught in an undertow that may well last a generation.

Anything is possible and Trump may yet win the presidency. Win or lose, the GOP is now a shell party run by amoral empty suits interested only in maintaining the status quo. The party of "No" has turned itself into the party of "None."


Monday, July 4, 2016

Own a Celestron GEM? Don't Leave Home Without This!

There are any number of minor unanticipated events that can ruin a night of imaging at a remote site.
  1. The weather can go bad. A sheet of clouds can roll in seemingly out of nowhere and obscure the sky. The wind can make your scope bounce. A heavy dew or frost can overwhelm your dew prevention gear.
  2. You can forget to bring a critical component. Over the years I've managed to forget counterweights, the counterweight shaft, cables, the dew shield for an SCT, and probably more things than I can remember that I forgot.
  3. Something can break in a way that simple tools and duct tape can't fix.
It was fault number 3 for me last night. Rather than going through power-up initialization my CGEM's hand control would stop with the display frozen on "Transmitting data..." Cycling the power was ineffective. Switching from AC to DC battery power didn't help. The evening was over before it started. This wasn't so bad at a site only an hour or so from home, but imagine it happening after driving eight hours to the Nebraska Star Party.

What I didn't know at that point was if it was the mount or the hand control that was the problem. Possibly both. Having Celestron fix the mount would probably run well over the $700 I paid in 2010. That's a sizeable portion of the cost of a new Losmandy G-11, a mount that would be a better than good replacement. On the drive home I had a bit over an hour in which to consider all the mounts that might replace my CGEM, and none of them were what I would call inexpensive. Certainly a new mount is not in my budget.

A new hand control would be more acceptable at about $100. Or I could take a substantial risk and go cheap by picking up a used control on ebay for less than $40.

With some trepidation I went online and found that "Transmitting data..." message meant the hand control had lost its firmware and was waiting for a refresh. A simple reinstall of the firmware might fix the issue.

The hand control comes with a cable that to connects its base to a computer through a serial port. As you're probably aware, serial ports are essentially extinct; very few computers still provide them. The workaround is a serial to USB cable called the TRENDnet TU-S9:
TRENDnet TU-S9 (USB 1.1 version)

I have the older model shown above that I used a few years ago to update the control and the CGEM motor firmware. It works fine with Windows Vista and 7. A newer model is white, sells for about $10 on Amazon, and is said to be compatible with Windows XP through 10 and OS X 10.4-10.11. All you need to do to restore the hand control firmware is follow the instructions found in this excellent YouTube video. It takes all of five minutes, and in that amount of time I had my mount back in working condition. My budget was safe!

If I'd had it with me last night, I could have fixed my mount and taken advantage of a beautiful evening.

The moral of this story: If you have a Celestron mount and you're traveling to a dark sky site, avoid a wasted trip. Be sure to bring the cables you need to reinstall the firmware, and if you've got a laptop put the installer on it and a copy of the appropriate firmware version(s) for your mount(s). You can bet I'll be bringing this to Nebraska this year.

Tuesday, June 21, 2016

A New Astronomical League Bright Nebula Program Object List: Getting Better, but Not Good Quite Yet

Finally! A New version of the AL Bright Nebula Program list.
IN BRIEF
  • It's brighter--all the dimmest objects are gone
  • It's clearer--most of the seemingly conflicting objects are gone
  • It's buggy--there are a lot of duplicate items and typos, and a few head-scratchers remain

IN DETAIL

After almost two years of letting the Astronomical League's Bright Nebula Program suffer with an object list that was confusing and somewhat buggy, a new version is out. While the new list has some improvements, it continues the legacy of errors found in early versions.

Errors that should have been caught include:
  • Six objects are on the list twice
  • There remains one object on the list that is known to be a catalog error. (Is this intentional?)
  • One object's existence is disputed (NGC 1990: is it a reflection nebula or simply glare?)
  • Some designations are simply wrong. Examples include: Pickering's Triangular Wisp is given an NGC number that belongs to a galaxy; apparent typing errors assign incorrect catalog numbers to the western branch of the Veil, Struve's, Running Man, Eta Carinae and Barnard's Loop nebulae
  • Unlike earlier versions that were ordered by RA, the new list appears to have been left in random order
  • Two entries are given the same index number of 116

It's as if the list was never reviewed or proofread. It's definitely not up to the AL standards to which I've grown accustomed.

One upshot of the errors is that there are actually only 143 or 144 objects (depending on whether the disputed object is retained) in a list that is claimed to have 150 objects.

Despite its smaller size, the new form of the program is much easier to complete. Gone are the objects in Lynds brightness categories 5 and 6. Most of the 4s have been dropped, too. There are also fewer objects so far south that they're unavailable to northern observers/imagers. The loss of objects is countered with a lot of new reflection nebulae; these won't be all that easy to image from urban locations, but my guess is that they're not as difficult as imaging Lynds brightness 5 and 6 objects.

Other improvements long overdue are the resolution of some of the problematic designations like NGC 6526. The confusing object assignments for the Cat's Paw, Gamma Cass, Heart, Butterfly, and Pelican nebulae areas have been dealt with. There's still an issue with the Seagull, but progress has been made.

The list difficulty is so different now it will be interesting to see if the award numbering system is reinitialized. On a related note, the certificate number I have on paper continues to be different from the one the AL reports on its web page. I doubt it will ever be fixed.

One final comment: It would have been nice if the program coordinator had thanked those of us who completed the old form of the program and essentially acted as beta testers.

I'm currently working on a corrected object list that will be in PDF and spreadsheet formats. I'll post a download link here as soon as it's ready.

Sunday, June 5, 2016

Sharing the Back Yard

I live in a second-tier suburb south of Minneapolis. About a mile away is the Minnesota River valley, a broad expanse that's been kept relatively undeveloped. One might expect to get a lot of wild visitors from the valley, but seldom has anything out of the ordinary been observed. Aside from deer that have been seen only two or three times in over 30 years, it's the usual suburban mix: Owls, rabbits, and raccoons (although their numbers seem to be greatly reduced in the last 20 years or so).

Increasingly present are species that are reclaiming old territories. Bald eagles have become frequent visitors. There's a giant old cottonwood tree in an adjacent lot that someday could play host to a nest, but it might be too far from the river. "Location, location, location," applies in the animal world, too.

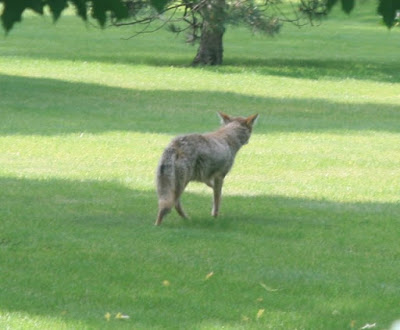
Coyotes are also returning. I've heard them howling nightly at most star parties in the open country but now they're back in the suburbs. I've gotten a few glimpses of one trotting quickly away in the last few years, and this spring I've seen one that seems more at ease. Twice it's been seen sleeping on the back yard lawn at the sky brightens at the end of dawn:


The gleam in its eyes is from the flash, not radioactive waste! This one seems more at ease with its surroundings; It showed only mild interest in people walking a few hundred feet away.

Looking perfectly at home
Starting the morning commute
There's no shortage of food available to it. All sorts of rodents are on the menu: Rabbits, squirrels, and shrews are in abundance this year. Add to that all the pet cats and small dogs that are allowed to roam outdoors and I doubt the coyote will go hungry. (Our cat is an indoor cat.)

Bobcats have also been sighted in the river valley and I'm really not eager to see one in my back yard. I consider them much more likely than a coyote to go after larger prey like an imager.

The Minnesota river feeds into the Mississippi river a few miles downstream from here, and together they form a natural impediment to animals traveling southward. Black bears, not all that uncommon in the northern areas of the Twin Cities do occasionally make the trek southward. Two years ago a black bear made it "south of the river" and roamed for a few days through this area. Only the wayward bear came to harm; it was shot in the leg by a police officer and may have survived to return north.

Saturday, May 28, 2016

Virgo Cluster Mosaic Ib: A Less Aggressive Approach

Last time I settled on using a 200mm lens to make a mosaic of the entire--fifteen degree square--Virgo Cluster. This would require something on the order of 15 to 24 subimages.

A club member pointed out that the galaxies probably wouldn't look very good at that scale, and he was right. Here's a simulation of 200mm vs. 700mm.

700mm image
200mm simulation
The galaxies are starting to lose their distinction from stars, pretty much ruining the point of a galaxy cluster mosaic.

His solution is to image only the core of the cluster, an area of about 8° by 5°. That's roughly 1/5 of the entire cluster's expanse, but it does contain the densest concentration of galaxies of interest to visual observers.

I'm going to repeat the calculations from Part I for the AT65 telescope. N = 3.5 (round up to 4) and M = 3.25 (round up to 4). So this can be done with about 16 images using much better optics.

I had some time to put together the layout of the 16 frames:

Virgo Cluster mosaic layout. Blue box, suggested area to be imaged; green markers, centers of subframes; red marker, center of mosaic; red box, area of mosaic.
The final mosaic will have a pixel counts that are about three times the frame dimensions. Since I'll be using a Canon T2i, that will give a 162 megapixel mosaic!

Friday, May 27, 2016

Virgo Cluster Mosaic I: Choosing a focal length

The galaxy imaging I did this spring was so much fun that I'm considering a big project: A mosaic of the Virgo Cluster. One of  the club's members suggested that such a project could result in a poster that would be suitable for fund raising at the 2018 Astronomical League Convention (which the club is hosting). I don't know anything about poster printing and marketing, so I'll leave that to others.

The mosaic, on the other hand, interests me.

My images were all taken using my TV-102; with the 0.8X FF/FR it has a focal length of 700mm and a field of view using an APS-C DSLR of about 1.3° by 1.1°. That's too small a field to make this practical--The Cluster has a size of about 15° by 15°, which is an area about 140 times the TV-102 field. When overlapping is considered it gets even more impractical. I would like to finish this within my lifetime!

Another option is my AT65 (422mm FL) with a field that's 3° by 2°. This means I'd need 38 images not counting the area lost to overlap needed for proper alignment. This is better, but still quite a task, and nearly impossible given the fickle weather around here.

How about a 200mm lens? Its field is 5.1° by 3.9° and gives about 12 images needed before overlap is figured in. That's not bad. A big galaxy like M84 manages to be about 85x74 pixels, also acceptable. It's time to pin down the cost of overlapping.

Consider a single line made of identical overlapping images. We take W as the image width and A as the overlap between one image and the next.

The width of sky covered by the first image in the line is W. Each additional image in the line adds (W - A) to the line length, making it easy to write an expression for the total line width W:

W =W + (N-1)(W-A)

We can solve this for N:

N = (W - W)/(W-A) + 1

Pretty simple, huh? We can do the same for height, letting M equal the number of images of height H in a column, B be the overlap distance, and H the total height of the column.

M = (H - H)/(H-B) + 1

We can fiddle with this a little more to express the overlap as f, the fraction it is of the width or height. This is useful because we'll almost certainly try to use the same fractional overlap in both directions.

f = A / W = B / H

N = (W - W)/[W(1-f)] + 1
M = (H - H)/[H(1-f)] + 1

One more change, let's define the constant F equal to 1/(1-f), giving
NF(W/W - 1) + 1
M = F(H/H - 1) + 1

Notice that the right hand side of these expressions doesn't necessarily guarantee that N and M are whole numbers. It's up to us to round them up or down to an integer value depending on how well the resulting grid of subframes covers the target area.

One more alteration improves the convenience:

N = F(W/W - 1) + 1
MF(H/H - 1) + 1

We should check this pair of equations for correct behavior in the case of no overlap. In that case f = 0 is zero and F = 1. This gives 

N = (W/W - 1 + 1 = W/W
M = (H/H - 1 + 1 = H/H

The number of subframes, N times M, is equal to (WH) / (WH), the area of the mosaic divided by the area of a subframe. This is exactly right in the limit that the subframe is much smaller than the mosaic and we can ignore the need for N and M to be whole numbers.

For the 200mm lens, we have (expressing everything in degrees) W = 5.1 and H = 3.9. For the Virgo Cluster both H and W are 15, so

N = F(1.94) + 1
MF(2.84) + 1

Let's assume a 1/3 overlap rule, so F = 1 / (1 - 0.333) = 1.5.  This gives us

N = 1.5(1.94) + 1 =  3.91 (round up to 4)
M = 1.5(2.84) + 1 = 5.26 (round up to 6)

So--as a first guess--24 images are needed to make a rectangular mosaic of the Virgo Cluster.This could be as few as 15 (3x5), 18 (3x6), or 20 (4x5) depending on the fit and composition considerations. I'll leave that for Part II.

How about a 135mm lens that gives a 9.5° by 6.3° field?

N = 1.5(0.58) + 1 =   1.87 (round up to 2)
M = 1.5(1.38) + 1 =   4.47 (round up to 5)

Only 10 images, but the galaxies would be awfully small.

And for my AT65, with a a 3.0° by 2.0° field?

N = 1.5(4.0) + 1 =   7
M = 1.5(6.5) + 1 =   10.75 (round up to 11)

77 images, a bit much for my taste, and really difficult to get done by ALCON 2018.

Just for fun, let's do the case for the TV-102.

N = 1.5(0.58) + 1 =   16.8 (round up to 17)
M = 1.5(2.38) + 1 =   19.95 (round up to 20)

That's a mosaic with 340 subimages. That's not going to happen.

Monday, May 9, 2016

Markarian's Chain

The Minnesota Astronomical Society (MAS) has sponsored Messier Marathons for many years. Recently they've begun holding the marathon twice a year by adding a fall gathering for what's called the mini-marathon.

The spring marathon gives everyone a long, good look at the Virgo cluster of galaxies, home to 16 Messier Objects. There are more than just Messier galaxies in the cluster and deciding which particular faint fuzzy you see in your eyepiece can be difficult. Navigating the Virgo cluster is difficult for anyone who hasn't done it frequently.

Beginners wander into the cluster not just during marathons but also when working on their Messier lists. It's not unusual for them to leave the cluster with a sense of frustration.

With that frustration in mind the MAS started what it calls the Virgo Venture, a spring evening during which all attention is on the cluster and learning how to navigate it. Special star-hopping charts are provided and there's an experienced navigator around to help observers find their way.

It was at one of these Ventures that I first observed Markarian's Chain, a gentle arc of galaxies in a small patch of sky. It was the first time that I'd seen more than two galaxies in the same field of view. In fact, I could count six, and with a little travel add a few more! I was impressed, and it marked a first appreciation of wide field viewing for me.

This year's Venture was held last Saturday despite thinning cirrus clouds running east-west over the site and a thick plume of smoke from Canadian wildfires. My imaging target was the Chain but given the overhead murk I didn't have a lot of hope. I shot an hour of light frames with the haze and another hour as the haze was disappearing, so it didn't turn out too badly.

The entire group of galaxies fits tightly in the 700mm view of a TV-102 with its focal reducer/flattener in place:

Markarian's Chain, stretching from the two fuzzies in the upper left corner to M84 near the right edge.
The acquisition details are at AstroBin. Briefly this is two hours of light frames using a modified Canon T2i at ISO 800, a TV-102 at f/7, and autoguiding.

The weather forecast suggests a week of clouds and then the moon comes back. A good cycle to do some lunar/planetary imaging, I suppose. June's new moon will bring a last shot at many Arp galaxies, and then it's summer and back to nebulae!

Tuesday, May 3, 2016

M81 and 82 Revisited

A nice clear night and an opportunity to image from a friend's home north of the city lights produces a pretty picture:


This is based on 44 x 3m light frames with 15 dark frames, Canon T2i at ISO 800 on a TV-102 at f/7.

Power saving update: the software I talked about that turned off the laptop LCD display wouldn't keep it off. Apparently something about using ImagePlus kept turning the display back on. This wouldn't be a problem if a hand control was used to run the DSLR and images were stored on-camera.

Battery Update: I ran the laptop (fully charged), dew prevention, mount and camera from the 35Ah battery for four hours; loaded voltage fell from 12.7 (unloaded, 13V)  to 11.8V. Unfortunately I popped the battery onto the charger as soon as I got home and didn't check its final unloaded voltage.

Assuming it was 12.1V it would have been at 50% capacity, meaning it would have supplied about 17Ah or about 4Ah per hour. This is about right if I take into account that the old laptop battery was in place and it could run the laptop for maybe two hours, after which the 35Ah battery was supplying 6A to both run the laptop and recharge its battery.

That's a whole lot of assumptions and guesses, though, so it doesn't mean much. I may end up rewiring the battery box to include an ammeter so that I can monitor power use more rigorously.

Tuesday, April 26, 2016

This Year's Star Parties

It's once again time to start planning which star parties are worth the travel expense and time to attend. A big attraction of nearby star parties is their skies which can be much darker than those nearby, which are marginal at best or abysmal (like my back yard). But that's only one attaction. Let's look at the most important factors:
  • Sky darkness
  • Open horizons
  • Light domes
  • Programs
  • Amenities
  • Downsides

I would list ambience as a factor, but the truth is I've never been to a star party where the people have been anything less than great.

Here are some information about the ones I plan to attend this Summer and Fall:

Nebraska Star Party


I put off attending this because of the comments about heat and storms. What a mistake!
  • Sky darkness: Dark gray (the darkest zone possible). 
  • Open horizons: Excellent in all directions; the observing fields are surrounded by low hills. 
  • Light Domes: Only one dome worth mentioning, and it's a feeble one from Valentine (population 2700, 26 miles to the northeast.) The dry air seems to suppress domes.
  • Programs: Exellent. The Wednesday talks at the local high school are top notch with nationally known speakers.
  • Amenities: Campgrounds are available, as is primitive camping on the observing fields.  The observing fields are essentially "bring whatever you need," providing only mowed land with three pit toilets. There's no power or water (drinkable or otherwise). There are catered suppers on three nights; the food is basic but very good. Door prizes that range from very good to grab-bag stuff you'll donate to your local club.
  • Downsides: Prickly pear cacti will puncture unguarded feet and tent floors that aren't protected by ground covers. By day there are occasional biting flies and just enough mosquitoes to provide distraction. DEET up and it's fine. And don't forget the possibility of withering heat and violent thunderstorms packing lightning, wind, and hail. 
  • Hints: If you're concerned about the heat, make the half-hour drive to Valentine where the public library has WiFi and A/C! A great place to cool off. Also be sure to visit the showers at the nearby campground (bring quarters).
Summary: I'm going for the third time, despite never having won a door prize! If you don't mind the primitive conditions, heat, and threat of storms you should make the pilgrimage to NSP at least once.

Iowa Star Party


This is a personal favorite of mine, in part because I was a charter member of the host club and did my graduate study in nearby Ames.
  • Sky darkness: Light blue
  • Open Horizons: Excellent if you set up in the middle of the field.
  • Light Domes: There's a significant dome from Des Moines (population 611000, 50 miles to ESE). During humid conditions a few others can be seen. To the south, nothing.
  • Programs: Usually there's a talk by a scientist from one of the nearby universities and another by a host club member. These are given in an old barn which can sometimes be stiflingly hot and humid. 
  • Amenities: There's no power or water at the observing field, but power for recharging batteries can be had at one of the nearby buildings. There are a limited number of cottages and houses for those who want to sleep in comfort, and one is kept open during the day for those who seek respite from the heat. Saturday night there's a home-cooked supper that's always terrific. Door prizes that vary in quality from year to year.
    If you like hiking, horseback riding, and wildlife there's a lot to do during the day.
  • Downsides: Summertime heat and humidity have been insane the last couple of times I've attended. This year it's on the Labor Day weekend, so maybe it will be cooler. Pests are usually not a problem.
Summary: A nice sub-regional party with dark sky and pleasant surroundings


Heart of America Star Party


I've only been to this once, but it's a really well organized event with a lot of things going for it. Unfortunately the one time I attended it rained all three nights so some of my information is incomplete.
  • Sky darkness: Light blue
  • Open horizons: Excellent
  • Light domes: I think there may be one to the north from Kansas City (population 2 million, 50 miles N) and probably from Butler, MO (population 4100, 12 miles E)
  • Programs: Substantial--usually at least one speaker of national significance, another visiting from a university, and members' talks. These take place in a building with good A/V adjacent to the observing field.
  • Amenities: Limited field power; showers set up nearby, and good food aplenty. Food and drink are available throughout the night, as are activities (movies and bingo) for cloudy nights. Very nice door prizes.
  • Downsides: People like to pack together on the observing field, but there's ample room.
Summary: A superb gathering, well organized and attended. Usually in October, so it doesn't conflict with other major parties and is unlikely to be subjected to hot weather.


Saturday, April 23, 2016

Back into Planetary Imaging

I've been doing so much deep sky imaging over the last few years that I've neglected the solar system for almost three years! Last night I decided to do something about that and went out and imaged Jupiter.

One of the problems I'd had when planetary imaging was getting the mechanics of it to flow smoothly.

My polar alignment was never good enough, causing targets to drift and making it tough to use region of interest (ROI) imaging. ROI imaging lets you use a small portion of your sensor and get higher frame rates. For example, my Point Grey Research Chameleon gives only 15 frames per second (fps) at its full resolution. When that's reduced to 640 by 480 pixels it provides 24fps, and further narrowing of the ROI can get it up to 30fps.

One way around polar alignment problems is to use autoguiding. To make autoguiding work in this way you need to have a rough alignment (and I do mean rough: north and level is good enough unless you want to use very long focal lengths.) You also want to use the planet as your guide star. Doing so causes the rotation due to rough polar alignment to be around the planet's center. This keeps it fairly minimal over the time span of most captures.


This is based on about 230 frames out of 2300, processed using AutoStakkert 2.6 and Registax 6.1. FireCapture 2.4 was used for acquisition, and it worked much better than the version that was available in 2013. The scope was a C 9.25 with a 2X TeleVue Barlow (f/20, FL 4700mm), and the mentioned PGR color Chameleon. It's only a so-so image and has a number of issues caused by one or more (probably all) of the following:
  • Misalignment of optics
  • Rotation of Jupiter and motion of the moons (the video spanned a little over 1.6 minutes)
  • Poor seeing (which it was)
  • Lack of experience using AS!
Despite these problems it was good to get a not-awful image. What pleases me most about this image  is the natural color it has without the need for any tweaking. Back in the old days of using my TouCam colors never seemed quite right.


Saturday, April 16, 2016

Reducing Laptop Power Consumption

As I found out in an earlier post, my laptop uses about 2.1A when its battery is fully charged and about 5.6A when the battery is depleted. At typical lead-acid battery voltage (~13V) these translate to about 27 and 73 watts, respectively. This makes a laptop one of the largest drains on a battery when imaging. Is there a way to reduce this significantly?

The answer is definitely yes!  Let's start with a review of laptop power consumption as measured by another blogger. He found these amounts for a laptop very similar to mine:
  • Laptop off, battery charging: 54w
  • Laptop on, idle (display at full brightness, WiFi on, power management "balanced": 20w. 
Notice that an idle laptop that's also charging the battery will consume 74w, essentially the same amount I found. Your laptop may have different power use, but it will probably be in the same area.

Next he tried a few methods of reducing the power use with the following results:
  • Set screen brightness to dimmest setting: 4w reduction
  • Turn off hard drive: no reduction
  • Disable WiFi: 2.5w reduction
It's possible to completely turn off the display saving a little more (the specifics in in a moment). My guess is that powering down the display will reduce power by about 6w.

The total reduction by turning off the display and disabling WiFi is therefore about 8w or so. That's about 2/3A when running off a 12V battery, and over a four hour imaging session it will amount to 2.7Ah. That's not a big amount, but it's not insignificant. Recall that my summer star party standard was 16 hours of imaging. The saving in that amount of time is 10.7Ah.

So how does one turn off the laptop display? Luckily there's a tiny program for Windows that does just that. It's appropriately called "Turn Off LCD" and it can be found here. Unzip it, put the exe file on your desktop and double click it whenever you want to shut off your display. This does not affect any programs that are running; guiding software and image downloads will continue normally. To restore the display just move your cursor or hit a key.

You can assign the program to a key stroke if you wish. The way I've done this is to use AutoHotkey. Here are the steps needed to do that if:
  • Download and unzip Turn Off LCD, then move the exe file to the folder of your choice.
  • Download and install AutoHotkey
  • Right click your desktop and choose New / AutoHotkey Script. If this options isn't available it's probably because AutoHotkey isn't running; start it using the Start Button / All Programs / AutoHotkey / AutoHotkey
  • Add your hotkey specification after the script's boilerplate. As an example, here's my script for binding Turn Off LCD.exe to the key combination of the Windows key and s:
      #s::
         run, TurnOffLCD.exe
      return

    Note that I've renamed the exe file to omit the blanks because I don't like file names that include blanks (I was raised in the era of DOS 3 world of 8.3 file names, what can I say?) You may need to specify a path to the exe file--it's just prepended to the exe file name.
    You can bind the exe to any key you want; more information is provided in the AutoHotkey help. Read it and learn.
  • Save the script file with a name that makes sense to you. I called mine ScreenOff.ahk
  • Right click it and choose Compile Script. This will create ScreenOff.exe.
  • Move the compiled script to the Windows Startup folder so that it will be loaded every time your start your laptop.
  • Hit Windows + s to turn off the display. Move the cursor or hit any key to resume.
Remember to disable WiFi and Bluetooth if you don't need them.

Any software that you don't need should be disabled or turned off, as it will only make your CPU, HDD, and graphics adapter work harder and consume more power. Software that should be disabled while imaging includes all security software, Windows Update, and Windows Defender. If you're not on a network none of that is needed or useful.

Unless your laptop's CPU is slow and feeble you can change its power settings to run slower and use less power. Windows usually supports three modes: High Efficiency, Balanced, and Power Saver (the one you want.) Be sure your laptop's battery is fully charged before you take it into the field.

Do all this and you may be able to reduce your laptop's power consumption by 1/3 to 1/2.

Sunday, April 10, 2016

Messier Marathon Night Results

"Mission Accomplished!" to use a cliched phrase. "Goal Reached" might be a little better, or maybe "Dumbness Overcome."

This was one of my first attempts to use my DSLR in quite a while, and I managed to make a lot of mistakes early on:
  • Forgetting to return to ISO 1600 from the composing setting of 6400
  • Forgetting to set the shutter control to bulb
  • Forgetting to increase the number of frames on the DSLR controller from the dark frame to light frame counts
And so on. The evening began with starts and restarts, but once it got going it went well. The time I lost meant I wouldn't go after the dimmer planetary nebula I had included on my object list in the last post, but that was okay.

All the hardware worked perfectly, although some went untested. The dry air and the gusty to breezy conditions meant the dew preventers weren't needed. It was only around 2 A.M. that frost began to appear, and my scopes stayed clean until the end a little before 3 A.M. The DSLR power supply worked perfectly and the 35Ah battery was barely tested running that and the mount. I used my laptop for PHD with its power supplied by it's own battery augmented with a Duracell 600 battery pack. The Duracell ran down pretty far in the five or so hours, so this might not be a good option for multi-night imaging. For more power conservation I need to find a way to turn off the laptop's display, not simply dim it.

The evening tally was six Arp galaxies and one planetary. In terms of Messier objects it was 9 1/2. Let's see some marathon images:

Leo Triplet (clockwise from NGC 3526 at top, M65, and M66) Together these are Arp 317. M66 is Arp 16.

M49 (right of center, Arp 134)

M60 (left of center, Arp 116) and M59 (right of center)

M87 (Arp 152)

M90 (Arp 76) and M89 at bottom edge

M97 (Owl Nebula) and M108 at bottom edge


All the images are based on 10 three minute exposures with a Canon T2i (at ISO 1600) riding on a TV 102 operating at f/7--except the image of M90, which was 5 three minute exposures at ISO 6400 (see list of mistakes above). These were calibrated with 20 dark frames collected throughout the night as the temperature fell from around 30°to 20°F. They obviously haven't been flatted. I reprocessed them to include synthetic flattening, and now they look a lot nicer!


An inspection of single light frames shows that they surpass visual observations, so why not bring back the idea of an Imaging Messier Marathon? Three minutes at ISO 1600 is about the same as 45 seconds at ISO 6400. 3/4 minute times 110 objects is only 82 minutes; out of a six hour marathon night that leaves four and a half hours for acquisition and composing images. Definitely doable.

That aside, the evening bumped my Arp list count to 26 and my planetary list count to 23. Both lists are about 1/4 done!

Onward to warmer weather!

Thursday, April 7, 2016

Messier Marathon Plans

Tomorrow night is Messier Marathon night and it looks like it may actually be clear!

Considering what we often see for the MM, this will be relatively balmy (wind chills in the teens above zero) and dry (the observing field is a little mushy, but there's no snow). It helps that this year it's being held in April even if that's not best for getting a high count.

Having gone over to the imaging side, that's what I'll be doing. To keep in the spirit of things I'll do mostly Messier objects.

Because the Ms are fairly bright I'll be using my DSLR. The targets will be taken from the two Astronomical League lists I'm working on, Arp galaxies and planetary nebulae.

Here's the list, Galaxies first:
  • M49
  • M60
  • M65
  • M66
  • M87
  • M90
These all have surface brightness between magnitude 21.3 and 22.3, so I think they can be imaged fairly quickly for modest quality results; it is a marathon night. Because M65/M66 occupy the same field of a TV-102 and DSLR, they require only one image. So for the six galaxies I'm expecting four to five hours of clock time including time for acquisition, composition and dark frames.

Next the planetaries and their surface brightnesses:
  • M97 (22.3)
  • Abell 21 (24.9)
  • Abell 36 (25.5)
  • Abell 35 (26.2)
  • PN G164.8+31.1 (26.6)
You can see why the last four are not Messier objects; they're not very easy to see. Abell 21 is about three times larger than M97, making it a good target for the relatively short focal length TV-102 (700mm). Given its location in Gemini it might be the evening's first object and will get up to two hours of photons. The other dimmer objects will probably get passed over.

Sunday, April 3, 2016

A Battery Box Addition

The Battery Box got one refinement over the last couple of weeks: A built-in 7.5VDC power supply.

I had intended to use an external supply, but the little Drok unit gets good reviews and is much smaller than the adjustable supply I had planned to use. It was perfect for mounting within the box. All it needed was an output plug. For that I went with the same sort of plug used on many mounts, a lockable panel-mount socket and plug. (Both were purchased on eBay.)

Drok 12VDC to 7.5VDC step-down converter
5.5x2.1mm socket and plug
A built-in converter presents two problems if it's left connected to a battery: A continual power drain (0.1 to 0.12W) and possible interaction with a smart charger. The drain doesn't sound like much, but it equals about 7Ah per month; that's a lot for a 35Ah battery. To prevent these problems I isolated the converter using a rocker SPST switch. As a reminder to turn off the converter when it's not needed I added a tiny LED that draws a minuscule 3mA. Here's the switch and LED:

Switch and indicator light


As I said, it's a tiny LED! It's just bright enough to let you know that the converter is active.

12V sockets (above) and new 7.5V socket (below).
I made an extension patch cord that fits the plug and the power cord from the camera's dummy battery; this will permit me to use other power supplies.

One other add-on is intended to make this easier to use: An accessory cable for my charger that will let it charge through one of the sockets. Because this is a small battery it can be charged at a relatively low amperage of 1.1A. While I haven't yet recharged it from a state of deep discharge, I'm hoping that it will remain cool during charging even when left in the box. It's my hope to never need to remove the cover.

NEXT UP: It's the Messier Marathon, April 8 or 9! I plan on imaging some Messier galaxies as a part of the Arp galaxy imaging project. There are six Messier/Arp galaxies I haven't imaged yet: 49, 60, 65, 66, 77, 87, and 90. Only 77 is badly placed; it will set too soon for imaging. Because it's a marathon night, I'll shoot only luminance with my ST-8300M, and probably only an hour apiece at most using my TV102. Last year the MM had only so-so skies. Here in Minnesota we're overdue for some good Messier luck.

Monday, March 14, 2016

Box your Battery

Tired of lugging a heavy battery around by its carrying strap? Inconvenienced by connecting to it using alligator clamps? Messed up by dew getting the battery all wet? Make a battery box!

It's simpler than you might think and you can make it as fancy as you want. Here's my rather minimalist box:

A Simple Battery Box

At the right side under the lid protuberance designed to allow dew to run off are two 12V sockets. I may add a couple more on the far side. Each is individually fused so that if one device blows the rest keep working.
 
The voltmeter springs into action
The only other thing I added was an LED voltmeter that's actuated by a momentary-on push button. This helps me monitor the battery's state of charge.

Under the hood
The 35Ah battery (group U1) is dwarfed by the box, which is designed to handle batteries in groups 24-31. I've used rigid foam to hold it in place. I haven't done a deep recharge of the battery yet, so I don't know how warm it will get. I suspect it won't get warm at all--My charger is only 1.1A. With an accessory the charger can charge the battery though one of the sockets

What you'll need:
  • The box: The one I used comes with a useful divider and can be used with a  battery that provides 75Ah and still have room for the sockets
  • Sockets are found on eBay for about $6 each. I used waterproof ones that come with their own cables and fuses. I bought the kind that attach with a locking ring; they've been solid in use.
  • The voltmeter (about $4) is also from eBay, waterproof, and also attaches with a ring.
  • Connecting wire. If you run your own wire to the sockets, be sure to use 14AWG or heavier wire, and check that the fuses are appropriate for the wire and devices you plan to connect. Wire to the voltmeter can be much lighter as it will carry only a tiny current.
  • Tools: The only helpful tool you may not have is a variable drill bit that will help make the socket and meter holes. You don't need one as large as the holes--it can be used the start the hole and ream it to proper size.
What you don't need:
  • Battery terminals for jumper cables. This should be a deep-cycle battery, and it doesn't like jump starting. 
  • A carrying strap. The box comes with handholds at either end. A 35Ah battery and box weighs under 25 pounds, so it's easy to carry.
As you can see from the above picture a U1-sized battery leaves a lot of room for accessorizing. An amp meter could be useful to install if you want to measure battery drain. If you have the need for other voltages, add some step-down DC converters. They're small and very inexpensive. You should probably isolate them from any charger, perhaps with a two-way rocker switch. Go wild and add lights and a radio and you have one of the overpriced commercial "power tanks."

I'll be field testing this battery over the summer at a number of star parties, and may modify it as a result.

My battery box delivers twice the watt hours of a commercial "power tank," and costs less (about $125 total,  $100 of which is the battery and charger).

Friday, March 11, 2016

Trying My New Battery; Color Balance Issues

The weather has been cooperating a little better this last week, and I've been able to try out my battery-based imaging setup. I haven't done much more than image an hour here, a couple of hours there, but the results are about as expected.

Here are two images from my inner red zone back yard,

M42:

As you can see I was unable to completely eradicate the sky brightness gradient.

The Rosette:

Both are taken without filters only because I don't have one. A decent filter would have improved these greatly.

Here are a couple from some distance north of the Twin Cities in a yellow zone,

75m of the M81/82 area:


I have this delusion that I'll be able to image the integrated flux nebula.

The southern portion of Auriga (including some dark lines from tree branches):

The first two images came out horribly red/magenta heavy, and it was a lot of work getting the color right. I passed that off as a consequence of the camera mod and light pollution. The second two appeared just as red on the display screen while working on getting the exposure right, but they came out fairly neutral because I chose the ImagesPlus RAW conversion that ignores the camera's white balance; I used "Bayer No White Balance" instead of "At Capture White Balanced Color."

Color balance isn't an issue when CCD imaging, particularly if your filters are balanced by the manufacturer to give equal white signals in each channel.

The question is now which is better, a custom white balance or using the "no white balance" processing option. There's only one way to find out, and that will require a sunny day, a few sheets of white printer paper, and a clear night. That's my next task.

Oh, and the battery worked perfectly. It's nice to have the power right there in such a light package. 35Ah, less than 23 pounds. My little battery case now has two power sockets, but the volt meter has yet to arrive.

Thursday, March 3, 2016

The Lust for Power, Part 3: Generators

Last time I found two imaging configurations that called for the use of big, heavy, and expensive deep cycle batteries. The common alternative is to buy a generator; it will supply 110V AC, and then your AC adapters will feed your equipment.

Generators as the primary power source

Generators come in a variety of sizes. The factors to consider, roughly in order of their importance, include:
  • Amperage rating (AC). While some generators have DC outputs, you'll probably be using the AC side.
  • Running and peak wattage (W). Wattage is easily computed by taking the product of amps times volts. [Energy is watt-hours (Wh); A battery's available Wh is just the product of its Ah and voltage. For example, a 100Ah 12V battery has a capacity of 1200Wh, of which about 60% is available before recharging.] 
  • Sound level. If you're at a remote site, chances are you'll have people camped nearby. Running a loud generator could get you booted out.
  • AC regulation. Is the ouput voltage well regulated, and is it in the form of a relatively noise-free sine wave? This is difficult information to come by.
  • Available low-energy modes. Does it reduce fuel consumption and sound level if the demand is small?
  • Subjective things like ease of use, noise level, fuel consumption, reliability, etc. Generally the more you pay the more you get in terms of these.
What kind of power will we need? Configuration 1 (CCD, guided large telescope) required 6A. At 12V this is only about 72W. Peak amps is about twice that and demands 150W. Configuration 2 has an even smaller demand (130W peak).

The smallest generators have about 800W peak power and a price point around $300. The PortaSource IG800W ($313) has marginal amps; the Generac ix800 ($287) gets mediocre reviews and a lot of 1-star votes on Amazon.

Medium-capacity generators have around 1600 to 2000W running power and twice the amperage that I require. Prices range from $400 to $600, although some brands can demand about $1000. It's not clear that the added cost is worth it. These generally weigh 50 pounds or more.

In this class I think the Wen 56200i ($429) fits my needs best .

Generators with greater capacity are not needed for imaging, but can also serve as emergency generators. I'm not going to consider them. 

Generators to recharge batteries


It may make some sense to get a small generator and then use it to recharge a battery. because the recharge takes place during daytime noise is relatively unimportant. What matters is the amperage of the charger, since that will be "restocking" the Ah lost overnight. Because some chargers operate at lower amps than your imaging use, you may be able to get by with a generator that doesn't meet specs as the primary power supply.

The required charging time will be the number of hours you imaged  times the amps used while imaging divided by the charger's charging amps.

Example: Imaging at 6A for four hours and using a 1.1A charger. The recharge time is 4h x 6A / 1.1A, or almost 22h. The most you would probably recharge for would be 12h, so you could recover only 13Ah of the 24 you used the night before. Not practical.

Now imagine imaging at 2.9A for four hours and the 1.1A charger. Recharge time is now 4h x 2.9A / 1.1A, or  10.5h. That's actually doable.

I've used a relatively slow charger in this example. A 3.5A charger would cut these times by 2/3 , to 7 and 3.5 hours. A 50Ah battery and 800W generator could make a nice tandem.

Generators to Augment Batteries


Okay, why not power things from both a battery and small generator, thereby easing the power demands on both, then using daytime to top off the battery? Let's see some examples.

Let's consider Configuration 2, small telescope, CCD, guiding, dew prevention: 5.2A. the two big power consumers are the laptop and CCD. Let's let the generator power the laptop and mount (3A), the battery handle the CCD and dew prevention (2.2A). 3A is easily within reach of the small generators, and the nightly Ah drawn from the battery is 8.8Ah. Recharge time is 8 hours. Suppose it's fall and you can image for 6 hours; you'll pull 13.2 Ah out of the battery and need 12 hours to put it back. The generator will run a lot--18 hours a day.

The downside is that nighttime running of the generator brings noise back into consideration. And you'll be running the generator quite a bit--both during imaging and the daytime. It's an interesting approach to powering your gear, but I think either battery or generator is better than a hybrid solution.


Friday, February 26, 2016

The Lust for Power, Part 2

In Part 1 I looked at the power requirement of my gear with the purpose of seeing how I might replace my aging deep-cycle batteries. The required amps for several configurations can now be given. The Ah requirement for hour hours a night for four nights is given in parentheses.
  1. C 9.25 on guided CGEM, CCD, dew prevention: 6.0A
  2. AT65 on guided CGEM, CCD, dew prevention: 5.2A
  3. AT65, guided GGEM, DSLR, dew prevention: 3.4A
  4. Camera lens on DSLR, unguided CGEM, dew prevention:  0.9A
Don't worry if the numbers don't exactly map with the empirical values given in Part 1--I'm usually rounding up here. What are our power supply options for these configurations?

Commercial Portable power packs

Most of commercially produced power packs are based on 17Ah batteries. Examples are the Celestron PowerTank 17 ($122) and Orion Dynamo Pro ($145). When brand new, these may be capable of delivering 80% of that 17Ah. That's 13.6Ah. As time goes on you'll see that decrease depending on the number of times you cycle the battery and how well you maintain it. A battery pack like this is sufficient for 14 hours of Configuration 4 and marginal for one night of Configuration 3. It doesn't meet the 16-hour requirement for either case without one or more recharges.

Generally speaking power units like these are wildly overpriced--unless you put a high premium on bells and whistles like radios, spotlights, and DC outlets at other voltages. You're get much better economy if you buy a larger battery and charger. For example, a 35Ah sealed AGM battery and charger cost around $100.

Some power supplies (Duracell, Black and Decker, etc.) are more focused on cranking power and include inverters so you can run your gear as if you had a AC outlet at hand. An inverter sounds nice, but it will eat up a small portion of whatever power you need to supply; a battery build for starting cars is quite different from your need (prolonged low current for many hours).

Recommendation: Don't buy any power supply that includes car starting in its list of features--unless the low Ah rating it provides is all you need. Even in that case, you're better off to simply invest in a battery and charger.

Batteries

For lowest cost you can use flooded (also known as wet) lead-acid batteries. These have caps on top for adding water and venting gas during charging. While less expensive than other battery types they have several downsides. The acid can spill or leak out and damage equipment or even cause personal injury. For this reason wet batteries have to be kept upright at all times.

While charging hydrogen gas can accumulate and cause an explosion.

Fortunately there are sealed lead-acid batteries that are spill proof and can be used in any orientation. Those that employ Absorbed Glass Mat (AGM) technology and its variations also have better deep-cycle characteristics than flooded batteries. Other advantages of sealed batteries are that they can be shipped without worries about acid spills and the need for the user to initially add the acid, and that they're maintenance-free (aside from recharging).

(Important note: You can't use a flooded battery charger on an AGM battery unless that charger specifically has an AGM capability.)

The battery size you need will be determined by your gear and the type of battery. I think the only practical type of battery to consider is AGM; other technologies (mainly lithium ion) tend to be more expensive. If you take care of your battery (keep it charged, avoid thermal extremes and physical abuse) and use it infrequently (a dozen times a year, maybe?) it will provide years of 
reliable ability to deliver between 50 and 80 percent of its Ah rating. I'll apply the 60% rate in what follows in order to be conservative.


Configuration 1 (large scope and CCD): 6A x 6h is 96Ah. This is 70% of a 160Ah battery. A single battery with that capacity weighs over 100 pounds and costs $300 or more. This doesn't fit my definition of portable power.

Two 80AH batteries would be a somewhat better solution because although being higher in cost they're a bit more portable--each is about 50 pounds. I've imaged this way, but I don't enjoy lugging the batteries around, and consider it a marginal solution in this case.

Configuration 2 (small scope and CCD)

This needs a battery with about 140Ah capacity. This is also met by a single heavy, expensive battery. The same two-battery solution works here as in Configuration 1, so we're again stuck with the non-optimal use of very heavy batteries.

Configuration 3 (short lens or scope, guiding, dew and DSLR)

This needs a 90Ah battery. Two 50Ah batteries would provide more than enough power and cost about $180. Total weight would be around 70 pounds.

Configuration 4 (short lens and DSLR)

This is clearly a case where a battery is the best solution, requiring only a 24Ah battery. It can't be much easier.

The last two configurations clearly can use batteries to meet the requirements. But what about the first two? You can either lug big batteries around or find an alternative: A generator. That's for Part 3.


Tuesday, February 23, 2016

The Lust for Power, Part 1

Okay, maybe not so much lust as desire.

For the last five years or so my dark sky imaging has relied on two deep cycle batteries. One of the batteries had been allowed to discharge to nearly dead but with regular recharging seems to have recovered, although there's no doubt it lost some of its life.

These are group 27 unsealed lead acid batteries that weigh about 55 pounds each. With that weight you might expect them to have good amp hour (Ah) ratings. What are their capacities in Ah? They're labeled with two RC values: 200 for a non-standard 23A drain rate, and 175 for the standard 25A rate. The higher drain rate translates to a capacity of 73Ah and as expected the slightly lower drain of 23A gives a capacity of 76.7Ah. My expected drain rate of 6.5 amps is much lower and should suggest a larger yet AH value. Another practice is to take the Ah to be half the RC; for my batteries this would be 87.5Ah.

The upshot of all that uncertainty--and battery capacity is notoriously difficult to quantify--is that I'll assume the batteries started their lives with an AH value around 80. What it is now I can't say, other than it's less.

Even that conclusion has to be questioned, for some of those amp hours are coming when the voltage is well below 12V. Will everything keep working at 11 volts? SBIG says my CCD will work even at 10V. Kendrick controllers basically turn off when the voltage drops below 11.6V. (They're quite adamant about this and have refused pleas to disable the low voltage cut-off.) The CGEM's ability to handle low voltage is questionable, though; there are reports that it will begin to fail when the voltage goes below 12V.  So even if my batteries are able to produce 80Ah, they're not all usable.

Time for some "ground truth." How have the batteries performed in the past? Probably their biggest single star party workout came at the 2014 Nebraska Star Party where I imaged for seven and one half hours at an hourly drain of about 6A (see below). This probably says more about the lack of clear sky time than it does about the batteries.

Hauling batteries like this on long road trips is a bit of work, and does present a small risk that the batteries could leak acid. So far I've never tipped them over, but an unpleasant accident almost seems inevitable. So it may be time to replace them, and what follows is my exploration of the options.

Power Requirements

Some dark sky star parties are three nights, others are four, and all of them that I attend are during the summer or early fall. A typical summer night is completely dark for only about five hours; by the equinox this stretches to nine hours. Rather than estimate a nightly power need, an hourly power consumption is probably more sensible to use. ADDED: I was able to actually measure some of the values, and those are added in [red].

  • CGEM Mount: During fast slews it can require 1.5A [1.4A], but when tracking it's more like half of that. Let's assume a 0.75A [0.35A]demand while imaging.
  • SBIG ST-8300M CCD Camera: The spec sheet says the camera draws 3A at 100% cooling. A more typical cooling load is 60% of this, so I'll assume a steady 2A draw.
  • DSLR instead of CCD? probably more like half an amp. [With the display off, my Canon T2i, draws 0.13A while idle,  0.19A while imaging. The 12VDC-to-7.4VDC converter is 0.03A of those values.] 
  • Laptop: My old Gateway's AC power adapters says it runs at a maximum output of 3.4A @ 19V, so at 12V that's more like 5.4A. This agrees with my 12DC adapter's spec sticker that says it permits up to 5.6A. That's the load when it's running and charging the battery. A more realistic load is closer to half that, so I'll say 3A to be on the high side and include losses in the 12VDC to 19VDC adapter. [While charging it draws 5.6A, and 2.1A when fully charged. These values don't take into account computational demand of autoguiding.  Included in these values is 0.12A for the 12VDC-to-19VDC converter. Plugging in the Orion StarShoot Autoguider adds about 0.5A. Dimming the display to its minimum cuts half an amp from the draw.]
  • Dew Prevention: I use Kendrick dew prevention, and the power need varies greatly with the telescope objective diameter. At 100% power the strip I use for the guide scope draws 0.3A, for the 4" scope 0.9A, and for the 9.25" scope, 2A.  So my range is 1.2 to 2.3A. Because I almost always use a power setting half this, I'll take the dew demand as .5 to 1A [The low setting actually ranges from 0.17A (6" strap) to 0.97A (28" strap)]
How does this add up?
  1. The maximum is imaging with the C9.25 on a dewy night with autoguiding: 6.75A [6.0A]
  2. Small scope on a dewy night with autoguiding, 6.25A [5.2A]
  3. On a dewless night both drop to about 5.75A [5.0A].
  4. DSLR + lens, no guiding? 4.3A [0.7A].
  5. There are more combinations, but let's stop here.

The reality is that I seldom image more than a few hours a night. If we cap the maximum number of hours at four per night, the nightly power need for Case 2 above is about 26AH [21Ah], so a four-night party would need 104AH [83Ah] if it was clear every night.

At the other extreme is using a DSLR and using the laptop only for focusing. This would require only 21AH [11Ah]!


Next time in Part 2, can I use batteries to meet my imaging needs?

Saturday, February 20, 2016

A Truss Mirror Grinding Stand

Years ago I built a mirror grinding stand from 2x4s and plywood designed to be so solid that it could be rigid when bolted together--no glue was necessary. It was very, very heavy, which was great for stability but a bother to keep around the basement when not in use.

The club has been talking about a mirror-making workshop, and although it doesn't seem like something that's going to take place any time soon I was motivated to build something better for my mirror work. After looking around the Internet for designs I settled on something like the Stellafane design. It's a simple sort of truss barrel.

What I didn't like about the Stellafane design was 24" diameter of the top--it's too big for my purposes--and the four-corner truss. I decided to try a three-corner truss instead. The four-corner truss is a standard for big Dobs and is used by Starmaster, Teeter's, Discovery, and Obsession. The thee-corner truss has proven itself on Orion and Meade Dobs, so perhaps it would work well for ATM work. It's a little lighter and less work to assemble, too.

Because I was using a three-corner truss it seemed logical to make the top and base hexagonal instead of the circles used by Stellafane. My hexagons are inscribed in a 20" diameter circle, which will be of adequate size to handle any mirror I can foresee working on up to 12" diameter.

Here's what it looks like after first assembly:


The stand is 37" from floor to top, just right for me.

What you can't see is that there are three rubber feet under the base to help it sit flat on the floor without rocking. At this point it's held together by wood screws. It seems rigid enough, but I won't know how really solid it is until it's in use. There may very well be some glue in its future.

Still to be done is the addition of adjustable cleats for standard mirror sizes: 6", 8", 10", and 12" should do it. The entire assembly will get sealed with polyurethane, with the top getting a nice sanding and a triple coat of poly to resist the water it's going to see.

Thursday, February 18, 2016

Correcting the Too-short Celestron Hand Control Cable

One of the perennial, if minor, "what were they thinking" topics in astronomy hardware is the short coiled cable used to connect Celestron hand controls to their mounts. The cable, stiffly coiled like an old phone handset line, is simply too short.

This wasn't so bad on my old CG5 ASGT where the mount head isn't all that large, but on my CGEM it couldn't be ignored. It was possible to have the handset pulled right out of its tripod leg cradle as the scope turned in RA. That's not something you want to see when you're imaging, since it means the coiled cord was torquing the mount and then letting the handset become a free-swinging weight in whatever breeze there might be.

One solution I tried for a while was a coiled extension cable. The added cable was so heavy and droopy that it was awkward to handle and tended to get snagged on the mount. Then I came across a video that shows how to replace the stock cable with one that's more user-friendly.

All you need is
  • A piece of flat 6-conductor telephone cable, preferably one with at least one end having an RJ12 connector attached--if not, you'll have to do that yourself. These can be found many places; on Amazon they're typically around $5 to $6.
  • A soldering gun and solder (A good, fast-heating gun is much preferable to the old pencil type)
  • A wire cutter
  • A craft knife for stripping very thin wires
  • Heat-shrink wire tubing (I found this on eBay)

Extremely helpful to have is a soldering jig to hold the ends of the wires together as you solder them.

The most important consideration is getting the wire connections correct. In my case the wire colors and order in the cable exactly matched that used by Celestron, so it was easy to get things right. If you get the connections wrong its quite possible you'll ruin your handset.

The filter from the old cable will be reused on your new cable. Aside from that, you can discard the old cable. Or toss it into your pile of stuff you probably should trash but are keeping "just in case" it might be useful someday.

The job takes an hour or so, when you're done you'll have the kind of cable Celestron should have provided in the first place!

Friday, February 12, 2016

A Mirror Grinding Stand

Among my many unfinished projects is a replacement mirror grinding stand for the one I'm using now. The current stand is very heavy despite being compact. The one nice thing about it is that it can be disassembled into a top, base, and legs. I'm making this new one to see if it might serve as a template for a mirror making workshop that the local club may hold sometime in the near future.

The new one should be much lighter. It will be built much like the Stellafane stand, but instead of a four sided truss design it will use a three sided pattern much like some truss-tube Dobs employ. I prefer the triangular design because it will save a little weight, will probably be just as solid, and makes it easier for the stand to sit on a flat floor without rocking. Also the fewer struts allow easier addition of my favorite ballast, 40# bags of water softener salt. The target height of the stand is 37" and it will double as a platform for mirror testing.

There are only 14 main pieces: Hexagonal top and base, six struts and six cleats.

Unassembled top and bottom of stand

This view shows the underside of the top and top of the base (if that makes any sense). The six cleats will be inset from the corners of the top and base so that the 2x1" struts sit flush with their sides. The top piece will be rotated 60° relative to the base so that the cleats alternate when seen in a top view.

The ends will be 3/4" plywood, which I hope will be stiff enough for the task. If not, I'll just add another sheet to the top. The hexagon is 20" across (vertex to vertex). and should be large enough to allow working on a mirror up to 14" across. I don't plan on ever working on one over 12", and probably won't go past 10" anyway.

The above needs some sanding before assembly; for that I'm going to wait for warmer weather so that I can use the garage and keep the sawdust out of my basement. In the meantime I'll begin working on my Canon DSLR portable power supply.