Friday, October 2, 2020

Getting started in Spectroscopy

The remainder of the pandemic (at least until there's an effective vaccine or treatment) will see me exploring a new aspect of astronomy: stellar spectroscopy.

Basically this involves imaging the spectra of stars. In my case I'll start with a diffraction grating mounted on the objective of a cameral lens. The grating produces a spectrum to the side of the star, like this:

I'm using a monochrome CCD camera. If you look closely along the spectrum you'll see little dark gaps in it. Those are real, not artifacts, and denote wavelengths that are being absorbed by the star's outer atmosphere. In the case of Vega it's hydrogen that's doing the absorbing, so the dark lines fall at known hydrogen Balmer wavelengths. These make it easy to calibrate your imaging setup, which is one reason Vega is recommended as the first star to image.

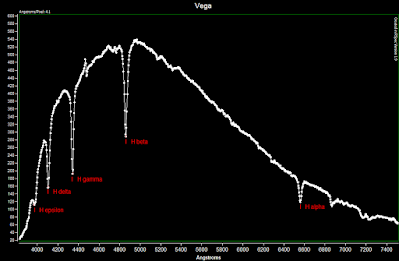
A spectrum like this can be analyzed with software. There are many software titles for doing this, I happen to use RSpec. Here is an example of RSpec output:

(This and all subsequent spectra were made with a 135mm SLR lens mounted on an SBIG ST-8300M CCD camera. An SA-100 grating was in front of the lens objective.) 

Five Balmer lines are clearly visible, allowing for fairly accurate calibration. Once calibration is complete it's possible to open a professional-quality spectrum of a star of Vega's spectral classification and use it to create an instrument response curve. This curve can be used to compensate for the way most sensors lose sensitivity away from visible wavelengths.

Once you have your calibration and instrument response done you're off and running. So what can you do? Quite a bit, but there are limits. You can't go too deep with a grating sitting in front of your lens objective; the SA-100 I use clamps the lens down to an objective diameter of only 21mm and your light gathering is greatly reduced. And worse, stars are converted into extended objects so the fraction of light going into the spectrum is spread over many pixels. This means your ability to look at dim objects is going to suffer unless you use long exposure times. (More about this later.)

Even with the limitation of an objective-mounted grating there are still interesting things to be seen with it.

Here is my spectrum of the star Gamma Cassiopeiae:

This is an emission star; it's thought to be surrounded by a decretion disk mainly made of hydrogen. The gas is excited and emits radiation at Balmer wavelengths. Notice at right you can see absorption areas caused by Earth's atmospheric oxygen and water vapor.

You can also get a glimpse of components other planet's atmospheres. Here are my spectra of Saturn and Jupiter:


When looking at a solar system object, you're basically seeing the sun's spectrum with absorption lines added by the planet's atmosphere. For these two gas giants one can see the absorption features in the sun's atmosphere (yellow labels), methane and ammonia in the gas giant's atmosphere (red labels and bars indicating the feature's spectral width) and absorption from the atmosphere of the earth (blue labels).

Presently I'm thinking about building a small collection of spectra for various star classifications. The problem with getting out to the really cool stars is that they tend to be quite dim. My first attempt to collect data for the Garnet Star (class M) required 240 second exposures. I probably should have used something more like 300 or 360 seconds.

On the subject of exposure times, I've made a little graph based on the objects I've observed:

Note this uses a log scale for exposure time. As expected, the required exposure time grows exponentially with magnitude. To get the spectrum of a magnitude 6 star I would need 17 minute exposures; to get down to 8th magnitude it's a 70 minute exposure! 

The way around this is to put the grating into the optical path of a telescope objective so that you can take advantage of the larger objective.That will be my next exercise.
Wednesday, July 29, 2020

APT + Stellarium Imaging Workflow

I came across an excellent video last week by Matt's Astrophotograpy. Matt's setup and choices for software are much like mine but his experience is vastly greater so I took a lot of notes.

I'm going to post those notes here and alter them as I do more imaging.


Software

Please consult each software's documentation to determine how it is to be configured.

Imaging Control: Astro Photography Tool

Once upon a time I used ImagesPlus camera control, then moved to BYEOS when I switched to a DSLR. My first impression of APT was that it was a mare's nest of capabilities and was too tangled to tame. I tried to like SGP, but the way it functioned seemed counter intuitive. I found NINA interesting but had to give it up when I found it didn't support my SBIG CCD or the QSI I was hoping to buy. Maybe by the time I buy that QSI it will be supported. So I sat down and started learning APT!

Be sure to install version 3.84 or later so you get ASTAP support (see next section).

Plate Solving:

I think you really only need to install ASTAP and its G17 star database. ASTAP seems superior for both near and blind solving compared to the old standards, PS2 and ASPS. And please don't tell me about AstroTortilla. Not to diminish the role it had in bringing plate solving to the masses, I always found it to be slow and unreliable.

Guiding: PHD2

Obviously.

Planetarium: Stellarium

This is a personal preference thing. I like Stellarium; it's pretty and it does what I need. This workflow will make use of Stellarium.

You may want to install version 20.1 instead of 20.2, as the latter requires you to manually connect to the mount.

Stellarium tip: The config.ini file lets you configure Stellarium's defaults. Here are two examples...
Turn off full screen mode, look in the [video] block, and set fullscreen = false
Turn off daytime sky brightness, look in the [landscape] block and set flag_atmosphere = false.

Slewing/Parking/PEC:

Slewing in RA is needed for Polemaster, which will want you to slew your mount several times. This can be done conveniently from within an ASCOM control panel or by using a hand control.


If you would rather slew entirely from within APT, do this:
Start with the mount at counterweight down (CWD) orientation and the RA axis pointed at Polaris. Connect APT to the mount. Copy the values of current RA & Dec to the GoTo fields. To do the requested rotation, usually just subtract one hour from the RA and click the GoTo button. (If the stars turn in the opposite sense of the PoleMaster display arrow, add instead of subtract.) Repeat for the second rotation.

To return to the start orientation, undo the RA changes in one step. DO NOT use the APT park button!


Setup & Initializing


Assemble

Start by assembling the components of your imaging system. This includes making all the data and power cable connections.

If your system is portable, this means rough-aligning your mount to north and balancing it for imaging.

When ready, power it all up: Laptop, Gemini II, imaging camera, dew heaters.
Make the data connection to your laptop. (In my case the data connection must be made after power-up because it could damage the SBIG camera if made too soon.)

Start APT and optional Camera Cooling

Steps marked with an asterisk are required even if not using the cooling aid.

*Launch APT
*APT/Camera / Connect
APT/Camera /Cooling Aid. Check settings and start.
*APT: Tools / ATP Settings / Main. Set image destination folder (optional)


Polar Align

(I use a PoleMaster for polar aligning. I agree with Matt 100%: PoleMaster is the way to do polar alignment.)
 
APT/Gear: Connect Scope (This launches an instance of the GeminiTelescope ASCOM driver.)
Attach PoleMaster to mount, connect USB
Launch PoleMaster software, and connect
Perform slews using one of these methods

ASCOM controller
  1. Find the Gemini ASCOM driver icon in the Windows tray area. Right click and choose Show Hand Controller
  2. Confirm Speed is "S" and that PEC is checked.
  3. Use the hand control RA buttons to perform slews
  4. When finished use the tray icon menu to close the hand controller. DO NOT minimize it!
APT
Use the add/subtract RA method described earlier

Disconnect and Remove PoleMaster


Sync

Launch Stellarium
Stellarium: If using version 20.2, manually connect the mount (use the telescope control plugin)
Stellarium: left click a suitable sync star, then use CTRL-1 to go to it
APT/Gear: Open Pointcraft
APT/Camera. Verify that exposure time is appropriate (I use 10s with my ccd and L filter)
APT: Shoot
APT/Pointcraft: "<< Scope Pos" to populate approx. position fields
APT/Pointcraft: Solve
APT/Pointcraft: (assuming solve is successful) Sync
Stellarium: Should now show true position of scope. Use CTRL-1 to center star in FOV
APT: Shoot new image to confirm star is now reasonably centered. If it is not, use Pointcraft Aim as described later and then Sync again


Focus

Please refer to APT documentation to learn how to best use the focus aids. I use a Bahtinov mask whenever possible.

APT/Gear/Filter Wheel/Go To Filter: Select filter to focus
APT/Camera/Bulb Seconds: Set appropriate exposure time
Attach Bahtinov mask
Shoot single images or use Live View. If Live View is used, possibly disable Live View Automation (APT:Tools/APT Settings/Main/Live View Automation) to prevent binning
APT/Tools/Bahtinov Aid: Make sure focal length, aperture, and pixel size are correct; turn on Cross mode
Drag Aid window so that focus star is at crosshairs
Recalc as needed if not in Live View mode
Adjust focus until satisfied with focus
Close Bahtinov aid
Remove Bahtinov mask!


Acquire


Obtain and Compose Target

Obtain a Target Object

    Find target in Stellarium, CTRL-1 to it
    APT Pointcraft:  <<Scope Pos
    APT Shoot image
    APT Pointcraft Solve
    APT Pointcraft Aim, click on image to refine center if desired
    APT Pointcraft GoTo++
    When completed you are good to go.
   
Go To Specified Coordinates

    APT Gear Enter coordinates into Center FOV boxes
    APT Pointcraft GoTo++
    When completed you are good to go.

Resume an Old Session

    Find target in Stellarium, CTRL-1 to it
    Open image from previous session
    APT Pointcraft Solve
    APT Pointcraft << Solved
    APT Pointcraft GoTo++
    When completed you are good to go.


Autoguiding

Launch PHD2
Toolbar Connect Icon or simply CTRL-C, connect guide camera and mount
Main Menu/Tools/auto-select star or simply ALT-S
Click SHIFT-toolbar Guide button to calibrate
Let PHD settle
APT/Gear/Guide to connect to PHD2 and configure optional dithering


Acquisition

APT/Camera Select Imaging Plan
APT/Camera Start


Shutdown

APT/Camera/Warming Aid: Warm the camera slowly (optional)
APT/Gear/SHIFT-Guide to disconnect from PHD2
PHD2/Toolbar/Stop button
PHD2/Toolbar/Connections disconnect all
Close PHD2
Find the Gemini ASCOM driver icon in the Windows tray area. Right click and choose Show Hand Controller
ASCOM Hand Control/Park (optional)
APT/Gear/Disconnect Scope
Tray ASCOM icon/Right click, Exit
When warming is complete, APT/Camera/Disconnect
close APT
close Stellarium
Turn off Laptop
Turn off Gemini II
Disconnect USB cables from any devices that may be harmed (Applies to my SBIG ST-8300M)
Disconnect all from power supply


Monday, July 20, 2020

2020 Nebraska Star Party: What Might Have Been

Fans of NSP know it was cancelled for 2020 due to the pandemic. The cancellation may have seemed a bit premature when it was announced on June 12, but to me it was clearly the right thing to do. During the last month the virus has been spreading almost unchecked in some parts of the country. Nebraska itself has seen a mild rebound in the number of positive tests, but not nearly as bad as what is happening elsewhere. Possibly the good people of Nebraska have more sense than those in a few other states and they're not afraid of masks?

The 2019 NSP was a real dud with only one decent night of the five I was there. Mostly it was clouds and rain. There was hope that 2020 would be better. Then came the virus.

What follows is a night by night summary of what the 2020 NSP sky would have been, based on satellite cloud images, North Platte radar, and observations at Valentine. I don't use cloud observations from Valentine because I don't trust their accuracy. (Valentine will sometimes report clear skies when there is high overcast; go to the bottom of this entry to see an example.) I don't doubt some people are staging a private NSP and can provide better estimates, but until they report I'll depend on my estimates.

Please note that all times are approximate. The time of total darkness each night is now five hours six minutes, extending from about 11:17 P.M. to 4:23 A.M. I'll take this as five hours and rate each evening on a five-star basis; one star awarded per hour of possible imaging. A perfect night would look like (⭐). Because I usually arrive on Sunday and depart Friday morning I'm only going to report on five evenings. How many stars will NSP 2020 earn of the possible 25?

Sunday, July 19 (No Stars)

Daytime: High 87° with dew point around 61° most of the day.

Overnight was cloudy from dusk to about 4:15 A.M. with thunderstorms and rain around 11 P.M. and again at about 12:15.

Monday, July 20 (⭐⭐⭐)

Daytime: High 88° with dew point again around 61° most of the day. Thunderstorms with rain from about 8 until 9 P.M.

Overnight: Overcast until about 12:30 A.M., then clearing with occasional clouds until about 4 AM. About three hours of imaging were possible.

Tuesday, July 21 (No Stars)

Daytime: High 84° with dew point around 59° or 60° most of the day.

Overnight: Blowoff from thunderstorms in southeastern Wyoming spread overhead between 9 and 10 PM. Clearing began around 4:30 A.M. No precipitation was indicated by radar.

Wednesday, July 22 ()

Daytime: High 92° with a 69° dew point (heat index a very sticky 97°). At 9 P.M. (20m before sunset), it's 83° with dew point temperature 69°, winds are 14mph, and cloud cover is about 50%.

Overnight: A poor quality night, with broken high clouds most of the hours of darkness. Occasional wind gusts around 21mph, and heavy dew from dew point temperatures between 71° and 69°. "Clearer" periods from 11:30 P.M. to 1 A.M. and 2:00 to 3:00. Probably some light frames could be gathered during these short holes? If not, then it's a zero stars night.

Thursday, July 23 (No Stars)

Daytime: An even more unpleasant day (96° with a 67° dew point at 4 P.M., heat index 100°), but without the relief of the Wednesday air-conditioned high school.

Overnight: Persistent scattered clouds until a little past midnight, then cirrus from a thunderstorm passing to the south. Winds gusting up to 32mph until 3 A.M. Dew point temperatures around 69 all night. I think the clouds and wind would have essentially caused this evening to be useless for imaging. Visual observers would do better, but the scopes would have been bouncy and the transparency poor for much of the evening.

Friday, July 24 (No Stars)

If you would have hung around for Friday, ugh. The day was miserably hot and humid with a high of 99° and dew point of 70° most of the day. And then there were the thunderstorms and clouds to ruin the evening. A complete loss.

Saturday, July 25 (No Stars)

Well, wow. Hot, miserable day, then storms and clouds again. This completes one week of what might have been NSP 2020.

Summary

There were only 5 hours of imaging out of 25 possible:

Sun 😡😡😡😡😡
Mon 😡😡⭐⭐⭐
Tue 😡😡😡😡😡
Wed ⭐😡😡⭐😡
Thu 😡😡😡😡😡
Fri 😡😡😡😡😡
Sat 😡😡😡😡😡

It's even worse if you include the two additional washouts of Friday and Saturday: 5 good hours out of 35 possible, the equivalent of one good night in a week. It was a very good year to stay home; the virus didn't deprive you of much.

I hope to make it to NSP 2021! It has to be better than NSP 2019 and NSP 2020!

----------------------

Here's an example of problems with cloud reporting. This is not unique to Valentine, but is a consequence of how cloud observations are made in this era of automation by devices called ceilometers. A quote from an abstract for a 2016 study of ceilometer errors indicates the problem:
The limited areal coverage of ceilometers results in error when skies are heterogeneous, but these errors are small compared to those caused by the limited vertical range: observations of clear sky or few clouds are often in error as the instrument cannot detect the presence of upper-level clouds. [My emphasis.]
The hourly report for Valentine, NE on July 24 at 5:52 P.M. CDT. indicates CLR (i.e., clear) sky at 5:52 P.M. CDT.


A satellite image of Cherry county and Valentine taken four minutes later at 5:56 P.M. shows the sky is at least half covered with high clouds.


The position of the Valentine weather station is just south of the letters KVTN, at Valentine Municipal Airport.

Unfortunately it is often the case that clouds causing considerable extinction are completely missed by weather reports. This is partly by intent, as high clouds are not of importance to aviators.

The lesson here is: Don't assume the sky is clear because a station report says it is. It may in fact be unsuitable for imaging.

Friday, May 8, 2020

Astro Projects for a Shutdown

It's fairly evident that shelter-in-place is here to stay for quite a while. The state continues to feel that it will not be able to prevent a blowup from happening sometime around mid summer, at which time the hospitals may be seriously beyond their capacity. They are working to increase capacity so that when the crunch comes no one will have to go without any medical care they need. Will they succeed? We probably won't know until June or July.

That means it's likely to be solo astronomy until August. What's a person to do from a bright sky-site?

I have several projects I can work on:
  1. Mirrors. I believe I have the supplies on hand for the polishing and figuring of several mirrors (one each of 6", 8", and 10")
  2. Meteors. I can always set up my meteor detection system and start collecting data. More problematic is analyzing that data, but I may be able to program a sloppy workaround for having to visually inspect hundreds of images. 
  3. Daytime Observing. Night observing is difficult here as the light pollution is awful, and in the last few years trees have grown to take away even more of my sky. Rather than fight that, it might make more sense to move to daytime observing. Targets include the Sun, planets, and brighter stars. An interesting question is daytime visibility in terms of star magnitude and angular separation from the Sun.
------------------

Back to one of the many reasons we're in this mess, the President of our country. Today's news brings word that Vice President Pence's press secretary, Katie Miller, has tested positive for the virus. First, we do hope that she has one of the mild cases and makes a full and rapid recovery. Additionally we hope that she does not infect the Vice President or anyone else.

But now let's get the President's response, courtesy of the Associated Press:
Katie Miller had tested negative Thursday, a day before her positive result.
“This is why the whole concept of tests aren’t necessarily great,” Trump said. “The tests are perfect but something can happen between a test where it’s good and then something happens.”
Can you count the number of self contradictions? Somehow in our President's mind perfect tests "aren't necessarily great" because, you know, "something happens."  Yes, a person can go from testing negative to positive. This is the reason that more testing is better, so that the spread of the virus can be curtailed as quickly as possible. If Ms. Miller had not been tested Friday, she might have spread the illness to others in the time until her next test. One of the reasons we're in this mess is that testing was not nearly as available as it should have been. I'll leave it to you to sort out why that was (and still is) the case.

Tuesday, March 10, 2020

Getting Real in the Year of the Coronavirus

Old business first. Last time I looked at the idea that a 100W solar panel would be more than adequate for replacing the energy spent in a previous night of imaging. What needs to be realized about this idea is the uncertainties that come into play with it. Here are a few:
  • I rarely image for an entire night as assumed. In fact, I can recall doing so on only two occasions. Usually either fatigue sets in or the sky goes cloudy and you lose a couple of hours.  
  • Getting four or five consecutive nights clear all night is not something that happens often. In my experience the rule is maybe half the nights of a star party are clear.
  • Some imaging sites are quite dry (like Nebraska) and active dew control isn't needed for the first several hours. This eliminates one of the larger power requirements.
  • Starting with a fully charged laptop (which is almost always the case) greatly reduces its power consumption. 
In other words the estimates I made for required energy were probably overestimates. So I feel safe in saying that the panel in consideration will be adequate. It's not going to be able to run an air conditioner or refrigerator, but it will be fine for imaging.

---------------------

Now let's get to the topic of the moment, if not the decade, COVID-19. As I write we know that this virus is relatively contagious, spreading across the country, and tough on older people. Active cases are showing up in Minnesota and Nebraska, and doubtless will appear in South Dakota in the coming days. [Update: The day after posting this South Dakota reported 5 cases with one fatality.] Right now the cases are being contained through quarantine; what the situation will be by mid July and the Nebraska star party it's impossible to know. A safe guess is that the virus will be widespread by then and that most group activities will be suspended; NSP may not even happen. Another consideration is that my wife and I are both in our 60s and stand a significant chance of requiring medical assistance should we become ill with the virus. Because of that my current thinking is trying to avoid the illness at least until the end of the year and the release of a possible vaccine. Even without the creation of an effective vaccine it's hoped that doctors will learn how to better treat the illness.

Avoiding getting sick relies on some simple fundamentals:
  1. Avoid people who may be infected. Given the asymptomatic spread of the virus this means avoiding pretty much everyone. Especially to be avoided are being in close quarters with many people, such as might happen on a cruise ship or commercial airplane.
  2. Wash one's hands thoroughly and often
  3. Avoid touching one's face
This is what we will be doing for the next year and hoping to catch some luck. Barring a minor miracle I won't be at NSP this year or any other star parties. My back yard will be safe enough I hope, so I'll try to do some astronomy from there!

Good luck to you in the coming year, it's going to be a difficult one for all of us!